Leaky HDPE pipe connections are a project manager's nightmare, causing delays and costly repairs. Master the right techniques and components to ensure a permanent, leak-free system every time.
A leak-free HDPE connection depends on three key factors: choosing the right method (fusion or mechanical), meticulous surface preparation, and correct installation. For mechanical joints, using an internal stiffener for thin-walled or high-pressure pipes is crucial to prevent deformation and ensure a lasting seal.
I've been in the pipe fitting business for over 30 years, and I've seen it all. The difference between a successful project and a failed one often comes down to small details in the connection process. It’s not about finding a magic bullet, but about systematically doing the right things. Understanding why HDPE is unique is the first step. Let's get into the details so you can avoid the common pitfalls and build systems that last.
Why are HDPE Pipes More Prone to Leakage Than Other Materials?
You've noticed that HDPE pipes seem to have more connection issues. This can be frustrating, making you question your material choice. Understand its unique properties to prevent leaks effectively.
HDPE's flexibility and smooth surface are great assets, but they also make it prone to leakage if not handled correctly. Its tendency to "creep" (deform under stress) and low surface energy can make achieving a permanent, tight seal more challenging than with rigid materials.
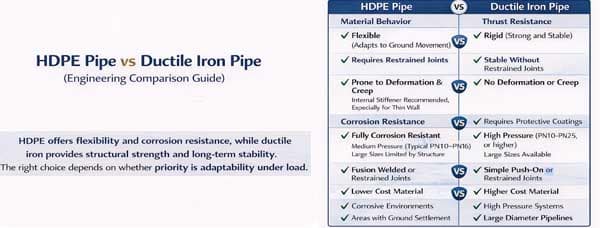
In my experience, many engineers new to HDPE treat it like ductile iron or steel, and that's where the problems start. HDPE is fundamentally different. It expands and contracts significantly with temperature changes. More importantly, it exhibits a property called "creep," meaning it slowly deforms over time when under a constant load, like the pressure from a mechanical coupling's gasket. This is why a joint that seems tight at installation might leak months later. Its surface is also very smooth and has low surface energy, which makes it difficult for some seals to grip onto. We must account for these unique characteristics in our joint design and installation procedure.
Material Property Comparison
| Property | HDPE (High-Density Polyethylene) | Ductile Iron |
|---|---|---|
| Flexibility | High | Low (Rigid) |
| Creep Potential | High | Very Low |
| Thermal Expansion | High | Low |
| Surface Energy | Low (Slick) | High |
How Do You Choose the Right Connection Method for HDPE Pipes (Fusion vs. Mechanical)?
Fusion or mechanical? The choice can be confusing. Picking the wrong one can lead to system failure and costly rework down the line. Learn the pros and cons of each method.
**Fusion welding (butt, electrofusion) creates a monolithic, leak-proof joint ideal for new installations. Mechanical couplings offer versatility for repairs, transitions between materials, and situations where fusion isn't practical. The best choice depends on your project's specific needs, budget, and available equipment.**
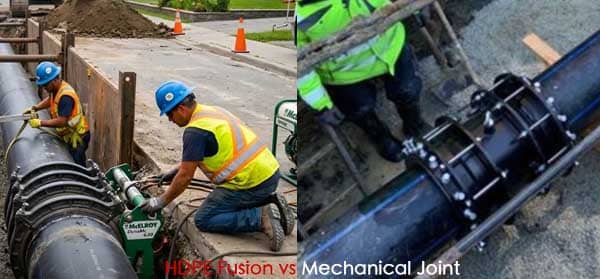
As a manufacturer, we produce components for mechanical joints, but I always tell our customers that the best method is the one that's right for the job. Butt fusion is fantastic for long, straight runs in new construction. It creates a seamless pipeline. However, you can't always use it. What if you need to repair a small section, connect to a valve, or transition to a different pipe material like ductile iron? That's where mechanical couplings shine. They provide a reliable connection without needing a power source or expensive welding equipment on-site. The key is understanding the strengths of each and applying them correctly.
Connection Method Breakdown
| Feature | Fusion Welding | Mechanical Couplings |
|---|---|---|
| Joint Integrity | Monolithic (part of the pipe) | Excellent, but depends on installation |
| Use Case | New construction, long runs | Repairs, transitions, valve connections |
| Equipment | Expensive fusion machine | Basic hand tools, torque wrench |
| Site Conditions | Needs clean, dry area, power | Very flexible, can be used in wet trenches |
Is Surface Preparation the Most Critical Step to Prevent Leakage?
Your connections are still leaking despite using the right parts. It's incredibly frustrating when you follow the steps but the joint fails. Focus on the most overlooked detail: surface preparation.
Yes, absolutely. Poor surface preparation is the number one cause of HDPE joint failure I see. For fusion, this means scraping off the oxidized layer. For mechanical joints, it means ensuring the pipe surface is clean, smooth, and free of scratches that could compromise the gasket seal.
I cannot stress this enough. After 30 years of troubleshooting joint failures for customers, I can confidently say that skipping or rushing surface prep is the root of most leaks. When HDPE pipe is extruded and sits in the sun, a very thin, brittle layer of oxidation forms on its surface. For fusion welding, this layer must be completely removed with a scraper, or you'll get a weak, "cold" fusion that fails under pressure. For mechanical joints, the principle is the same. The gasket needs a clean, smooth, and uniform surface to seal against. Any deep gouges, scratches, or dirt create a leak path. It takes only a few extra minutes, but it makes all the difference.
Preparation Checklist
- Clean the Pipe: Use a clean, lint-free cloth and an approved cleaner (like isopropyl alcohol) to remove all dirt, grease, and moisture from the connection area.
- Inspect for Damage: Carefully examine the pipe surface where the gasket will sit. Deep scratches or gouges will prevent a proper seal. If you find any, you may need to cut the pipe back to a clean section.
- Scrape for Fusion: For butt or electrofusion, use a dedicated pipe scraper to remove the entire top layer of material in long, even strokes. You should see continuous ribbons of plastic coming off.
What are the Correct Installation Steps for HDPE Pipe Couplings?
Installing mechanical couplings seems simple, but small mistakes happen. A tiny error during installation can lead to a huge, costly leak later on. Follow this precise step-by-step guide for perfection.
First, prepare the pipe ends. Then, slide the coupling components on. Insert an internal stiffener if required. Position the gasket correctly. Finally, tighten the bolts to the specified torque in a star pattern to ensure even pressure. Overtightening can be as bad as under-tightening.
We once had a major contractor customer who was experiencing random leaks on a large water main project. Their crews were experienced, but the failures were inconsistent. I went to the site myself. I watched them work and noticed they were tightening the bolts on the couplings sequentially, going in a circle. This was causing the coupling to clamp down unevenly, pinching the gasket on one side and leaving it loose on the other. I showed them how to use a star or crisscross pattern, like changing a car tire, to apply even pressure. They also started using a torque wrench on every single bolt. The leaks stopped immediately. It’s these small procedural details that ensure reliability.
Step-by-Step Installation Guide
- Prepare Pipe Ends: As discussed, ensure the pipe ends are clean, smooth, and free of defects.
- Mark Insertion Depth: Lightly mark the pipe to show how far it should be inserted into the coupling. This ensures it's fully seated.
- Install Internal Stiffener: If required by the pipe SDR or pressure, insert the stiffener into the pipe end. It should be a snug fit.
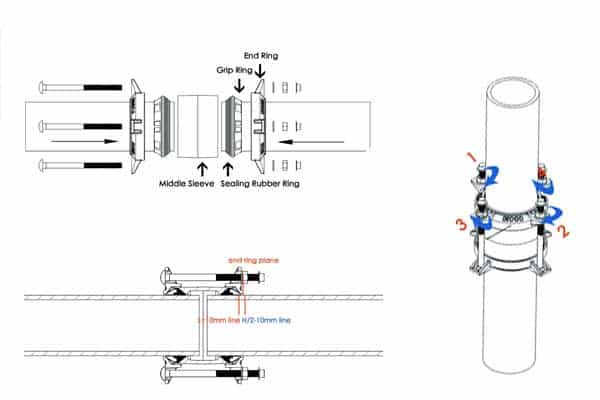
- Position Components: Slide the end rings and gasket over the pipe. Ensure the gasket is clean and properly oriented.
- Join and Tighten: Bring the pipe ends together within the coupling's center sleeve. Hand-tighten the bolts, then use a torque wrench to tighten them to the manufacturer's specified value using a star pattern.
How Does Gasket Sealing Work on HDPE Pipes (And Why Does It Fail)?
You trust the gasket to do its job, but sometimes it fails. This can make you lose faith in mechanical joints entirely. Understand how gaskets work to prevent these failures.
A gasket creates a seal by being compressed between the coupling body and the pipe surface. It fails due to improper compression (uneven tightening), a damaged pipe surface (scratches), or pipe deformation (creep), which reduces the compression on the gasket over time.
Think of a gasket as a spring. When you tighten the coupling, you compress the rubber gasket, and it pushes back against the pipe and the coupling body, creating a seal. The problem with HDPE is its tendency to creep. If the pipe itself deforms under the pressure of the gasket, that "spring" force is reduced, and a leak can form. This is why internal stiffeners are so important on thin-walled or high-pressure HDPE. The stiffener supports the pipe from the inside, preventing it from deforming and ensuring the gasket maintains its sealing pressure for the life of the system. A scratch on the pipe is like a tiny tunnel under the gasket—a clear path for water to escape.
Common Gasket Failure Modes
| Failure Mode | Cause | Prevention |
|---|---|---|
| Under-Compression | Bolts not tightened to the correct torque. | Use a calibrated torque wrench. |
| Uneven Compression | Bolts tightened in a circular pattern. | Use a star/crisscross tightening pattern. |
| Surface Imperfection | Scratches, gouges, or dirt on the pipe. | Thorough surface cleaning and inspection. |
| Pipe Creep | Pipe deforms under gasket pressure over time. | Use an internal stiffener. |
How Do You Prevent Pipe Pull-Out in HDPE Systems?
Pipe pull-out is a catastrophic failure in pressurized systems. The resulting damage, water loss, and service downtime can be massive. Learn how to properly restrain your HDPE pipe joints.
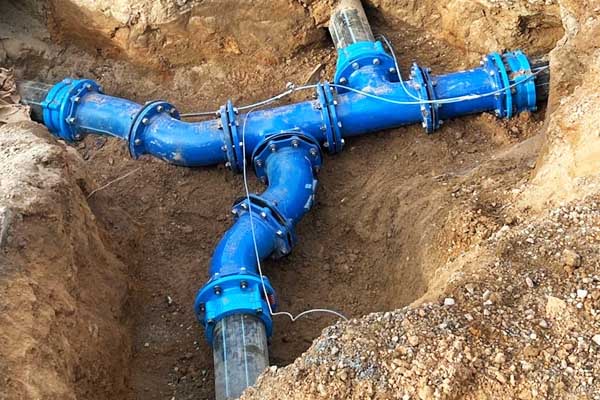
Restraint is achieved using mechanical couplings with gripping teeth or rings that bite into the pipe's surface. The key is ensuring the gripping mechanism engages correctly and that an internal stiffener is used to provide a solid backing, preventing the pipe from collapsing under the grip.
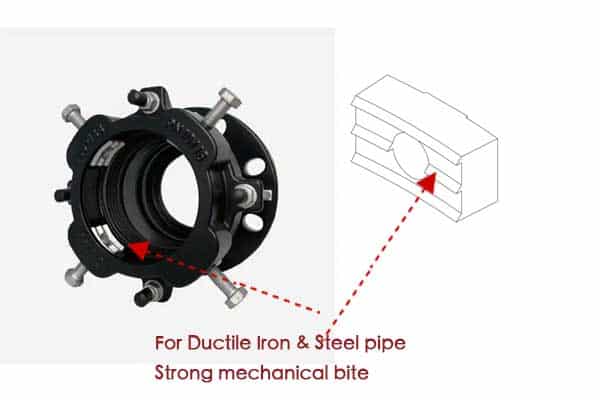
In any pressurized pipeline, the water exerts a powerful force, called thrust, at every change in direction, valve, or dead end. This force tries to pull the pipes apart. As a traditional way, you can use massive concrete thrust blocks to counteract this force. A modern, fast, and simple method is that you can use restrained couplings that grab onto the pipe and prevent it from pulling out. Our factory designs these couplings with sharp, hardened teeth that dig into the HDPE surface. However, this design relies on the pipe being strong enough to resist the force of the teeth. On a thin-walled pipe, the teeth can cause the pipe to deform or collapse inward before they get a good grip. An internal stiffener provides the necessary rigidity, allowing the teeth to bite securely and create a fully restrained joint that can handle the system's full thrust force.
How Do You Handle Misalignment and Angular Deflection in HDPE Connections?
Pipes rarely line up perfectly in the real world of trench work. Forcing a misaligned connection can stress the joint and cause future leaks. You need to use the right flexible couplings.
Many mechanical couplings are designed to accommodate a few degrees of angular deflection, allowing for minor ground settlement or slight misalignment. However, you must always check the manufacturer's specifications. Exceeding the allowed deflection will compromise the seal and lead to leaks.
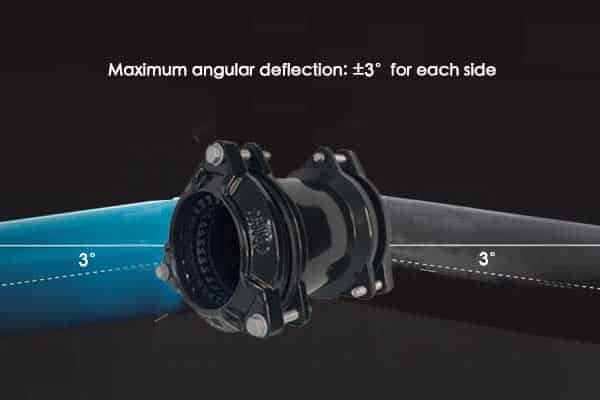
I often get calls from engineers asking if they can "bend" a joint into place. The answer is yes, but within limits. The flexibility of HDPE pipe itself can handle gradual curves, but sharp bends require fittings. A flexible mechanical coupling provides a "knuckle" in the system. It allows the pipeline to deflect a few degrees without stressing the pipe or the seal. This is perfect for accommodating gradual ground settlement or connecting pipes that aren't perfectly aligned in the trench. As an OEM manufacturer, we test our couplings to determine their maximum deflection angle. It's crucial for customers to get this data. If a coupling is rated for 3 degrees of deflection, trying to force 5 degrees will lead to a leak, guaranteed.
Handling Misalignment
| Problem Type | Description | Solution |
|---|---|---|
| Angular Deflection | Pipes meet at a slight angle. | Use a single flexible coupling (within its specified angular limit). |
| Parallel Misalignment | Pipes are parallel but offset. | Use two flexible couplings with a short "jumper" piece of pipe between them. |
What are the Best Connection Solutions for Different Scenarios?
A one-size-fits-all approach to HDPE connections just doesn't work. Using the wrong joint for the job is a recipe for disaster and unnecessary expense. Match the connection to the application.
For buried lines, use corrosion-resistant mechanical couplings or butt fusion. For high-pressure applications (PN16+), butt fusion or heavy-duty restrained mechanical couplings with internal stiffeners are non-negotiable. For above-ground lines, consider UV stability and use flanges for equipment connections.

The environment and operating conditions dictate the best solution. For a standard buried water line, a simple, non-restrained coupling might be fine between straight runs. But at a bend, that same line needs a restrained coupling to handle thrust forces. If that line is operating at high pressure (e.g., 230 psi / PN16), every single mechanical joint must be restrained and must include an internal stiffener. If the pipe is above ground, the couplings need a coating that protects them from UV degradation. When connecting to a pump or a metal valve, you'll need an HDPE flange adaptor. We work with our clients to understand their exact scenario and help them select—or even custom-design—the perfect fitting for their needs.
Scenario-Based Solutions
| Scenario | Recommended Method | Key Consideration |
|---|---|---|
| Buried, Low Pressure | Butt Fusion / Non-restrained Mechanical | Cost-effectiveness and speed. |
| Buried, High Pressure | Butt Fusion / Restrained Mechanical + Stiffener | Thrust restraint and creep prevention. |
| Above Ground | Flanges / UV-Coated Mechanical Couplings | UV resistance and maintenance access. |
| Transition to Metal Pipe | Flange Adaptor / Transition Coupling | Material compatibility and corrosion. |
What are the Most Common Installation Mistakes That Lead to Leakage?
You think you did everything right, but the joint is still leaking. Finding the source of the mistake can be a huge headache and cause project delays. Review these common errors.
The most common mistakes are poor surface preparation, uneven bolt tightening, forgetting the internal stiffener, and exceeding the coupling's allowed deflection. The fix is simple: go back to basics. Re-prep the surface, use a torque wrench, and install a stiffener where required.
It's almost always one of a few simple things. I remember a large irrigation project that was plagued by leaks. The crew was convinced our couplings were faulty. I flew out and brought a simple checklist. We went to the next joint they were installing. First mistake: the pipe end was covered in mud. Second mistake: I could feel a deep scratch with my fingernail right where the gasket would sit. Third mistake: they were tightening the bolts with an impact wrench, with no torque control. Fourth mistake: it was a thin-walled SDR 21 pipe, and there was no internal stiffener. They were making four critical errors on a single joint. We fixed those four things, and the system has been leak-free for years.
Top Mistakes and How to Fix Them
- Dirty/Scratched Pipe: FIX: Disassemble the joint. Thoroughly clean the pipe ends with a clean cloth and solvent. If a scratch is deep enough to catch a fingernail, cut the pipe back to a smooth, undamaged section.
- Uneven Tightening: FIX: Loosen all the bolts. Re-tighten them in a star pattern to half the required torque, then repeat the pattern to bring them to the final specified torque. Always use a torque wrench.
- Missing Stiffener: FIX: This is a non-negotiable. Disassemble the joint and install the correct internal stiffener. If you don't have one, you cannot complete the joint safely on thin-wall or high-pressure pipe.
- Excessive Misalignment: FIX: Loosen the joint and physically realign the pipes. If that's not possible, use two flexible couplings and a short pipe piece to create a flexible offset.
How Do You Choose the Right HDPE Pipe Coupling or Flange Adaptor?
The market is flooded with coupling and adaptor options. Choosing the wrong one can compromise the integrity and safety of your entire pipeline system. Use this checklist to select the perfect part.
Choose based on pipe diameter and SDR, pressure rating (PN), restraint requirements, and the environment (e.g., buried). Always ask for manufacturer specifications and certifications. For thin-walled pipe (SDR ≥ 17), ensure the coupling system includes an internal stiffener.
Choosing the right fitting is a critical engineering decision. You can't just pick one that "looks right." As a factory with 30 years of experience, we guide our customers through a simple but crucial process. It starts with the basics: pipe outside diameter (OD) and pressure rating (PN). Then we move to the application:Is it transitioning to another material? The most important question I ask is about the pipe's SDR (Standard Dimension Ratio). This tells me how thick the pipe wall is. If the customer says SDR 17 or higher, my next sentence is always, "You will need an internal stiffener for every mechanical joint." This isn't an upsell; it's a fundamental requirement for a safe, long-lasting connection.
Selection Checklist
1. Verify Pipe and Pressure Specs
Make sure the coupling is designed for your exact pipe OD and that its pressure rating (PN) meets or exceeds your system's maximum operating pressure.
2. Determine Restraint Requirements
Is the joint at a bend, tee, or end cap? If yes, it experiences thrust forces and requires a fully restrained coupling.
3. Apply the Internal Stiffener Rule
This is our golden rule. You must use an internal stiffener if any of these conditions are met:
- The pipe's SDR is 17 or higher (e.g., SDR 17, 21, 26).
- The pipe diameter is large (DN300 / 12" or greater).
- The pressure rating is high (PN16 / 230 psi or greater).
Conclusion
Achieving a leak-free HDPE connection isn't magic. It's about understanding the material, choosing the right method, meticulous preparation, and correct installation—especially using stiffeners when the situation demands it.
