Struggling with difficult pipeline installations or maintenance? This process can cause long downtimes and high costs. A dismantling joint is the simple solution to make this work much easier.
A dismantling joint is a special fitting that provides an adjustable length to simplify installing or removing flanged equipment like valves and meters. This guide covers selection, installation, and maintenance to ensure your pipeline operates smoothly and efficiently for years to come.
Dismantling joints are a key part of modern pipelines, but not everyone understands how they work or why they are so important. They seem like a small component, but they solve a very big problem. If you want to build and maintain pipelines that are efficient and easy to service, you need to understand these parts. Let's dive deeper into what they are and how you can use them to save time and money.
What Is a Dismantling Joint?
Ever struggled to fit a new valve into a perfectly measured but tight pipeline? It's frustrating and wastes valuable time. A dismantling joint creates the exact adjustable space you need, making installation a breeze.
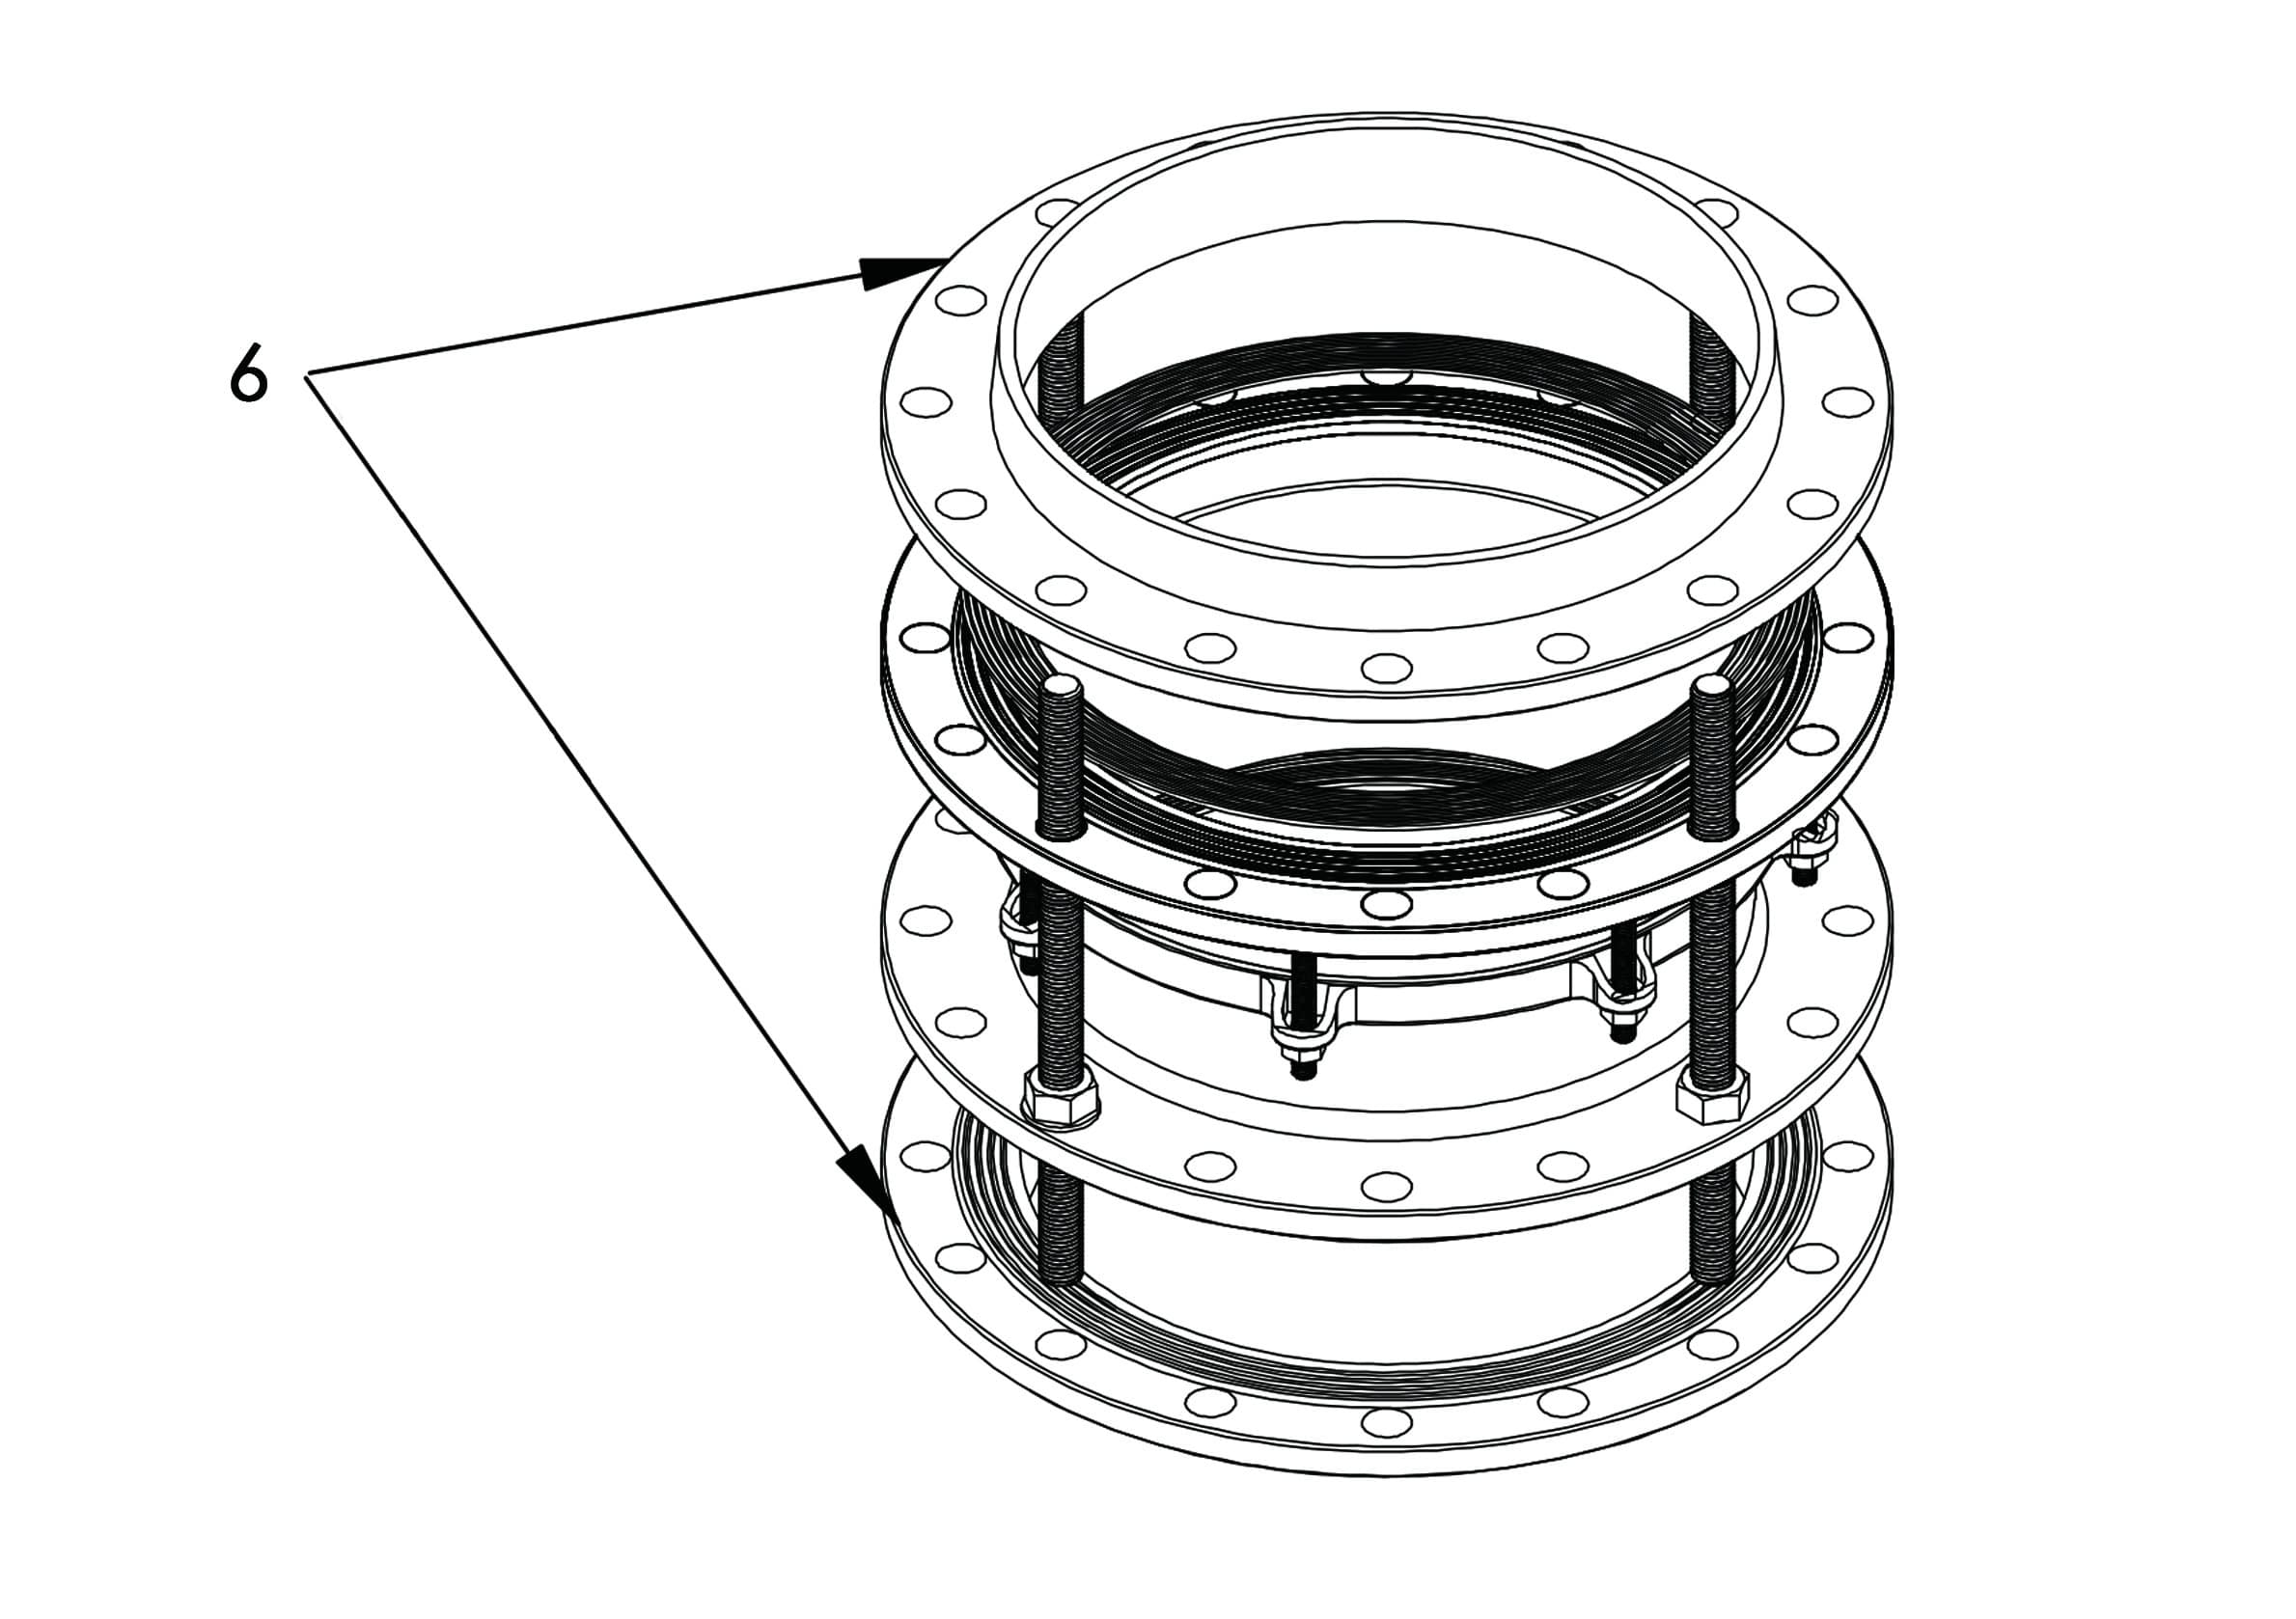
A dismantling joint is a special fitting designed to provide adjustable length in a flanged pipe system. It consists of a flange adaptor and a flange spigot that slides inside it. This adjustability creates a gap, making it simple to install or remove other flanged components.
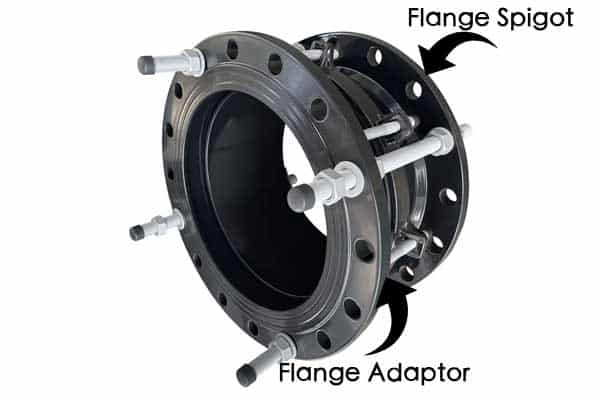
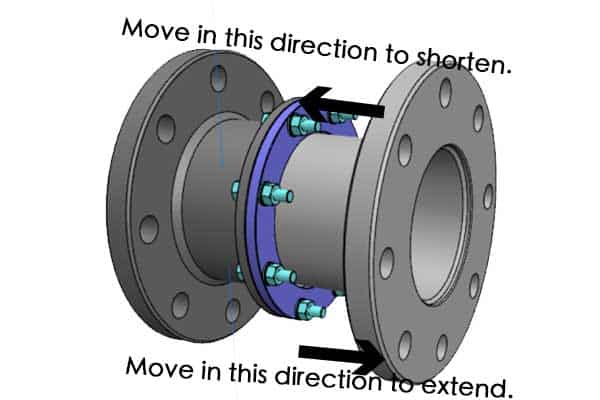
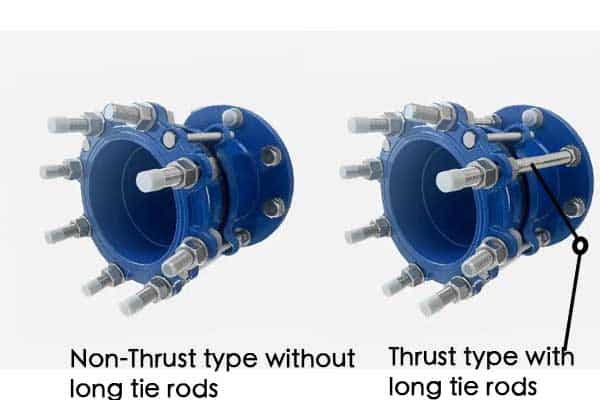
At its core, a dismantling joint has two main bodies and a set of tie rods(non-thrust dismantling joint no need these tie rods). The first body is a flange adaptor, which has a seal inside. The second body is a flange spigot, which is a piece of pipe with a flange on one end. The spigot slides in and out of the adaptor. When you push the spigot in, the total length of the joint gets shorter. When you pull it out, the length gets longer.
This simple telescoping action is what makes it so useful. In my 30 years of manufacturing these products, I've seen how this basic mechanism saves engineers countless hours on site. It turns a difficult, forceful job into a controlled, simple procedure. The table below breaks down the key parts.
| Component | Function |
|---|---|
| Flange Adaptor | The outer body that contains the sealing gasket. It connects to the pipe. |
| Flange Spigot | The inner body that slides in and out of the adaptor. It connects to the valve or meter. |
| Tie Rods | Long studs that hold the joint together and connect to the adjacent flanges. non-thrust dismantling joint no need these long studs. |
| Gasket | Creates a watertight seal between the adaptor and the spigot. |
What Does a Dismantling Joint Do?
Worried about damaging an expensive valve during maintenance? Trying to force equipment out of a pipeline can be risky and costly. Dismantling joints provide a safe, controlled way to access and replace parts without stress.
A dismantling joint’s main job is to create an adjustable gap in a pipeline. This makes it easy to install or remove flanged items like valves, pumps, or flow meters. It greatly simplifies both initial installation and future maintenance work.
The function of a dismantling joint is straightforward but critical for pipeline management. It serves two primary purposes that make life easier for engineers and maintenance crews.
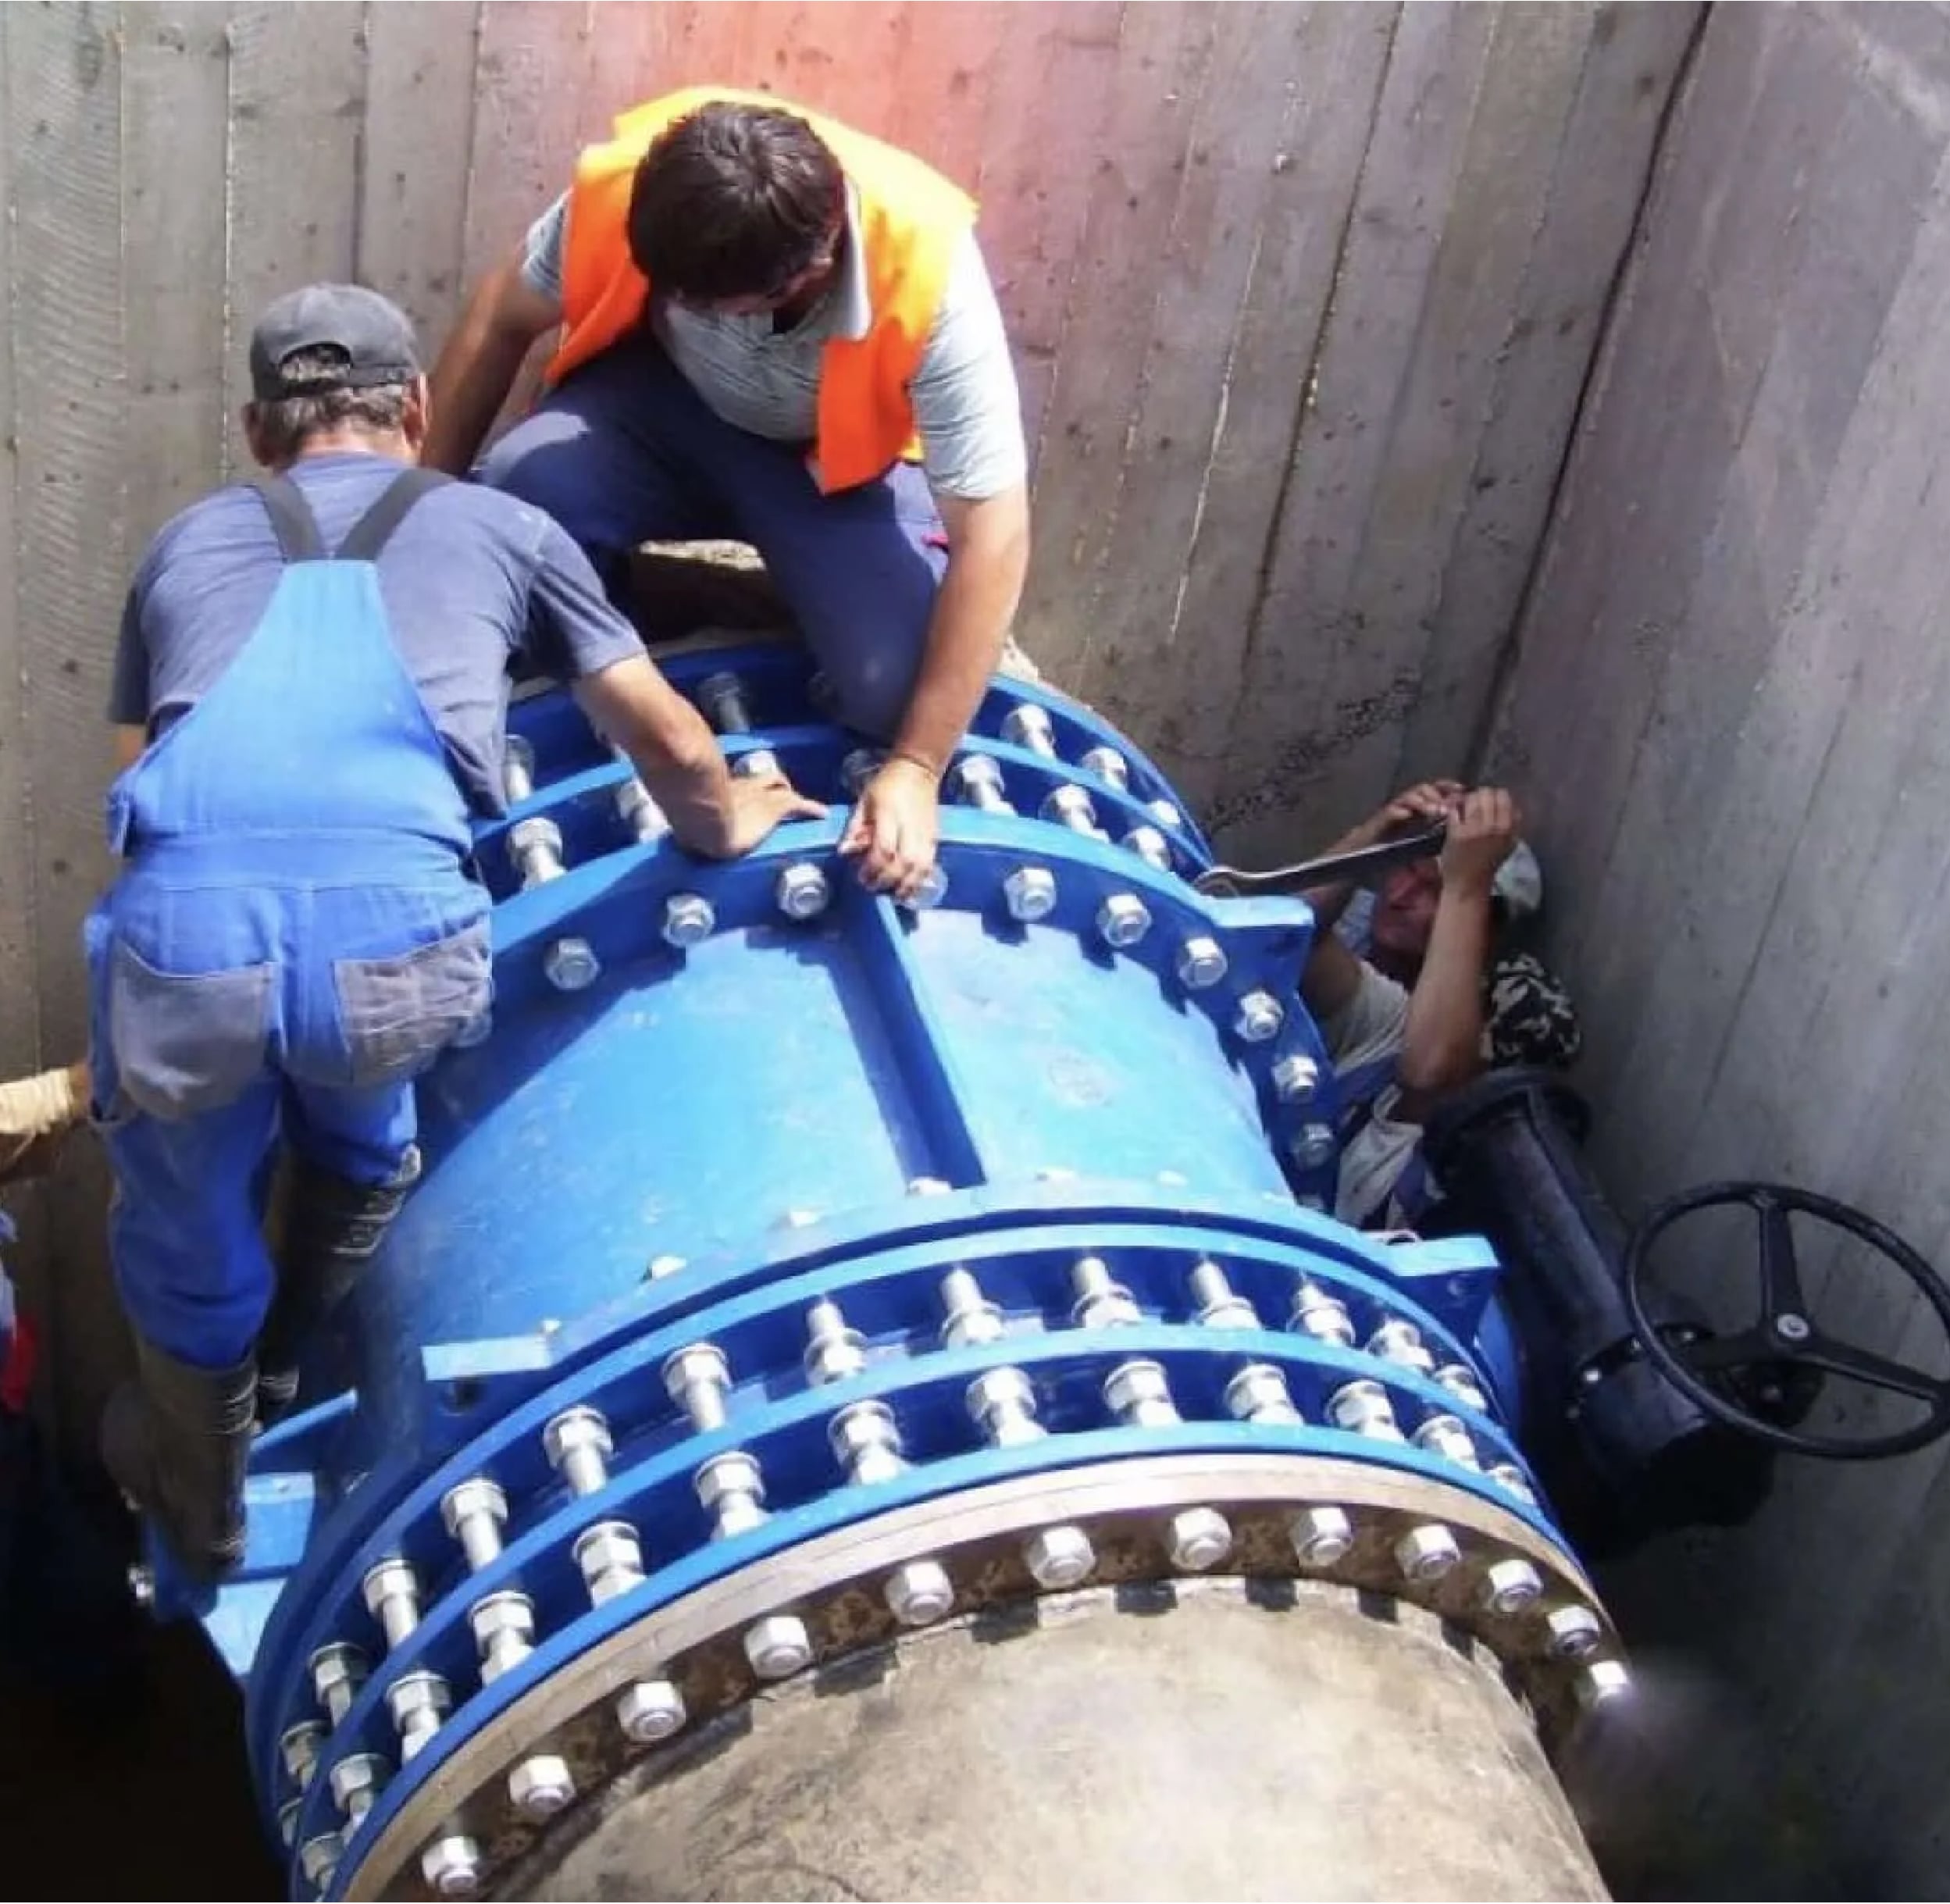
First, it facilitates the installation and removal of equipment. When you are installing a new valve, for example, you can set the dismantling joint to its shortest length. This creates a large gap, so you can easily lower the valve into place and bolt one side. Then, you extend the dismantling joint to connect to the other side of the valve. The process is reversed for removal. You create a gap, and the valve can be lifted out without any force.
Second, it provides a locked, secure connection. Once the joint is set to the correct length, the tie rods are fully tightened. This compresses the gasket to make a perfect seal and also locks the joint's length. For thrust-resisting types, these tie rods pass all the way to the adjacent flanges, making that section of the pipeline rigid and secure against forces within the pipe. I remember a customer who had to cut a pipe just to replace a valve. After that project, they installed our dismantling joints. The next replacement took a fraction of the time.
When Should You Use a Dismantling Joint?
Planning a new pipeline that includes valves, pumps, or meters? Future maintenance is not a question of "if" but "when." Without a plan for access, it becomes a major headache and expense later.
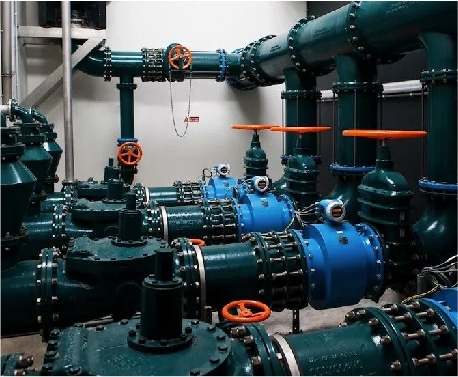
You should use a dismantling joint next to any flanged piece of equipment that might need to be installed, removed, or replaced in the future. This includes valves, pumps, flow meters, and check valves . It is a best practice for long-term pipeline efficiency.
As a manufacturer, I see orders for dismantling joints for a wide range of applications. They are a standard component in any well-designed fluid network. You should plan to install one in several key locations:
- Next to Valves: All types of valves (gate, butterfly, globe) may eventually need maintenance or replacement. A dismantling joint allows for quick and easy service.
- At Pump Stations: Pumps are mechanical equipment with a defined service life. They need regular maintenance. Placing dismantling joints on the inlet and outlet of a pump is standard practice.
- Alongside Flow Meters: Flow meters need periodic calibration or replacement to ensure accuracy. A dismantling joint allows you to remove the meter without disrupting the pipeline.
- With Check Valves or Strainers: Any in-line equipment that requires inspection or cleaning benefits from having a dismantling joint installed next to it.
For new pipeline projects, including dismantling joints in the design is a small upfront cost that pays for itself many times over. We design them into projects from the start. But we also get many orders for existing pipelines where engineers are tired of difficult maintenance and are retrofitting them to make future work easier.
How Does a Dismantling Joint Work?
The idea of a pipe fitting that can change its length might seem complicated. This complexity might make you hesitant to use one. But the mechanism is actually very simple, reliable, and proven.
It works with a flange spigot that slides inside a flange adaptor. By adjusting the nuts on the tie rods, you can push the spigot in to shorten the joint and create a gap. Then, you pull it out to connect to the equipment and tighten everything to lock it in place.
Let's break down the working principle into simple steps. Imagine you are installing a new butterfly valve.
- Create a Gap: First, you adjust the dismantling joint to its shortest possible length. You do this by loosening the nuts on the tie rods, which allows the flange spigot to slide fully into the flange adaptor. This creates a clear space between the two fixed pipe ends.
- Install the Equipment: With this gap, you can easily lower the new butterfly valve into position. You don't have to force or pry anything. You can loosely bolt one side of the valve to the fixed pipe flange.
- Close the Gap: Now, you extend the dismantling joint. You pull the flange spigot out until its flange meets the other flange of the butterfly valve. You can then insert the bolts to connect them.
- Secure and Seal: Finally, you tighten everything. You tighten the nuts on the tie rods to the correct torque. This compresses the gasket inside the dismantling joint, creating a perfect, leak-proof seal. Then you finish tightening all the flange bolts. The joint is now locked at the perfect length.
The seal is the most critical part. We use high-quality EPDM or NBR rubber gaskets in our joints to ensure they remain leak-proof for the entire life of the pipeline.
What Are the Types of Dismantling Joints?
Choosing the wrong type of joint can lead to catastrophic pipeline failure. A joint that cannot handle the forces inside the pipe is a huge risk. Understanding the two main types is crucial for safety.
There are two main types. Thrust (or rigid) dismantling joints have full-length tie rods to handle axial forces from the pipeline. Non-thrust (or flexible) joints do not and require external anchoring. Thrust joints are used in over 99% of applications for safety.
The key difference between the two types is how they handle axial thrust—the force generated by water pressure trying to push the pipeline apart at bends and ends.
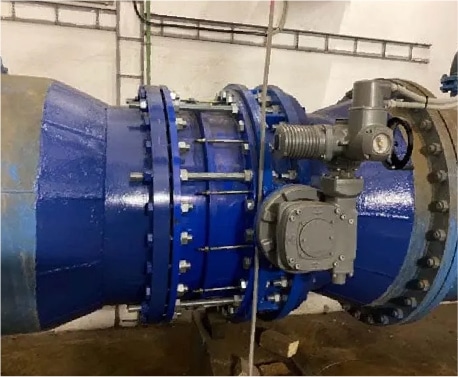
Thrust (Rigid) Dismantling Joints
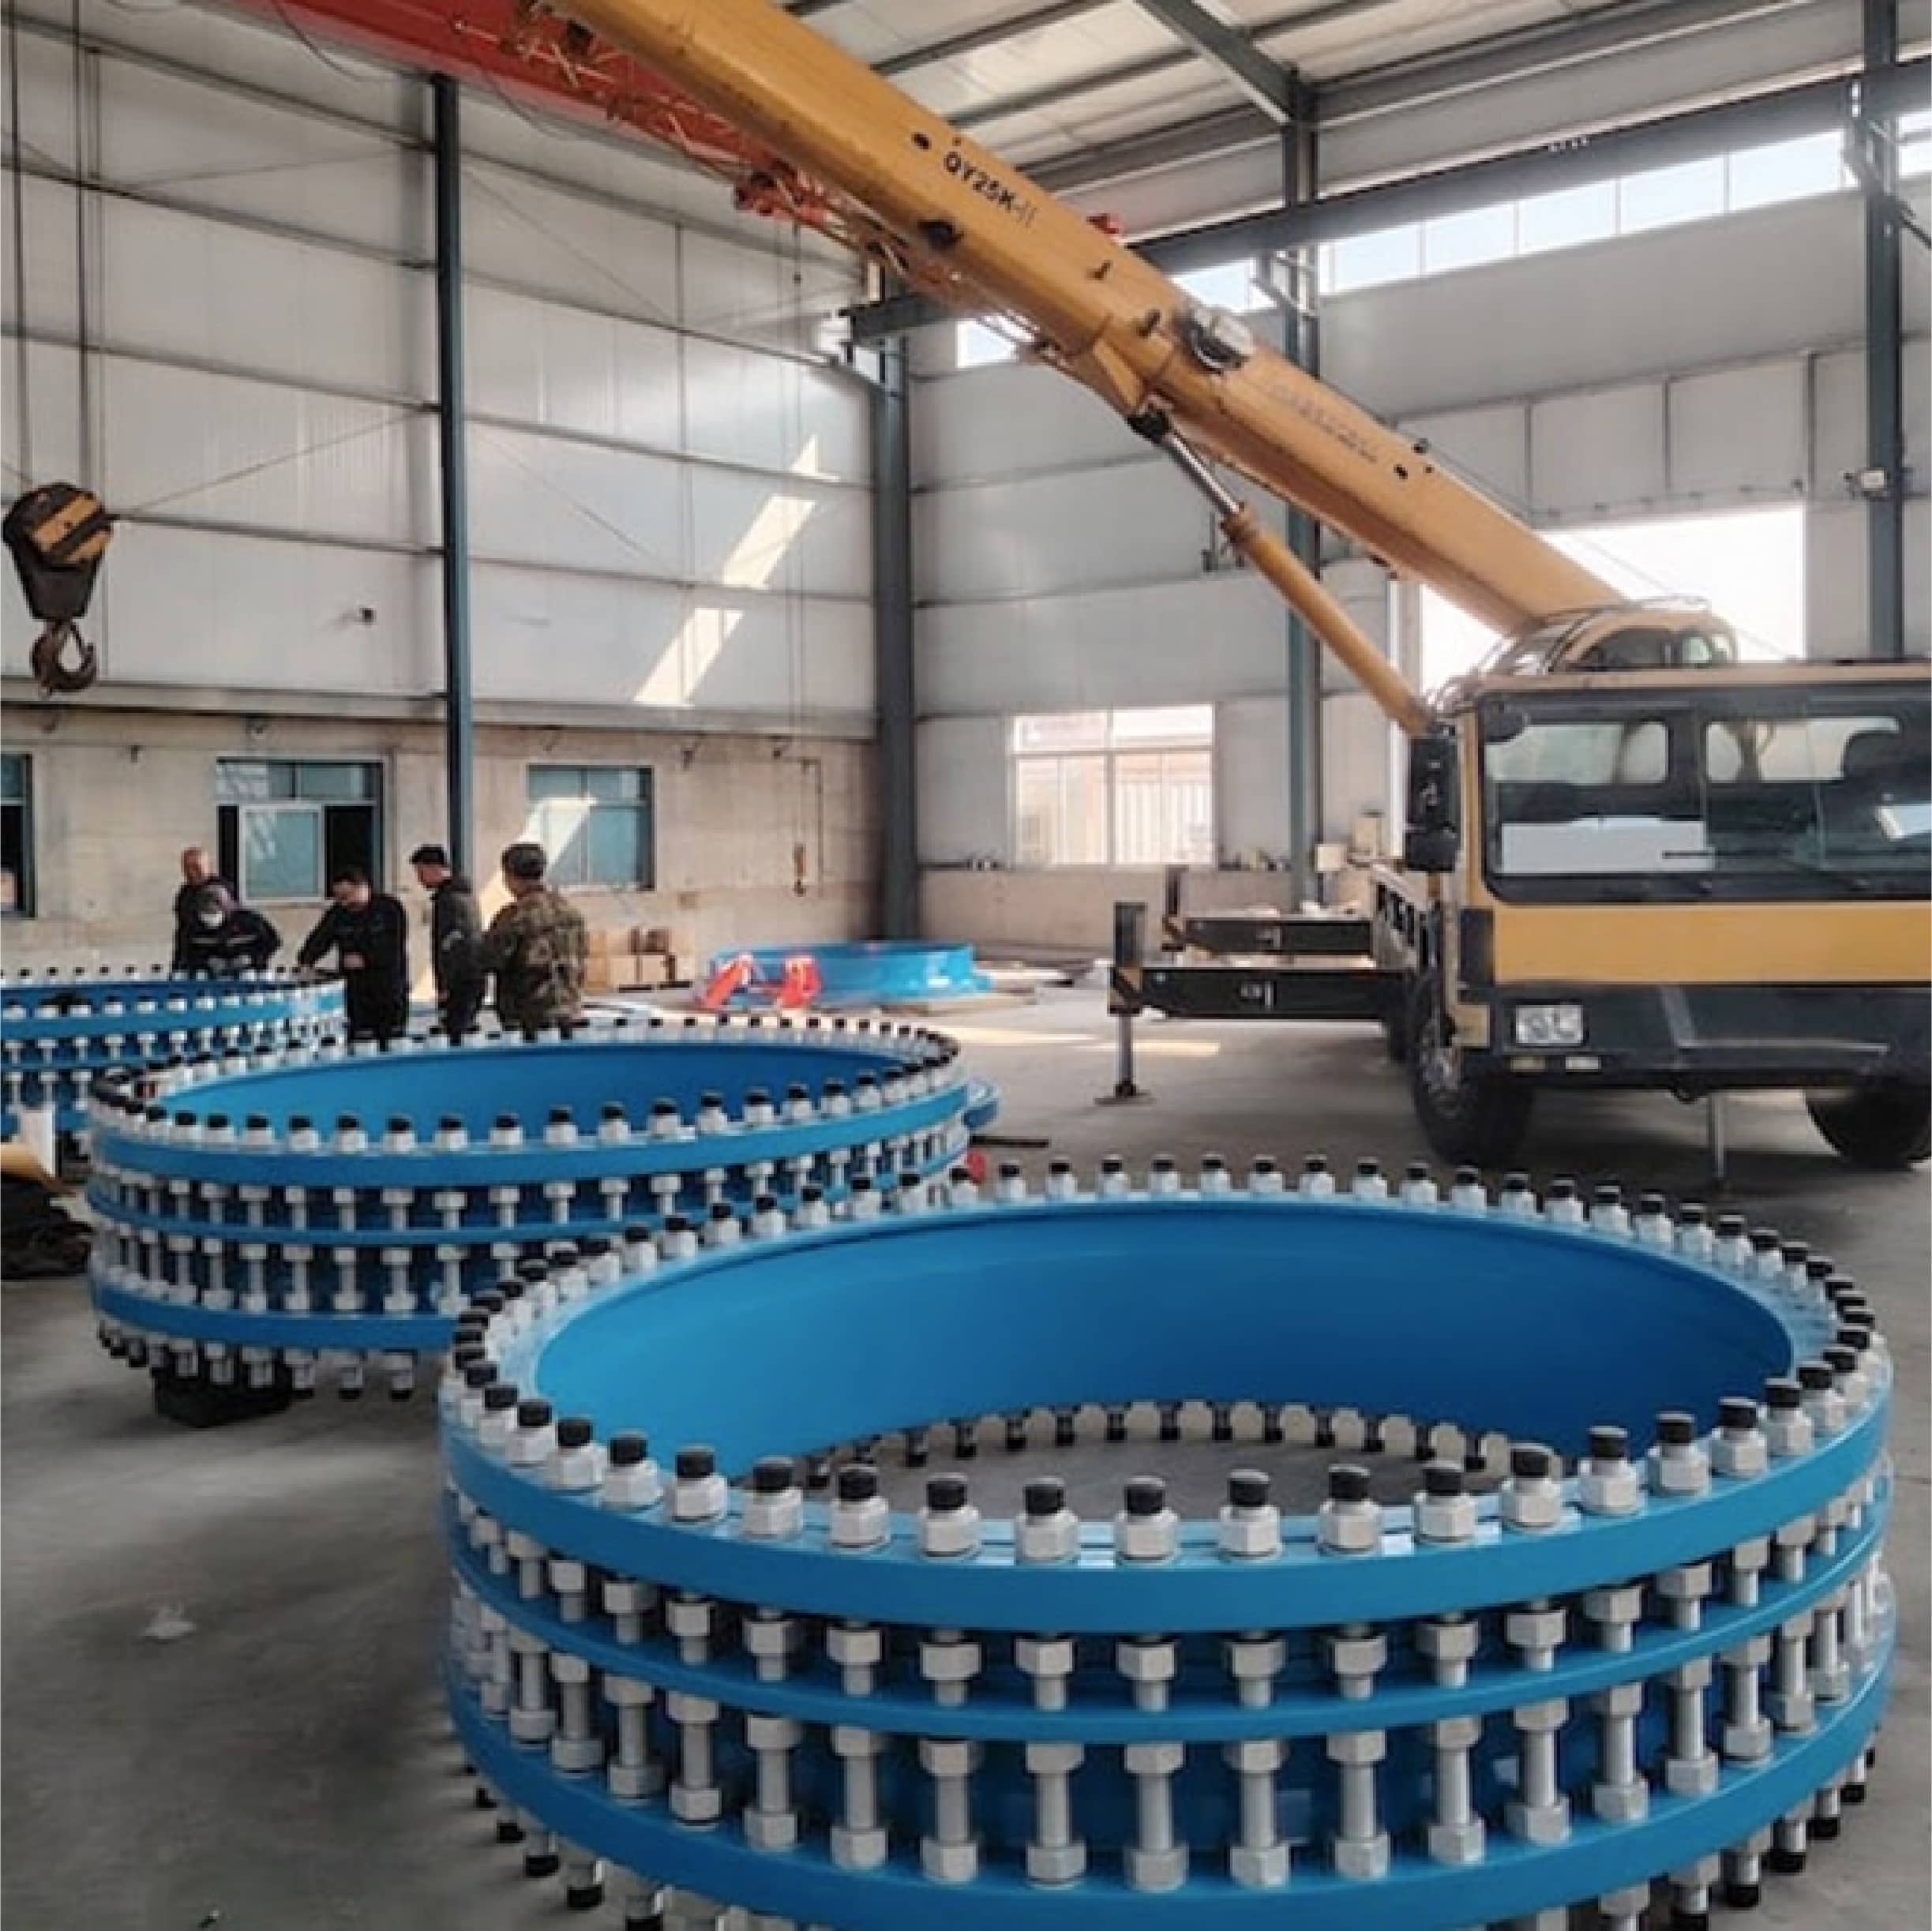
These are the industry standard. They feature long tie rods that span the entire length of the joint and connect the flange on the fixed pipe to the flange on the valve or meter. This design transfers the axial thrust through the tie rods, making the joint a rigid, self-restraining part of the pipeline. It can safely handle the pipeline's internal forces without needing external support. At our factory, we produce about 4,000 tons of these every year. They are the go-to choice for almost every application because they ensure pipeline integrity.
Non-Thrust (Flexible) Dismantling Joints
These joints have short studs that only assure the sealing of its own gasket. They do not connect to the adjacent equipment or pipe. As a result, they cannot resist any axial thrust. If you use this type, the pipeline must be firmly anchored with external concrete thrust blocks to prevent it from pulling apart. These are very rarely used. We only make a handful of them on special request for projects where a fully anchored system is already in place.
| Feature | Thrust (Rigid) Joint | Non-Thrust (Flexible) Joint |
|---|---|---|
| Tie Rods | Full length, connect to adjacent flanges | Short, only on the joint itself |
| Axial Thrust | Resists axial thrust | Does NOT resist axial thrust |
| Anchoring | Self-restraining | Requires external thrust blocks |
| Market Usage | Over 99% | Less than 1% |
For safety, unless your pipeline is securely anchored with thrust blocks, Judberd strongly recommends using a thrust (rigid) dismantling joint.
How Do You Choose the Right Dismantling Joint?
With so many options for size, material, and pressure, picking the wrong one can mean project delays and wasted money. Let's simplify the selection process to ensure you get it right the first time.
To choose the right dismantling joint, you must know four key details: the pipe's nominal diameter (DN), the working pressure (PN), the flange drilling standard (e.g., EN1092, ANSI), and the required installation length range. Getting these details correct is essential.
Choosing the correct joint is a process of matching its specifications to your pipeline's requirements. Here are the critical factors you need to confirm before ordering.
1. Size and Pressure Rating
The nominal diameter (DN) and pressure rating (PN) of the dismantling joint must match the rest of your pipeline. A PN16 joint cannot be used in a PN25 pipeline. This is the first and most basic check.
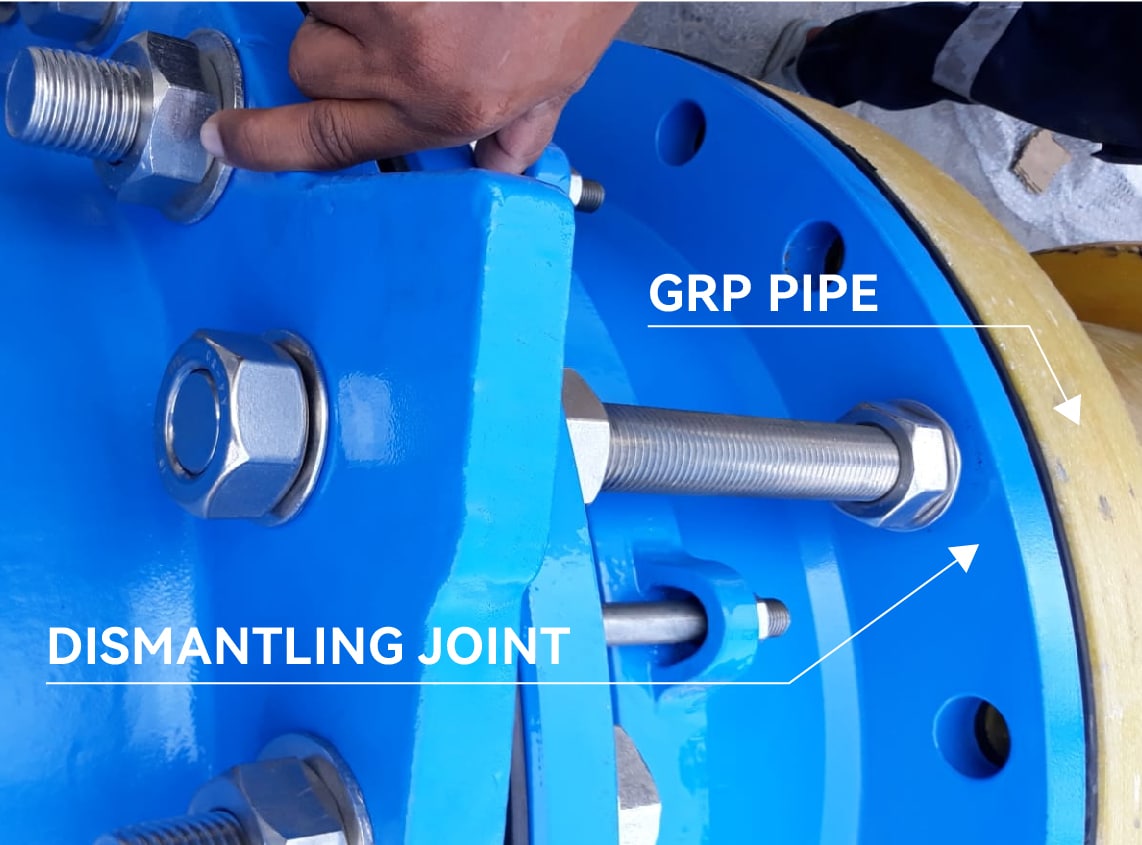
2. Flange Compatibility
The flanges at both ends of the dismantling joint are used to connect with the adjacent components on the pipeline. Therefore, the selected dismantling joint must have flanges with the same standard and pressure rating as the connecting components, ensuring proper connection and the ability to withstand the same pressure.EN1092-2 ductile iron flanges and EN1092-1 steel flanges are compatible in terms of bolt pattern (PCD, hole number, and hole size), allowing direct connection. However, their flange thickness may differ due to material strength differences, and this should be considered in design and installation. Additionally, there is another very important detail that is often overlooked. The tie rods on a thrust joint must pass through the bolt holes of the adjacent flanges. The thickness of these adjacent flanges affects the required length of the tie rods. You must tell us your flange standard, for example, EN1092-2 or ANSI B16.5. Our standard design is for EN1092-2 adjacent flanges. If you are connecting to a different standard, we need to know in advance so we can supply the correct, customized tie rod length.If adjacent flanges is stub flange of HDPE pipe,please do let us know,because we must take into account the thickness of the stub in the stub flange and accordingly extend the length of our long tie rods.
3. Adjustment Range
For most applications, a standard adjustment range of 50mm is enough. However, for very large diameter pipes (DN1800 or larger), the equipment being installed is also massive. Based on our experience, we recommend increasing the adjustment range to 60mm or more for these large sizes to give you more room to work.
4. Installation Gap (for Replacements)
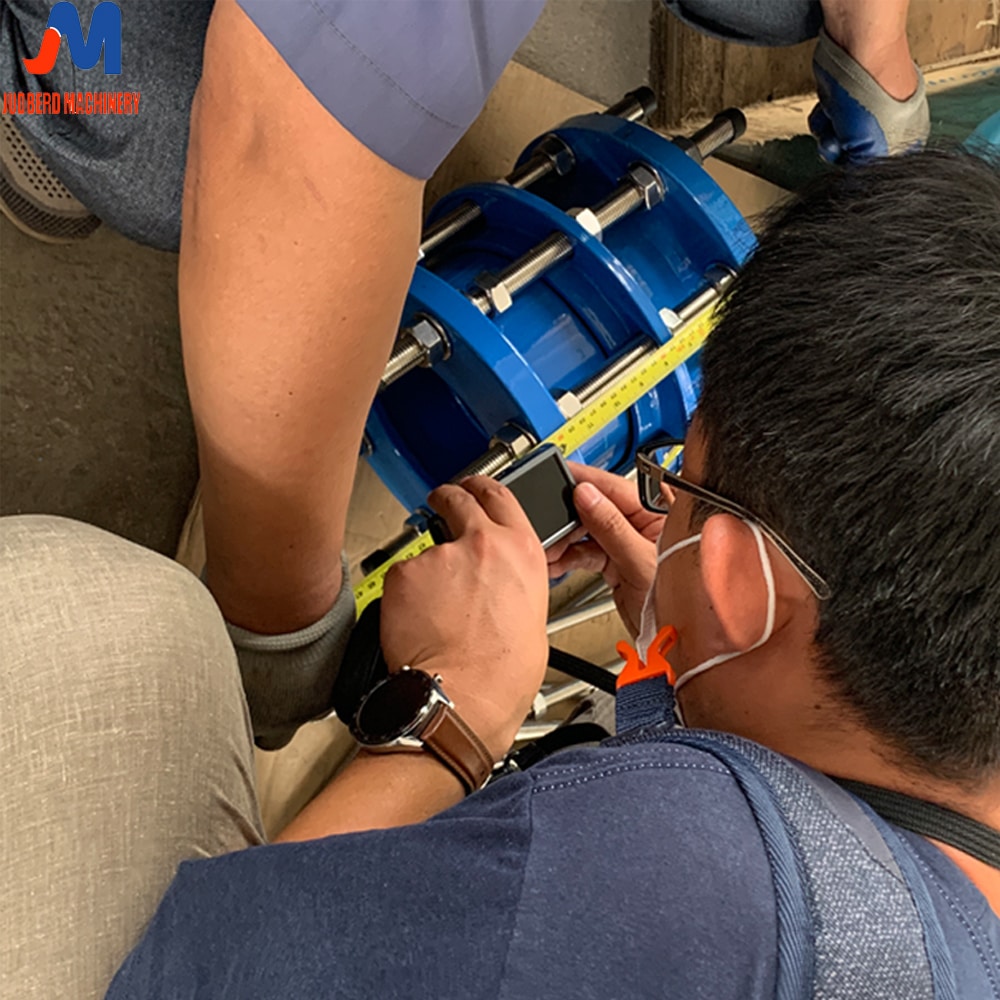
If you are installing a joint in a new pipeline, our standard dimensions will work perfectly. But if you are replacing an old valve or fitting in an existing pipeline, you must measure the gap. Provide us with the minimum and maximum possible lengths for the installation space, and our engineering team will design a custom joint for you.
Ductile Iron Dismantling Joint vs. Carbon Steel Dismantling Joint?
Material choice feels overwhelming. Choosing the wrong one can lead to premature corrosion or failure under high pressure. Let's compare the most common materials to make your decision easy and clear.
Ductile iron is ideal for low-to-medium pressure systems (≤ PN25), especially for water, due to its stability and cost-effectiveness. Carbon steel is used for high-pressure applications (≥ PN40) and for very large diameters where ductile iron molds are not practical.
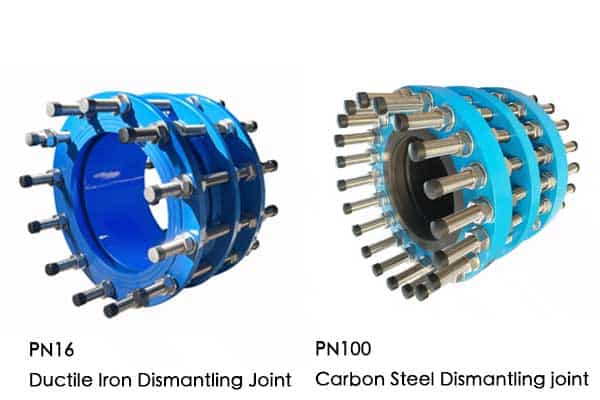
The material you choose depends on pressure, size, and budget. While we also produce stainless steel joints for special cases like food-grade pipelines, ductile iron and carbon steel are the most common choices.
| Material | Pressure Rating | Common Use | Manufacturing Notes |
|---|---|---|---|
| Ductile Iron | ≤ PN25 | Water, wastewater, oil | Requires molds. |
| Carbon Steel | ≥ PN40 | High-pressure gas & oil | Fabricated, no mold needed. Good for large sizes. |
| Stainless Steel | All ratings | Food-grade, corrosive media | Most expensive. Used only when necessary. |
Based on our 30 years of manufacturing, ductile iron is the workhorse for most water systems. It offers a fantastic balance of strength, corrosion resistance, and price. A factory like ours that can produce ductile iron joints up to DN2600 has significant capabilities.
For sizes even larger than DN2600, or for high-pressure pipelines like those in the oil and gas industry, carbon steel becomes the better option. We can fabricate carbon steel joints to almost any size without needing a mold. This makes it more flexible and cost-effective for very large, low-volume projects.
How Do You Install a Dismantling Joint?
A perfect product can fail if it's not installed correctly. An improperly installed joint can leak or even cause a pipeline to fail. Following these simple steps ensures a secure, leak-free installation every time.
First, set the joint to its shortest length and position it. Install the valve. Then, extend the joint to meet the valve's flange. Insert all bolts, and finally, tighten the tie-rod nuts and flange bolts evenly in a star pattern to secure the connection.
Proper installation is key to performance. I always tell my customers to take their time and follow these steps carefully.
- Prepare: Clean the flange faces on the pipe and the new equipment. Make sure they are free of dirt and rust. Inspect the gaskets to ensure they are new and undamaged.
- Position: Adjust the dismantling joint to its minimum length. Place it in the pipeline and loosely bolt its flange to the fixed pipe end.
- Install Equipment: Lower the valve or meter into the gap you created. Loosely bolt it to the other fixed pipe end.
- Extend the Joint: Loosen the nuts on the dismantling joint's tie rods. Slide the spigot end out until its flange meets the flange of the newly installed valve.
- Insert Bolts: Align the bolt holes and insert all the flange bolts and nuts, but do not tighten them yet.
- Tighten Evenly: First, tighten the nuts on the tie rods evenly until the gasket is compressed and the joint is secure. Then, tighten all the flange bolts. Always tighten bolts in a star or cross pattern. Never just tighten them in a circle. This ensures even pressure on the gasket and is the best way to prevent leaks.
What Are Common Problems and Their Solutions?
Even with a good product, issues can sometimes arise during installation. Leaks or alignment problems can stop a project cold. Knowing how to troubleshoot these common issues will save you time and money.
The most common problem is a leak, usually caused by uneven bolt tightening or a damaged gasket. The solution is to re-tighten the bolts in a star pattern or replace the gasket. Another issue is incorrect tie-rod length, which requires custom parts from the manufacturer.
Over my career, I've helped customers solve just about every possible issue. Luckily, most problems are simple to fix. Here are the most common ones we see.
| Problem | Likely Cause | Solution |
|---|---|---|
| Leak at the sliding seal (gland) | The tie-rod nuts were not tightened evenly. The gasket may be damaged or dirty. | Loosen and re-tighten the tie-rod nuts in a star pattern to the recommended torque. If it still leaks, disassemble and inspect or replace the gasket. |
| Leak at a flange connection | The flange bolts were not tightened evenly. The flange gasket is the wrong type or is damaged. | Re-tighten the flange bolts in a star pattern. Check that the gasket material is correct for the fluid in the pipe.Check gasket dimension is correct and quality is good. Inspect the flange faces for damage. |
| The tie rods are too short or long | The flange standard of the connecting pipe/valve was not specified correctly during purchase. | This is difficult to fix on-site. You must contact the manufacturer to get new, custom-length tie rods. This is why we always ask for the flange standard upfront. |
The number one service call we get is about small leaks. And 99% of the time, the problem is solved by simply re-tightening the bolts correctly. A torque wrench and a star pattern are your best friends during installation.
What Happens If You Don’t Use a Dismantling Joint?
Skipping a dismantling joint might seem like a small way to save money on a project. But this small saving can lead to huge costs and headaches in the future. Maintenance becomes a nightmare of cutting and welding.
Without a dismantling joint, replacing flanged equipment is extremely difficult, slow, and expensive. You may need to cut the pipe, causing long downtimes, and then hire skilled welders to put it back together. It also increases the risk of damaging expensive equipment.
Imagine you need to replace a failed gate valve in a pipeline that has no dismantling joints. The process is a nightmare. The valve is wedged tightly between two fixed pipe flanges. There is no space to move it.
To get it out, your maintenance team has two bad options. They can try to use crowbars and chains to pry the pipes apart, which risks damaging the pipe flanges and the valve. More often, they have no choice but to get a cutting torch and physically cut a section of the pipe out. This means a much longer shutdown. It requires a certified welder to come to the site to weld the pipe back together. The work is slow, dangerous, and expensive.
I've visited sites where a simple valve replacement took a full day and a team of people because they had to cut and re-weld the pipe. With a dismantling joint, the same job can be done by one or two people in just a couple of hours. The small initial investment in a dismantling joint pays for itself the very first time you have to do maintenance.
Do You Need Help Selecting a Dismantling Joint?
Feeling unsure about the exact specifications you need for your project? Ordering the wrong part is a costly mistake that can cause major delays. Let our 30 years of manufacturing experience guide you to the perfect solution.
Our team of experts is here to help. We can guide you through selecting the right material, size, pressure rating, and flange compatibility. As a foundry with full OEM/ODM capabilities, we can design and manufacture a custom solution just for your project.
As a foundry with 30 years of experience, we've seen it all. We don't just sell products; we provide solutions. We know that our customers—brand owners, wholesalers, and engineering firms—value quality, reliability, and expertise.
If you are a brand owner, we can be your OEM partner, manufacturing high-quality dismantling joints to your exact brand specifications. For wholesalers, we offer a reliable supply of standard, high-demand products at competitive factory prices. For engineering project managers, we act as your technical partner. We can help you solve complex pipeline challenges with custom-designed products.
Don't guess which product you need. Just send us your project details: the pipe size (DN), pressure (PN), the fluid inside, the flange standard you are connecting to and pipeline environment(above ground, underground or C5M environment etc). Our engineering team will provide a clear, technical recommendation for the perfect dismantling joint. We have helped thousands of customers find the right fit, and we are ready to help you too. Contact us today for a consultation or a quote.
Conclusion
Dismantling joints are essential for easy pipeline maintenance. Choosing the right type, material, size,working pressure PN ,and coating, and installing it correctly, will save you significant time, money, and effort long-term.
