A pipeline leak is a costly emergency. It disrupts service and wastes valuable resources. Finding the right fix for your specific pipe material can be overwhelming.
The best solution for pipeline leakage depends on the pipe material, pressure, and damage type. For most common materials like Steel, DI, HDPE, and PVC, a specialized repair clamp offers a fast, reliable, and permanent fix without shutting down the entire system. Choosing the right clamp is key.
I've been in this business for 30 years, and I've seen every kind of pipe leak imaginable. The key isn't just stopping the water; it's about understanding why the pipe failed in the first place. Let's break down the best solutions, pipe by pipe, so you can make the right call every time. This knowledge will save you time, money, and a lot of future headaches.
What Is the Best Solution for Pipeline Leakage by Pipe Material?
Different pipes have different problems. Using the wrong repair method on a specific pipe material can lead to a bigger, more expensive failure down the road.
The best solution is tailored to the material. For rigid pipes like steel and ductile iron, normal repair clamps are ideal. For flexible plastics like HDPE and PVC, specialized couplings or clamps that accommodate movement are better. Asbestos cement (AC) requires a careful, non-crushing approach.

To choose the right solution, you first need to understand the pipe's properties. Some pipes are rigid, while others are flexible. This is a critical factor in how they fail and how they should be repaired. In my experience, a one-size-fits-all approach never works.
Rigid vs. Flexible Pipes
Rigid pipes like steel, ductile iron (DI), and asbestos cement (AC) do not bend easily. They are strong but can be brittle. Leaks in these pipes are often due to corrosion pits or cracks from ground stress. A robust stainless steel repair clamp provides the structural support needed for a permanent fix. Flexible pipes like HDPE and PVC can bend with ground movement. Failures often happen from material fatigue, impact damage, or improper jointing. For these, a repair clamp needs a gasket that can seal effectively on a softer surface without causing more damage.
Pressure and Environment
The pipe's operating pressure is also crucial. A low-pressure PVC water line has very different needs than a high-pressure steel oil pipe. We manufacture standard clamps for pressures up to PN16, but for high-pressure applications, you need something much stronger, like our clamps rated up to PN140. The environment matters, too. For potable water, you need materials with WRAS or ACS certification. For a pipeline near the sea, you need a clamp made from highly corrosion-resistant materials to handle the harsh C5-M environment.
What Causes Pipeline Leaks? Common Failure Types Explained?
A leak is just a symptom. Ignoring the root cause means you'll be back fixing another leak soon. This costs you both time and money.
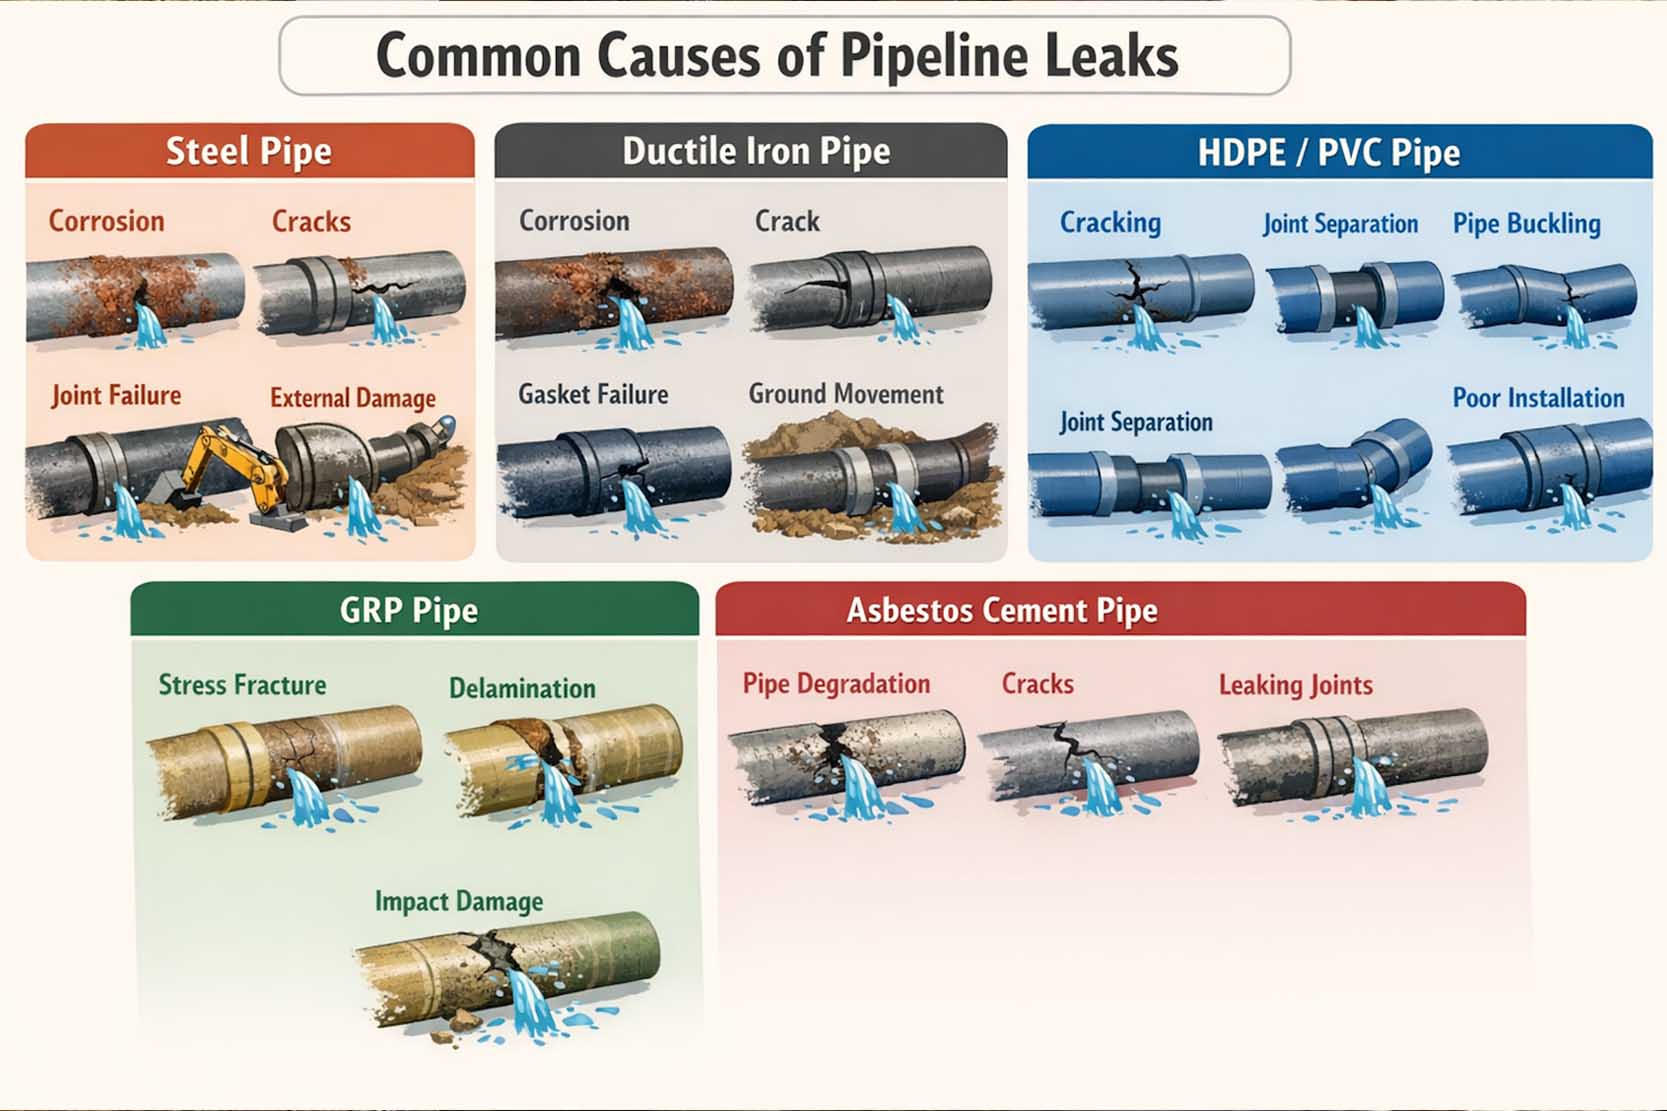
Pipeline leaks are commonly caused by corrosion, joint failure, ground movement, high-pressure surges, and accidental damage. Pinhole leaks from corrosion are frequent in metal pipes, while cracks and joint failures are common in both metal and plastic pipes. Understanding the cause helps prevent future issues.
Over the years, I've learned that a successful repair starts with a good diagnosis. You have to be a detective and figure out what went wrong. The clues are usually right there on the pipe itself if you know what to look for.
Corrosion: The Silent Killer
For metal pipes like steel and ductile iron, corrosion is the number one enemy. It can happen on the outside from aggressive soil or on the inside from the water chemistry. This corrosion creates small pits that eventually turn into pinhole leaks. These leaks look small but can grow quickly if not addressed. The best defense is a good coating, but once it's breached, you need a solid repair plan.
Mechanical and Environmental Failures
Pipes are under constant stress. Ground movement from soil settlement or frost can put immense pressure on a pipeline, causing it to crack or pull apart at the joints. High-pressure surges, also known as water hammer , can shock the system and cause a sudden failure. And then there's simple accidental damage. I've seen many pipes damaged by excavation equipment. These impacts can cause immediate cracks or create weak spots that fail years later. Joint failure is another big one, especially in older pipelines where gaskets have degraded over time.
How to Identify the Type of Pipe Leak Before Repair?
You see water, but what's the real problem? Guessing can lead to using the wrong repair method and having the fix fail. You need to know for sure.
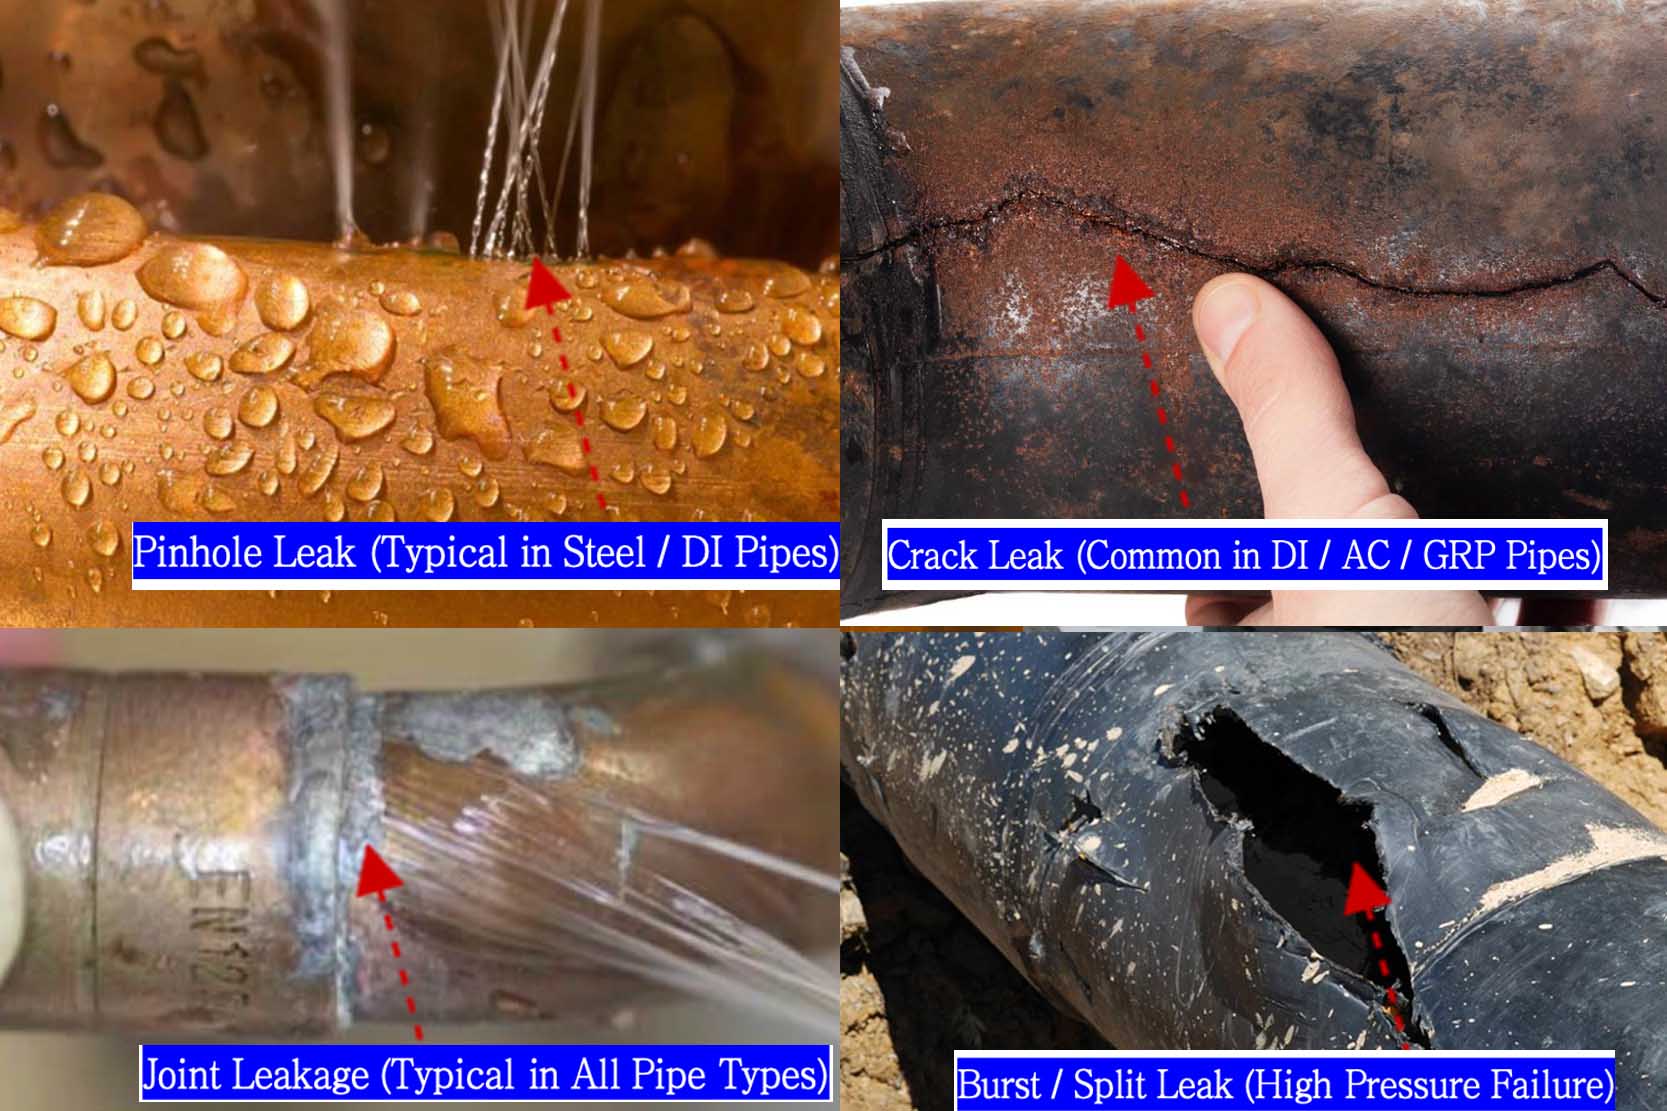
To identify a leak, first look for visual signs like drips, cracks, or corrosion spots. A pinhole leak is a small, high-pressure spray. A crack will be a longer fissure. A joint leak occurs at a connection point. The location and appearance tell you what repair you need.
Before you can fix anything, you have to get your hands dirty and assess the damage. A proper inspection is non-negotiable. It's the step that determines whether your repair will last for a week or for 20 years. Don't rush it.
Visual Inspection Checklist
The first thing to do is carefully clean the area around the leak. You can't diagnose what you can't see. Use a wire brush to remove dirt, rust, and old coatings. Once it's clean, you can perform a proper visual check.
- Pinhole Leak: Look for a tiny hole, often surrounded by a rust spot. The water will likely be spraying out with force.
- Crack: A crack can be a thin line (hairline crack) or a wider opening. Note its direction. A crack running along the pipe is longitudinal, while one wrapping around it is circumferential.
- Corrosion: Look for areas where the pipe wall is thinning, flaking, or has deep pits. General corrosion weakens a large area of the pipe.
- Joint Failure: Check if the leak is coming directly from a bell joint, flange, or coupling. The pipe itself might be fine, but the connection has failed.
This initial assessment will guide you to the right repair clamp. A standard clamp works for pinholes and longitudinal cracks. A leaking bell joint requires a specialized bell joint repair clamp .
Emergency vs Permanent Solutions for Pipeline Leakage?
You need to stop the leak now. But is your quick fix going to last, or is it just a temporary patch that will fail later on?
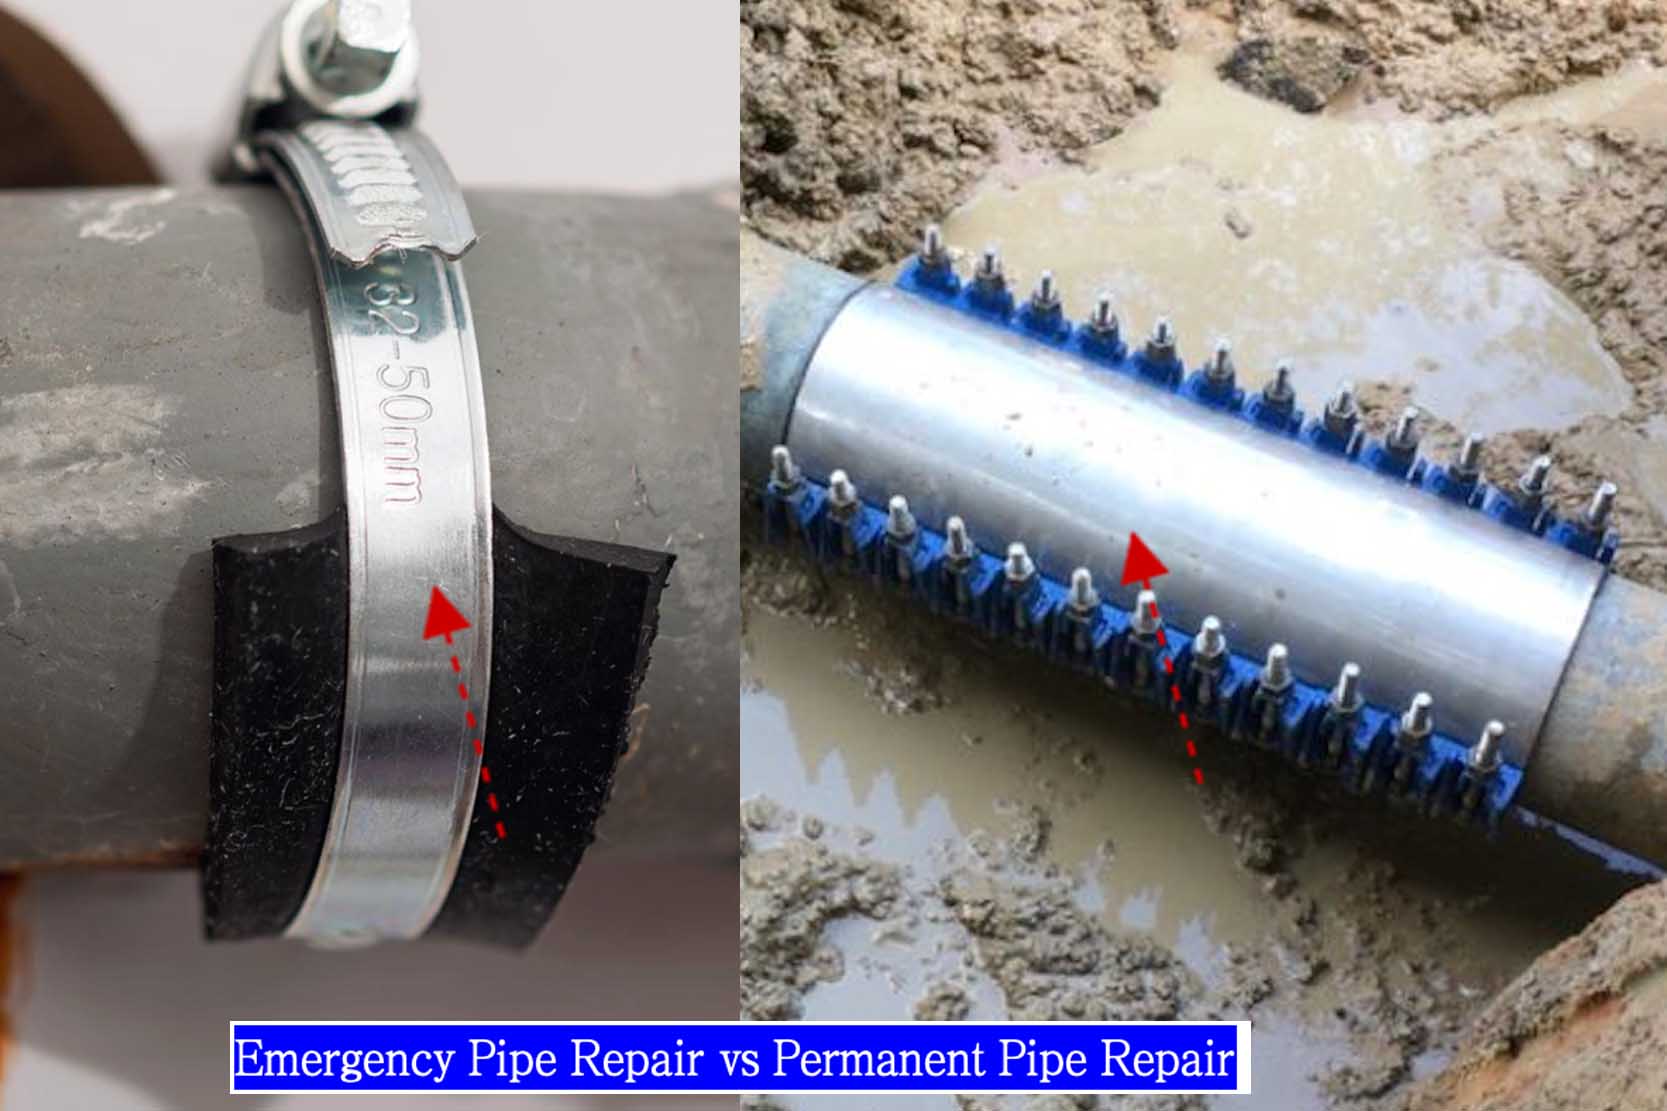
An emergency solution, like a simple patch or temporary clamp, is meant to stop the leak immediately to prevent further damage. A permanent solution, such as a high-quality stainless steel repair clamp or pipe section replacement, is designed to last for the remaining life of the pipeline.
In an ideal world, every repair would be permanent from the start. But in reality, sometimes you just need to stop the bleeding. The important thing is to know the difference and to have a plan to turn a temporary fix into a permanent one.
When to Use a Temporary Fix
An emergency patch is for situations where safety is the top priority or where you need to restore service immediately. It's a stopgap measure. For example, if a major water main breaks, the first goal is to stop the flooding. A temporary fix buys you time to plan for a permanent repair without shutting down services for an extended period. These temporary solutions are not designed to withstand high pressures or last for years. They are a means to an end.
The Value of a Permanent Repair
A permanent repair is an investment in the long-term health of your pipeline. Our stainless steel repair clamps, for instance, are engineered to be permanent solutions. When installed correctly, they seal the leak and reinforce the damaged section of the pipe, often making it stronger than it was before. This approach is far more cost-effective than replacing an entire section of pipe, which requires extensive excavation, cutting, and welding. A permanent repair gives you peace of mind, knowing the problem is solved for good.
| Feature | Emergency Solution | Permanent Solution |
|---|---|---|
| Goal | Stop leak immediately | Long-term reliability |
| Materials | Patches, tapes, simple clamps | Stainless steel clamps, couplings |
| Lifespan | Days to months | 10+ years |
| Cost | Low initial cost | Higher initial, lower lifetime cost |
Steel Pipe Leakage: Causes and Best Repair Solutions?
Steel pipes are incredibly strong. But they are vulnerable to corrosion, which can lead to pinholes and cracks, causing major service disruptions if not fixed quickly.
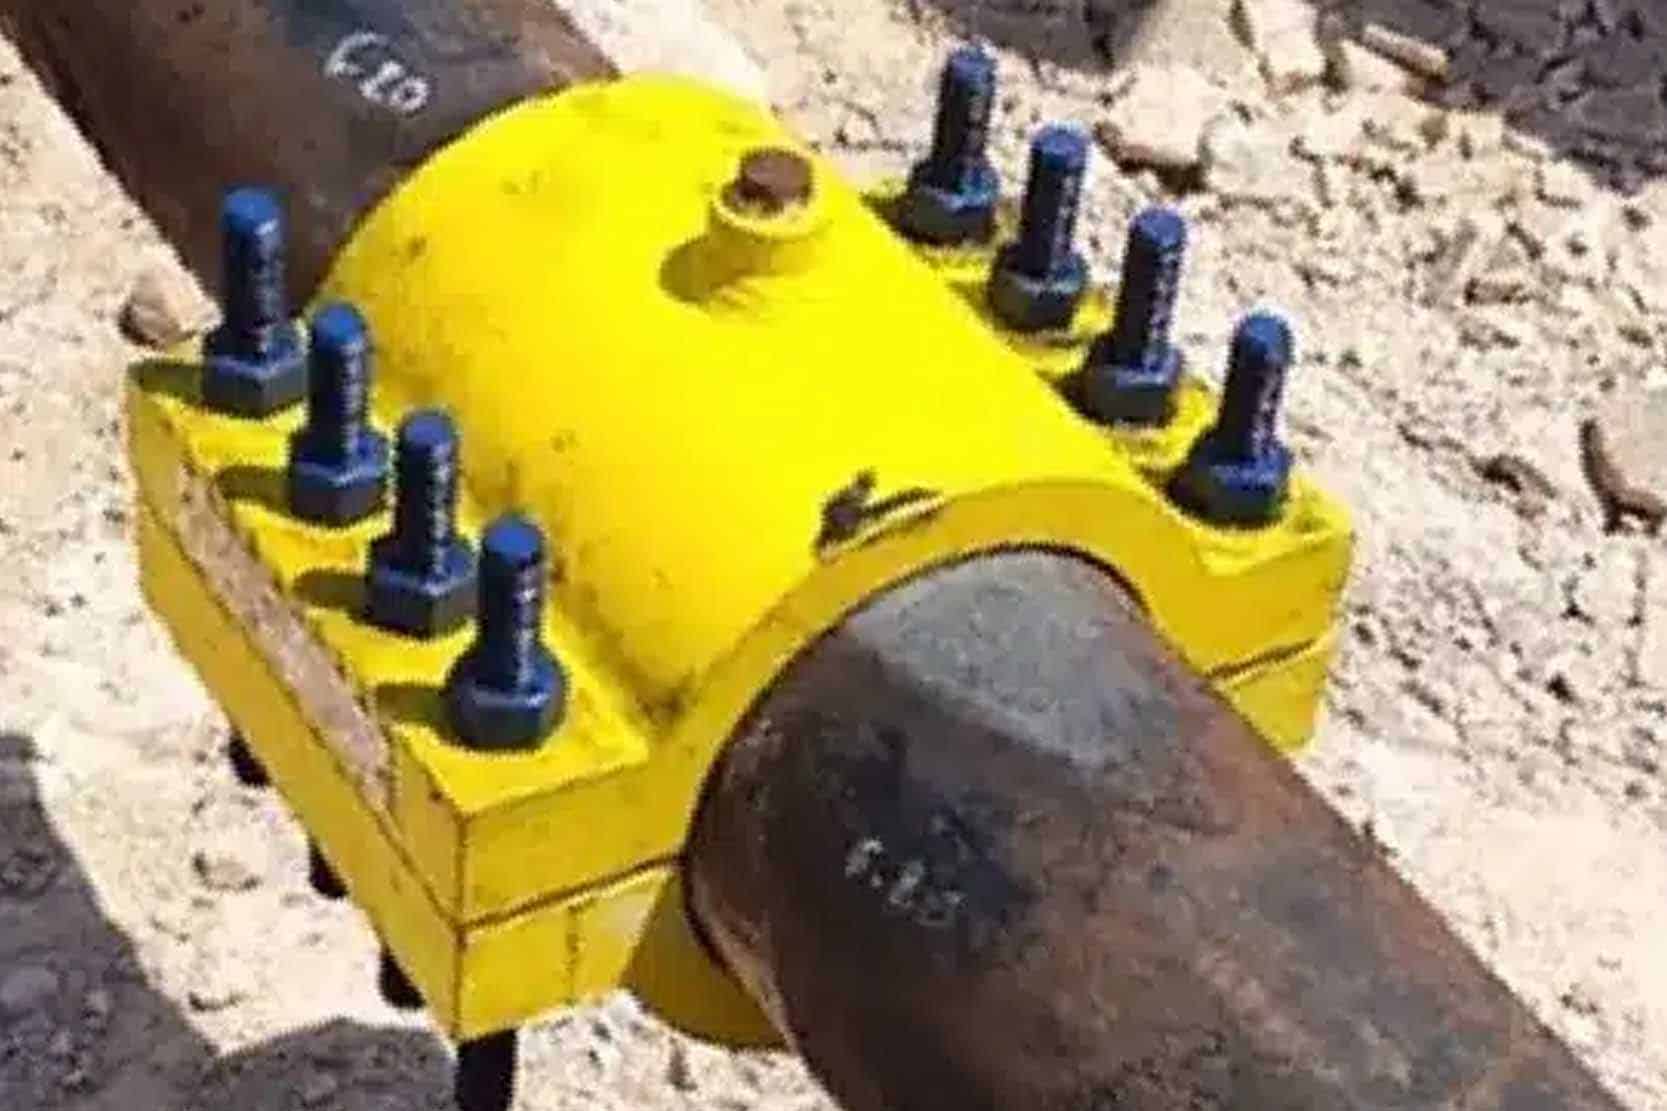
Corrosion is the primary cause of steel pipe leakage. The best solution is a full-encirclement stainless steel repair clamp. It provides a durable seal and reinforces the weakened pipe wall, offering a permanent fix without the need for welding or service shutdowns.
I've worked with steel pipes my whole career. They are the workhorses of the industry, used for everything from high-pressure oil lines to major water transmission mains. Their strength is their greatest asset, but their weakness is rust.
Understanding Steel Pipe Failures
Steel pipes typically fail in two ways: internal or external corrosion. External corrosion comes from aggressive soil conditions, while internal corrosion is caused by the fluid inside the pipe. Both create small pits that slowly eat through the pipe wall until a pinhole leak appears. These pinholes can be very difficult to detect until they become a serious problem. Another common issue is failure at welded joints, where small imperfections can become stress points over time, leading to cracks. High-pressure surges can also cause cracks, especially in older, more brittle pipes.
Why Repair Clamps Are the Best Choice
For most leaks on steel pipes, a repair clamp is the superior solution. Here's why:
- No Hot Work: Welding on a live pipeline is dangerous and often impossible. A clamp is a mechanical, "cold" repair, which is much safer.
- Speed: You can install a clamp in a fraction of the time it takes to cut out and replace a section of pipe. This means less downtime and lower labor costs.
- Reinforcement: A good clamp doesn't just patch the hole. It wraps around the pipe and provides structural support, which is critical if the pipe has been weakened by corrosion. For high-pressure steel pipes, we have developed specialized clamps that can handle up to PN140, ensuring a safe and secure repair even in the most demanding applications.
Ductile Iron (DI) Pipe Leakage: Typical Failures and Fix Methods?
Ductile iron pipes are tough and reliable. But their joints can be a weak point, and they can suffer from corrosion over time, leading to frustrating leaks.
DI pipe leaks most often occur at the bell and spigot joints due to gasket failure or ground movement. The best fix for this is a specialized bell joint repair clamp. For leaks on the pipe body caused by corrosion, a standard stainless steel repair clamp is the ideal solution.
Ductile iron is a fantastic material for water and wastewater pipelines. It has the strength of steel but with better corrosion resistance. However, it's not invincible. I've seen many DI pipe networks, and the problems are usually predictable.
The Bell Joint Problem
The most common failure point on a DI pipeline is the bell and spigot joint. These joints rely on a rubber gasket to create a seal. Over decades, these gaskets can degrade, harden, or become dislodged by ground settlement. This allows water to leak out, eroding the soil around the pipe and making the problem worse. This is a slow, chronic issue that can be hard to pinpoint. That’s why we designed our bell joint repair clamps. They fit over the entire joint, creating a new, permanent mechanical seal without having to dig up and replace the entire joint.
Body Breaks and Corrosion
While more resistant than steel, DI pipes can still corrode, especially in "hot" soils. This leads to the same kind of pinhole leaks and cracks you see in other metal pipes. For these situations, a standard full-encirclement repair clamp is perfect. It covers the damaged area and uses the pipe's own pressure to help create a tight seal. These clamps are a much faster and more economical option than replacing a full length of DI pipe, which is heavy and difficult to handle.
HDPE Pipe Leakage: Why It Fails and How to Repair It?
HDPE pipe is flexible and corrosion-proof. But it can be damaged by impact or improper fusion, leading to cracks and leaks that need a specific repair approach.
HDPE pipes typically fail from cracks due to impact damage, stress, or faulty electrofusion joints. The best repair method is often a specialized repair clamp with a wide gasket or a full-encapsulation shell that can seal effectively on the flexible surface without crushing the pipe.

HDPE (High-Density Polyethylene) has become very popular, and for good reason. It doesn't rust, and its flexibility allows it to move with the ground. But this flexibility also presents unique repair challenges. You can't just slap any old clamp on it.
Common Failure Modes in HDPE
Because HDPE is a plastic, it behaves differently than metal. The most common leaks I see are from what's called "slow crack growth." A small scratch or gouge from installation can, over years of pressure cycles, grow into a full-blown crack. Another major issue is faulty jointing. The sections of HDPE pipe are typically joined by heat fusion ( butt fusion or electrofusion ). If this process isn't done perfectly—if the temperature or pressure is wrong—you get a weak joint that will eventually fail. Finally, direct impact from rocks or excavation equipment can puncture or crack the pipe wall.
Repairing HDPE the Right Way
Repairing HDPE requires a delicate touch. A standard metal clamp can put too much focused pressure on the pipe, potentially crushing it or causing a new crack to form. That's why for HDPE, you need a repair clamp specifically designed for plastic pipes. These clamps often have a wider body and a softer, thicker gasket. This spreads the clamping force over a larger area, ensuring a tight seal without damaging the pipe. In our factory, we've developed clamps with low-profile lugs and wide bands that are perfect for this application. They provide a secure, permanent seal while respecting the flexible nature of the material.
PVC Pipe Leakage: Common Cracks and Fast Repair Options?
PVC pipes are common in irrigation and low-pressure water systems. They are cheap and easy to install but can become brittle and crack from UV exposure or impact.
PVC pipe leaks are usually caused by longitudinal cracks or failures at solvent-welded joints. A lightweight, full-encirclement repair clamp is a fast and effective option. For smaller cracks, a repair coupling can also be used to replace the damaged section.
PVC is everywhere, especially in smaller-diameter water lines. It's a great material, but it has its weaknesses. I often get calls about PVC pipes that have cracked for what seems like no reason at all.
Why PVC Pipes Crack
Unlike HDPE, PVC can become brittle over time, especially when exposed to sunlight (UV radiation). This brittleness means that a small impact from a rock or shovel can cause a long crack to form along the length of the pipe. These are the most common failures I see. Another problem area is the solvent-welded joints. If not enough cement is used, or if the surfaces aren't properly cleaned and primed before joining, you can get a weak bond that leaks under pressure. These leaks often start as slow drips and get progressively worse.
Fast and Easy Repairs for PVC
The good news is that PVC is relatively easy to repair. Because it's often used in lower-pressure systems, the repair solutions don't need to be as heavy-duty as those for steel or DI pipes. A simple, lightweight stainless steel repair clamp is often the perfect tool. You can install it in minutes with basic hand tools. Just make sure the clamp has a good quality gasket that can create a positive seal on the smooth plastic surface. For more extensive damage, you can also cut out the cracked section and install a repair coupling (sometimes called a slip-fix). However, this requires shutting off the water and can be more labor-intensive than using a clamp.
GRP Pipe Leakage: Challenges and Recommended Solutions?
GRP pipes are strong and light but can be brittle. A leak often means a hairline crack or a joint failure, which requires a careful and precise repair.
GRP (Glass Reinforced Plastic) pipe leaks are challenging due to the material's brittle nature. The best solution is a wide-band, full-encirclement repair clamp that distributes pressure evenly to avoid creating new cracks. Proper torque control during installation is critical.
GRP, or fiberglass pipe, is a high-performance material often used in corrosive environments or for large-diameter water mains. It has a fantastic strength-to-weight ratio, but you have to handle it with care. It's not like metal or even other plastics.
The Brittle Nature of GRP
The biggest challenge with GRP is that it's a composite material. It's very strong under tension, but it can be brittle and susceptible to impact damage. A sharp blow can cause a network of tiny hairline cracks that are hard to see but will leak under pressure. Another common issue is delamination, where the layers of glass fiber and resin start to separate. This weakens the pipe wall from the inside out. Failures at flanged or coupled joints can also occur if the bolts are over-tightened, which can crush the pipe wall.
The Importance of a Gentle, Firm Repair
When repairing GRP, you cannot use a clamp that concentrates stress in one area. This will just make the problem worse. The key is to use a clamp that spreads the load as evenly as possible. We recommend using a wide-band repair clamp. The wider the clamp, the lower the pressure per square inch on the pipe surface. It is also absolutely critical to use a torque wrench when tightening the bolts and to follow the manufacturer's specifications exactly. Over-tightening is the number one cause of failed GRP repairs. A properly installed, wide-band clamp can provide a reliable, long-term seal without compromising the integrity of the pipe.
AC (Asbestos Cement) Pipe Leakage: Safe Repair Methods?
AC pipes are old and fragile. Repairing them is risky due to the asbestos, and the pipe can break easily. You need a safe, non-crushing repair method.
Repairing Asbestos Cement (AC) pipes requires extreme caution. The safest and most effective method is to use a lightweight, full-encirclement repair clamp specifically designed for AC pipe diameters. This method avoids cutting or drilling, which would release dangerous asbestos fibers.
Working with AC pipe is serious business. Many of these pipelines were installed decades ago and are now reaching the end of their life. The material becomes very brittle with age, and the presence of asbestos means safety is the absolute top priority.
The Dangers and Difficulties of AC Pipe
The main risk is the release of asbestos fibers into the air if the pipe is cut, drilled, or broken. These fibers are a known carcinogen and pose a severe health risk. Beyond the health concerns, the pipe itself is very fragile. I've seen old AC mains crumble with just the pressure of the surrounding soil. They are prone to circumferential breaks (snapping clean in half) from ground movement. Trying to tighten a standard heavy-duty clamp on this material is a recipe for disaster; you will likely crush the pipe and create a much bigger problem.
The "Contain and Seal" Approach
The only responsible way to repair a leak in an AC pipe is to contain it without disturbing the pipe material. This is where a specialized AC pipe repair clamp comes in. These clamps are designed to be lightweight and have a very wide band to distribute the clamping force. They are made to fit the specific, and often irregular, outside diameters of old AC pipes. The goal is to gently wrap the pipe and use a soft gasket to seal the leak. No cutting, no drilling, no dust. This method safely encapsulates the damaged area and extends the life of the pipe until a full replacement can be planned and executed safely.
When Should You Use a Repair Clamp for Pipe Leakage?
Shutting down a whole pipeline for a small leak is a massive headache. It costs a lot and disrupts everyone. There has to be a better way.
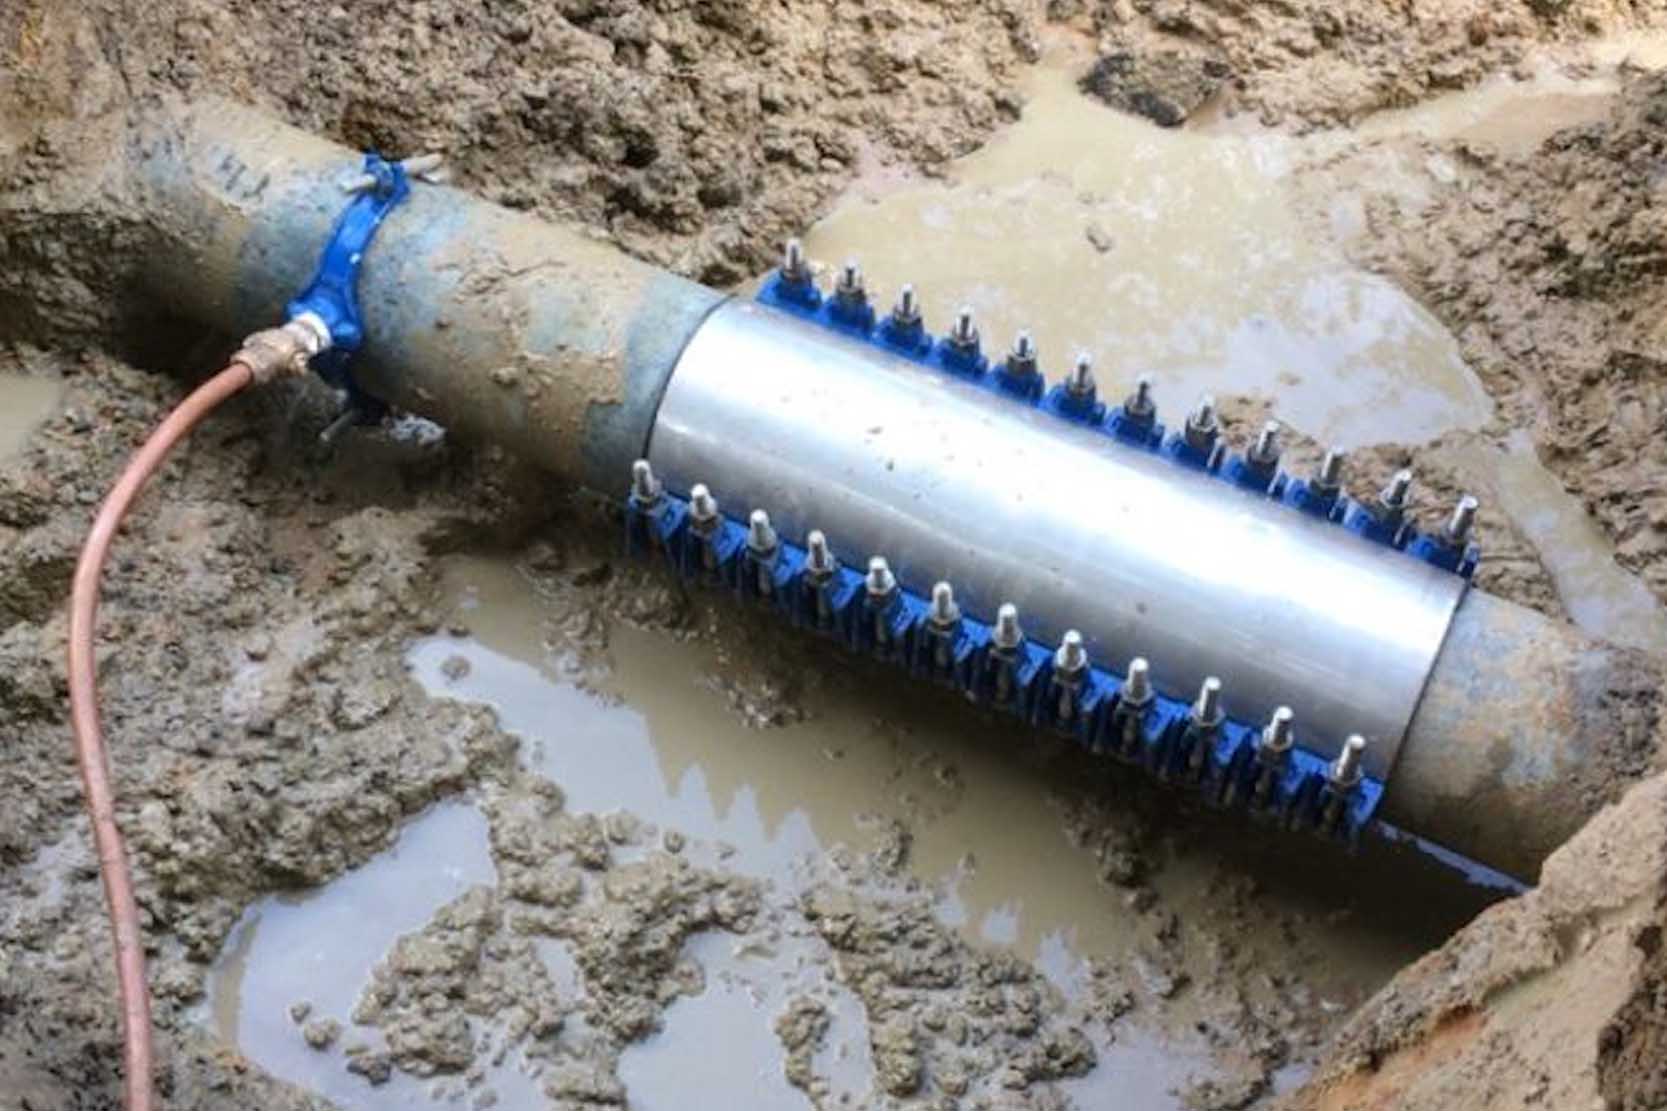
You should use a repair clamp for leaks like pinholes, cracks, and corrosion damage on straight pipe sections or at joints. They are ideal for making fast, permanent repairs without shutting down the line, saving significant time and money compared to cutting out and replacing a pipe section.
A repair clamp is one of the most valuable tools in pipeline maintenance. We've been manufacturing them for 30 years, and I know they are often the best choice. But they aren't for every single situation. Knowing when to use one is key to a successful repair.
Ideal Scenarios for Repair Clamps
A repair clamp is the perfect hero in these situations:
- Pinhole Leaks: A small hole from corrosion is the classic use case. A clamp provides a quick, permanent seal.
- Longitudinal Cracks: For a crack running along the pipe's length, a clamp can seal the leak and provide structural reinforcement.
- Corrosion Pitting: If you have an area of general corrosion with multiple small leaks, a wide-band clamp can cover the entire affected area.
- Joint Leaks: Specialized clamps, like our bell joint repair clamps, are designed specifically to seal leaking pipe connections without taking them apart.
- Live Repairs: The biggest advantage is that you can often install a clamp on a pipe that is still under pressure. This avoids costly shutdowns and service interruptions.
Limitations of Repair Clamps
While versatile, clamps have their limits. You should not use a standard clamp if the pipe is severely deformed, bent, or has a large hole with missing pipe material (a blowout). They are also not a solution for a complete circumferential break where the pipe has snapped in two; in that case, you need a coupling to rejoin the ends.
When Is Pipe Replacement the Only Safe Option?
Sometimes, a repair is just not enough. Trying to patch a pipe that is beyond its service life is risky and will only lead to more failures.
Pipe replacement is the only safe option when the pipe has lost its structural integrity. This includes cases of severe, widespread corrosion, large blowouts with missing material, or multiple circumferential breaks. A clamp cannot fix a pipe that is fundamentally failing.
As a manufacturer of repair products, I believe in fixing things whenever possible. But I also believe in safety and honesty. There comes a point where putting a clamp on a pipe is like putting a bandage on a broken leg. It's just not the right solution, and it can be dangerous.
Red Flags for Replacement
You must choose replacement over repair in these situations:
- Loss of Structural Integrity: If you can easily poke a hole in the pipe with a hammer or screwdriver because of deep, widespread corrosion, the pipe is finished. A clamp needs a reasonably sound pipe wall to seal against.
- Large Holes or Blowouts: If a large chunk of the pipe wall is missing, a clamp cannot bridge the gap. The gasket will just push through the hole.
- Severe Deformation: If the pipe is ovaled, crushed, or severely bent, a round clamp will not be able to create a proper seal.
- Multiple, Frequent Leaks: If you are constantly repairing new leaks on the same section of pipe, it's a clear sign that the entire section is failing. It's more cost-effective in the long run to replace it rather than chasing leaks one by one.
Making the call to replace is tough because it's expensive, but it's the only responsible choice when the pipe is no longer safe to operate.
How to Choose the Right Repair Method for Different Pipe Materials?
You have a leak and a toolbox full of options. Choosing the right one can be the difference between a quick fix and a permanent solution. It's a critical decision.
To choose the right repair method, you must consider four things: the pipe material, the type and size of the damage, the operating pressure, and the fluid inside the pipe. Match these factors to the capabilities of the repair product, such as a specific type of clamp or coupling.
After three decades in this industry, I can tell you that successful repairs come from a methodical approach, not guesswork. It's a simple process of matching the problem to the right tool. Here is the thought process I go through every time.
My 4-Step Decision Process
- Identify the Pipe Material: Is it steel, DI, PVC, HDPE, AC, or something else? This is the first and most important question. As we've discussed, a repair for brittle AC pipe is very different from a repair for flexible HDPE.
- Assess the Damage: What are you dealing with? A tiny pinhole? A 12-inch long crack? A leaking joint? The size and type of the defect will determine how big or specialized your repair product needs to be. For a leaking tee, you need a tee repair clamp, not a standard one.
- Check the Operating Conditions: What is the pressure (PN rating)? Is it a high-pressure oil line or a low-pressure sewer line? This will dictate the required strength of the clamp. What is the fluid? If it's potable water, you need a clamp with a certified EPDM gasket.
- Select the Right Product: With the information from the first three steps, you can now confidently choose the right product. Our catalog is organized to help with this. We have clamps for different materials, different pressures (up to PN140), and different configurations (straight pipe, bell joints, tees).
| Pipe Material | Common Damage | Key Consideration | Recommended Solution |
|---|---|---|---|
| Steel / DI | Pinhole, Crack | Pressure, Corrosion | Stainless Steel repair Clamp |
| HDPE / PVC | Crack, Puncture | Flexibility, No Crushing | Wide-Band, Low-Torque Clamp |
| AC | Circumferential Break | Fragile, Asbestos Safety | Lightweight AC-Specific Clamp |
| DI Joint | Gasket Failure | Joint Type (Bell/Flange) | Bell Joint Repair Clamp |
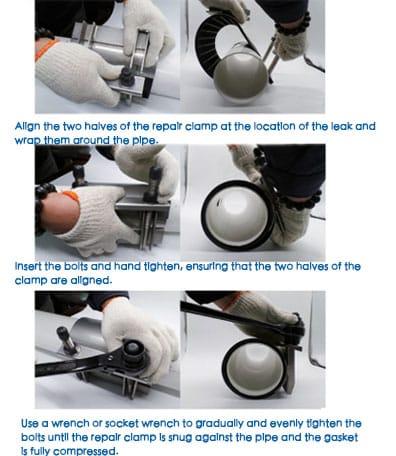
Step-by-Step Guide to Fixing a Pipe Leak with a Clamp?
Installing a repair clamp seems simple. But one small mistake in the process can cause the repair to fail, wasting the clamp and your valuable time.
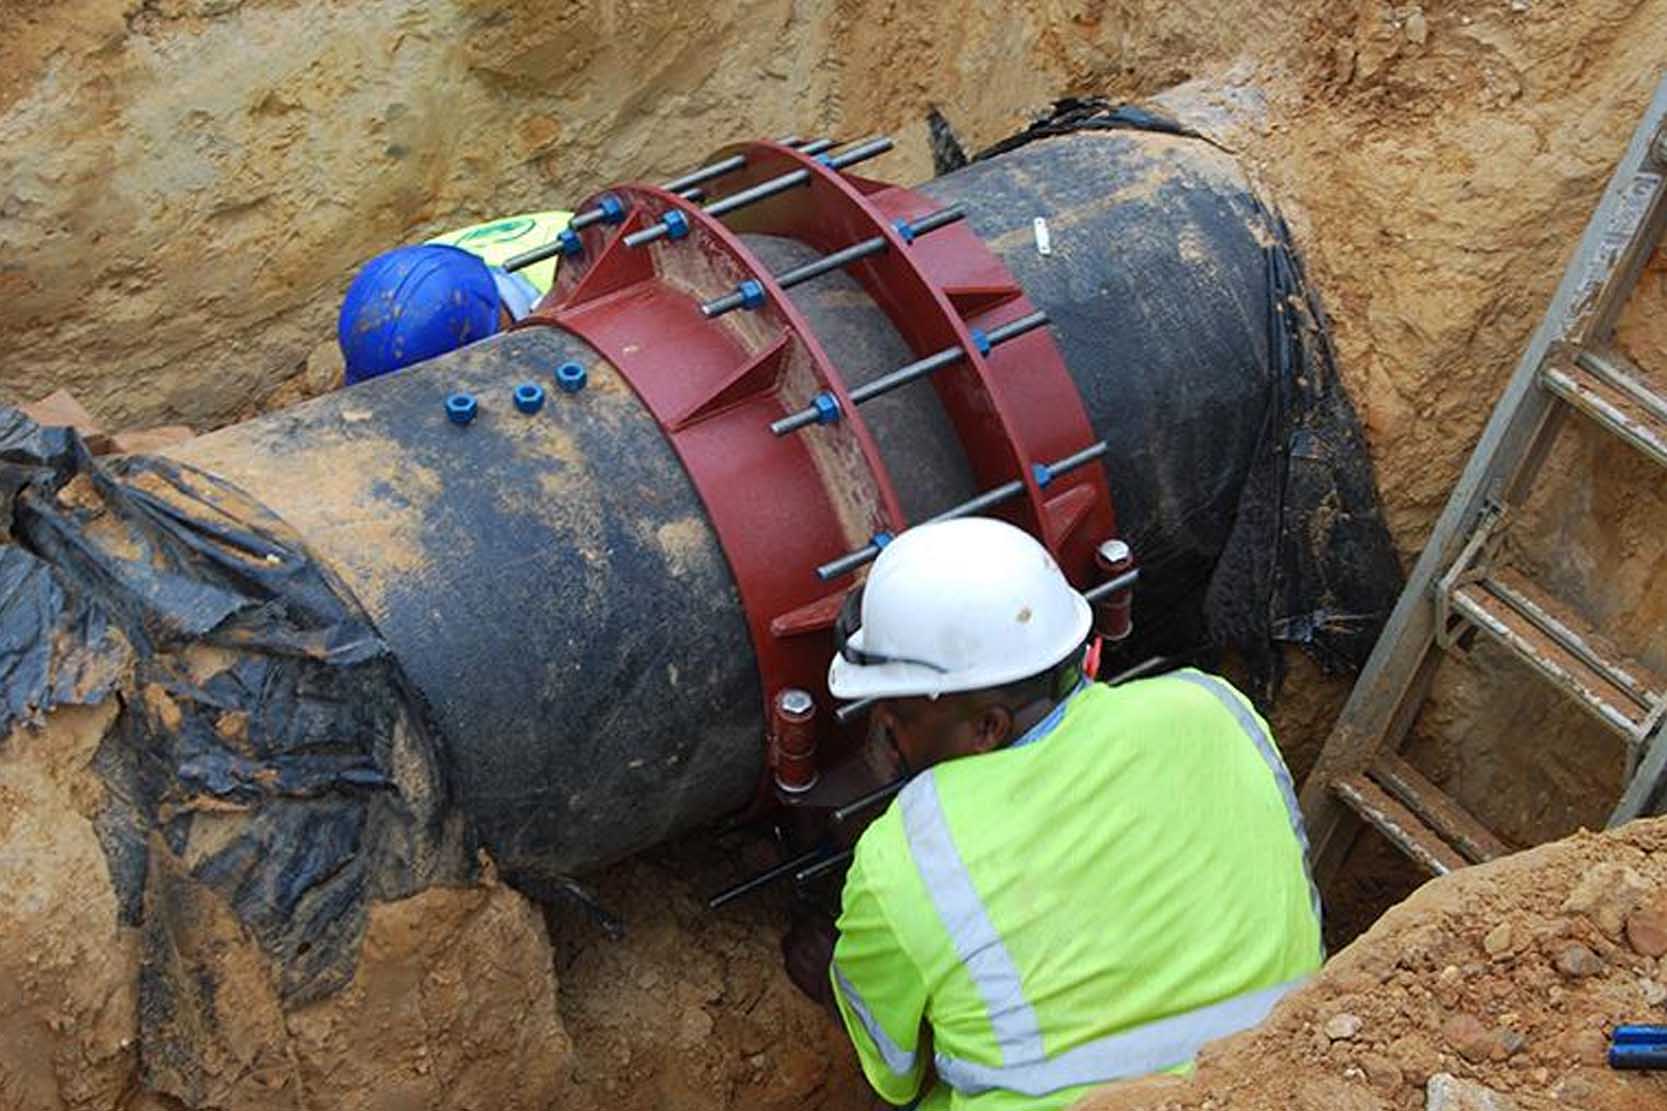
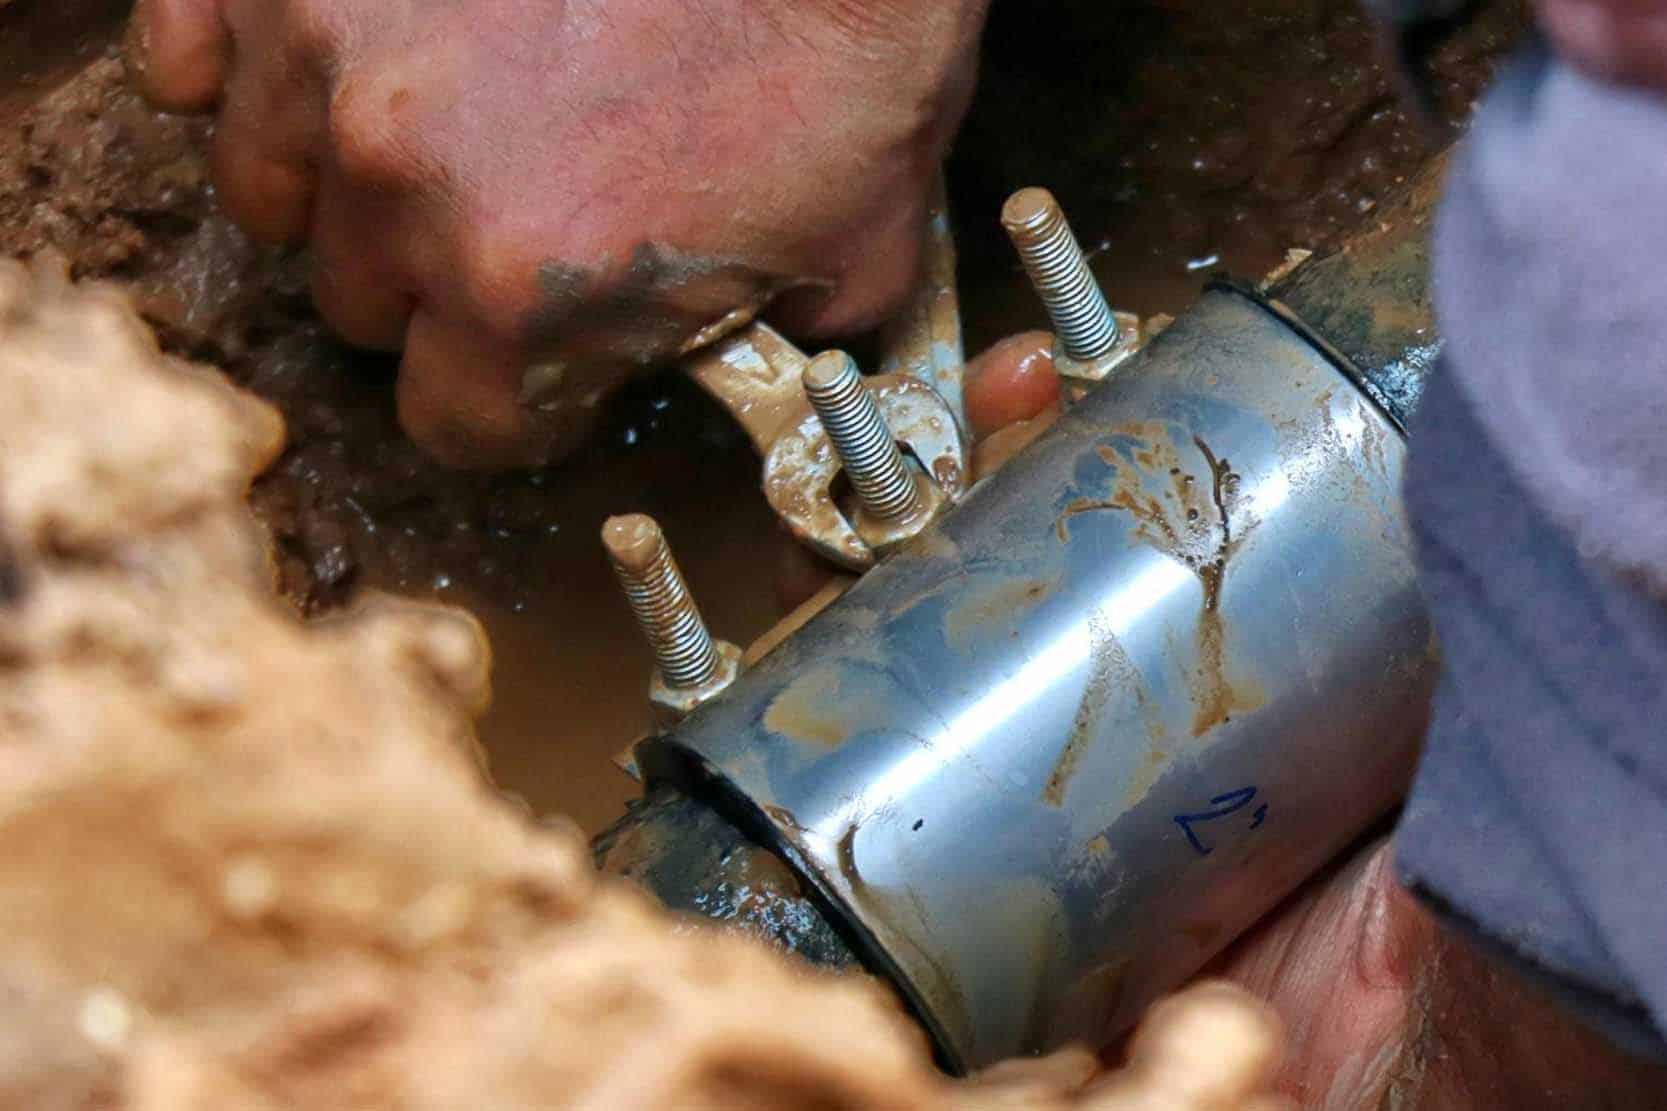
First, clean and measure the pipe's outside diameter. Select the correct clamp size. Open the clamp and position the gasket squarely over the leak. Then, bring the clamp body together and insert the bolts. Tighten the bolts evenly and incrementally to the recommended torque for a secure seal.
Proper installation is just as important as choosing the right clamp. I want to walk you through the exact steps we teach our clients to ensure a perfect, leak-free repair every single time. Follow these, and you won't go wrong.
The Installation Process
- Safety First: Before you do anything, ensure the site is safe. If possible, reduce the pressure in the line. This isn't always an option, but it makes the job easier and safer.
- Prepare the Surface: The gasket needs a clean, smooth surface to seal against. Use a wire brush or scraper to remove all dirt, rust, loose paint, and debris from the pipe around the leak. The cleaner the pipe, the better the seal.
- Measure the Pipe: Use a pi-tape or calipers to get an accurate measurement of the pipe's outside diameter (OD). Don't guess. Use this measurement to confirm you have the correct clamp size. Every clamp has a specific OD range it will fit.
- Position the Clamp: Open the clamp. Mark the center of the leak on the pipe. Carefully place the clamp over the pipe so that the gasket is centered perfectly over that mark.
- Tighten the Bolts: Bring the two halves of the clamp together. Insert the bolts and hand-tighten the nuts. Now, using a torque wrench, tighten the bolts as per installation instruction,different repair clamps require different bolt tightening methods and sequences.This ensures even pressure. Slowly bring the bolts up to the manufacturer's recommended torque value. Do not over-tighten.
- Final Check: Once tightened, visually inspect the clamp to ensure it is seated properly. Slowly bring the pressure back up and check carefully for any leaks.
Tools and Materials Needed for Pipeline Leak Repair?
Showing up to a job site without the right tools is a recipe for failure. A proper pipe repair requires more than just a clamp and a wrench.
For a professional pipeline leak repair, you will need personal protective equipment (PPE), tools for cleaning the pipe (wire brush), a measuring device (pi-tape), the correct size and type of repair clamp, and a calibrated torque wrench for proper tightening.
Being prepared is half the battle. After years of seeing repairs succeed and fail, I can tell you that the ones that succeed start with a well-stocked truck. You need to have the right gear on hand before you even get into the trench.
The Essential Toolkit
Here is a checklist of what our most successful clients carry for every repair job.
- Safety Gear (PPE): This is non-negotiable. At a minimum, you need gloves, safety glasses, and steel-toed boots. If you're working with AC pipe, you'll need respiratory protection as well.
- Cleaning Tools: A sturdy wire brush is essential for removing rust and dirt. A scraper can help with tougher scale or old coatings.
- Measuring Tools: A pi-tape is the most accurate way to measure the outside diameter of a pipe. Calipers or even a standard measuring tape can also work. You need an accurate OD to select the right clamp.
- The Repair Clamp: This seems obvious, but make sure you have the right one for the job. Check the material, pressure rating, and size range before you leave the shop. It’s always a good idea to carry a few common sizes.
- Wrenches: You'll need a set of socket or spanner wrenches that fit the nuts on the clamp.
- A Calibrated Torque Wrench: This is the most important tool for installation. Guessing the torque is the #1 cause of failed repairs. Over-tightening can damage the pipe or the clamp, while under-tightening will result in a leak.
Common Mistakes That Lead to Repair Failure?
You've done the repair, but it's still leaking. This is incredibly frustrating. It's almost always due to a few common, easily avoidable mistakes.
The most common mistakes in pipe repair are choosing the wrong size clamp, failing to properly clean the pipe surface before installation, and not using a torque wrench to tighten the bolts evenly. Any of these errors can cause the repair to fail immediately or over time.
I want your repairs to be successful. That's good for you and good for my business. So let me be direct about the mistakes I see people make over and over again. If you can avoid these pitfalls, your success rate will go way up.
The Top 3 Repair Killers
- Wrong Size Clamp: This is the most frequent error. The clamp has a specific range it can seal. If your pipe's outside diameter is outside that range, it will not seal properly. You might be at the very top of the range, meaning the gasket is barely compressed, or at the bottom, meaning the clamp bottoms out before the gasket is tight. Always measure the pipe OD and check it against the clamp's stated range.
- Dirty Pipe Surface: The gasket in the clamp needs a clean, smooth surface to seal against. I've seen people try to install a clamp over dirt, rust scale, and even old paint. The gasket cannot seal against an uneven, dirty surface. It will find a leak path. Take the extra five minutes to clean the pipe properly with a wire brush. It's the best investment you can make in the repair.
- Improper Tightening: People either guess the torque or they tighten one side of the clamp all the way down before starting on the other. Both are wrong. You must use a torque wrench to achieve the correct bolt tension, and you must tighten the bolts incrementally and in an alternating pattern to ensure the clamp closes evenly. This even pressure is what creates a reliable, 360-degree seal.
Final Inspection Checklist After Pipeline Leak Repair?
The bolts are tight and the leak has stopped. You might think the job is done, but there is one more critical step: the final inspection.
After repair, visually inspect the clamp to ensure it's seated evenly on the pipe. Check that the bolt torques are correct. Then, slowly re-pressurize the line and carefully check the clamp and the surrounding area for any signs of weeping or leakage.
The final check is your quality control. It's the step that lets you walk away from the job site with confidence, knowing you've done a professional job that will last. Don't skip it.
Your Post-Repair Quality Check
Before you start backfilling the trench, run through this simple checklist.
- Visual Clamp Check: Walk around the clamp. Does it look parallel to the pipe? Are the gaps between the clamp halves even on both sides? It should not look crooked or skewed.
- Final Torque Check: Go back over the bolts one last time with your torque wrench, again in a star pattern. Make sure every bolt is at the specified torque. Sometimes bolts can settle slightly after the initial tightening.
- Leak Test: This is the moment of truth. If you had reduced the pressure, bring it back up to normal operating pressure slowly. Watch the edges of the clamp gasket closely. Look for any signs of moisture, drips, or weeping. Use a dry cloth to wipe the area to make sure.
- Document the Repair: Take a photo of the completed installation. Note the date, location, pipe details, and the type of clamp used. This information is invaluable for future maintenance and asset management.
Once it passes all these checks, you can be confident that you have a solid, permanent repair.
Conclusion
Choosing the right leak repair method saves time, money, and future headaches. A high-quality, properly installed repair clamp is often the best permanent solution for many different pipe materials.
