A sudden pipeline leak can disrupt service for thousands and create costly emergencies. You need a fast, reliable repair, but pipe replacement takes too much time and money.
The fastest way to repair most municipal water pipeline leaks is by using a repair clamp or a pipe coupling . These solutions do not require cutting the pipe or shutting down the system for long periods. They are designed for quick installation to seal leaks effectively.

I've been in the pipeline fittings business for 30 years, and I've seen it all. A frantic call about a leak is a common start to my day. The good news is that for most municipal systems, the fix is simpler and cheaper than you might think. You just need the right tools and knowledge. Let's walk through how you can handle these situations quickly and efficiently, so you can get the water flowing again without breaking your budget.
What Causes Municipal Water Pipeline Leaks?
You've found a leak, but do you know what caused it? Ignoring the root cause is a recipe for repeat failures and escalating costs down the line.
The most common causes of municipal pipeline leaks are corrosion, joint failure, ground movement, and poor installation. Material defects are rare. Usually, external factors or human error are the real culprits behind the leak.
In my experience, the pipe itself is rarely the problem, especially high-quality ductile iron pipes . They are incredibly stable. The real issues often come from the environment or how the pipe was installed. Municipal water lines are typically low-pressure systems (PN ≤ 25), so dramatic bursts are uncommon. Instead, you'll find persistent, costly leaks. Understanding why they happen is the first step to a permanent fix. For example, I've seen more leaks caused by someone forgetting to properly tighten a bolt than by a faulty pipe. These small mistakes have big consequences. Let's break down the common causes by pipe material.
| Pipe Material | Common Leak Causes | My Notes |
|---|---|---|
| Ductile Iron (DI) | Joint failure, external corrosion (pitting), gasket aging. | DI is strong, but vulnerable at joints and to aggressive soil. Prevention is key. |
| HDPE | Faulty fusion joints (butt or electrofusion), cracks from stress. | The pipe is flexible, but the connection points are critical. A bad weld is a future leak. |
| PVC | Brittle cracking from age or impact, joint failure. | PVC gets brittle over time. It's less forgiving than DI or HDPE to ground shifts or pressure spikes. |
How Do You Identify the Type and Severity of a Pipeline Leak?
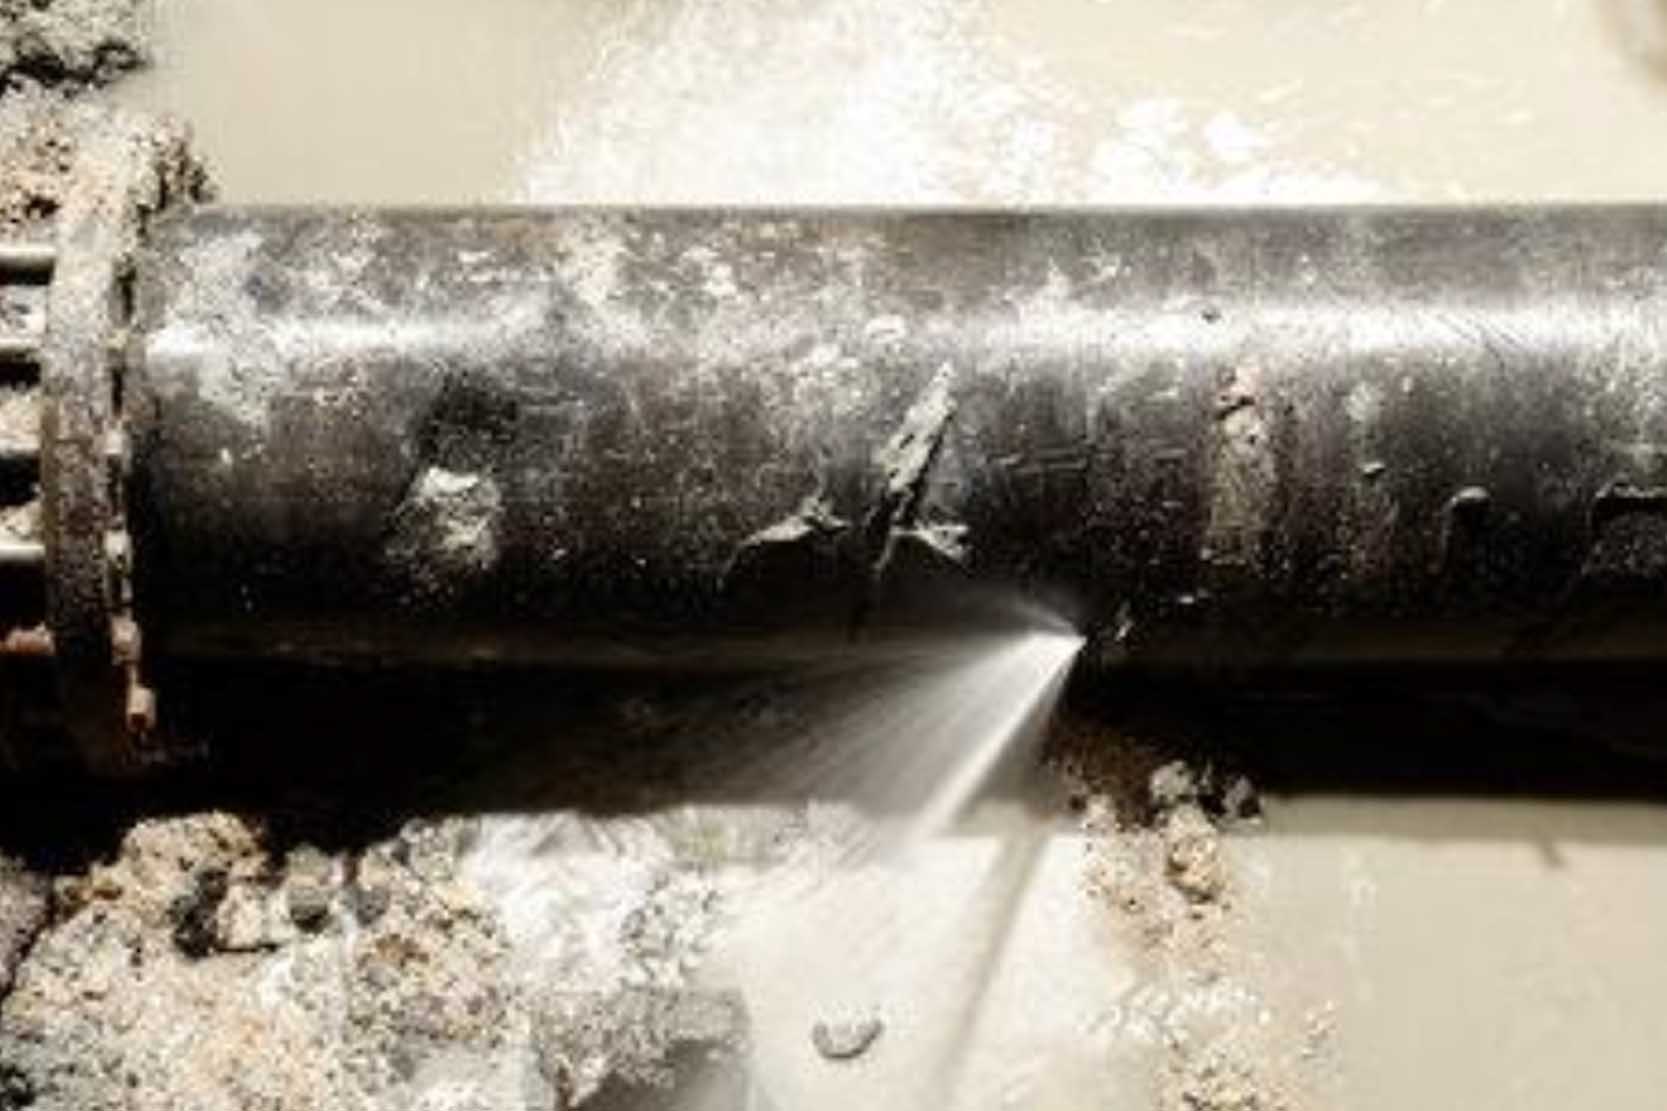
A small surface drip and a high-volume spray require different responses. Misjudging the leak's severity can lead to a failed repair or a much bigger emergency later on.
First, visually inspect the leak to determine its type (drip, spray, stream) and flow rate. Use acoustic leak detection equipment for non-visible underground leaks to pinpoint the exact location and estimate severity.
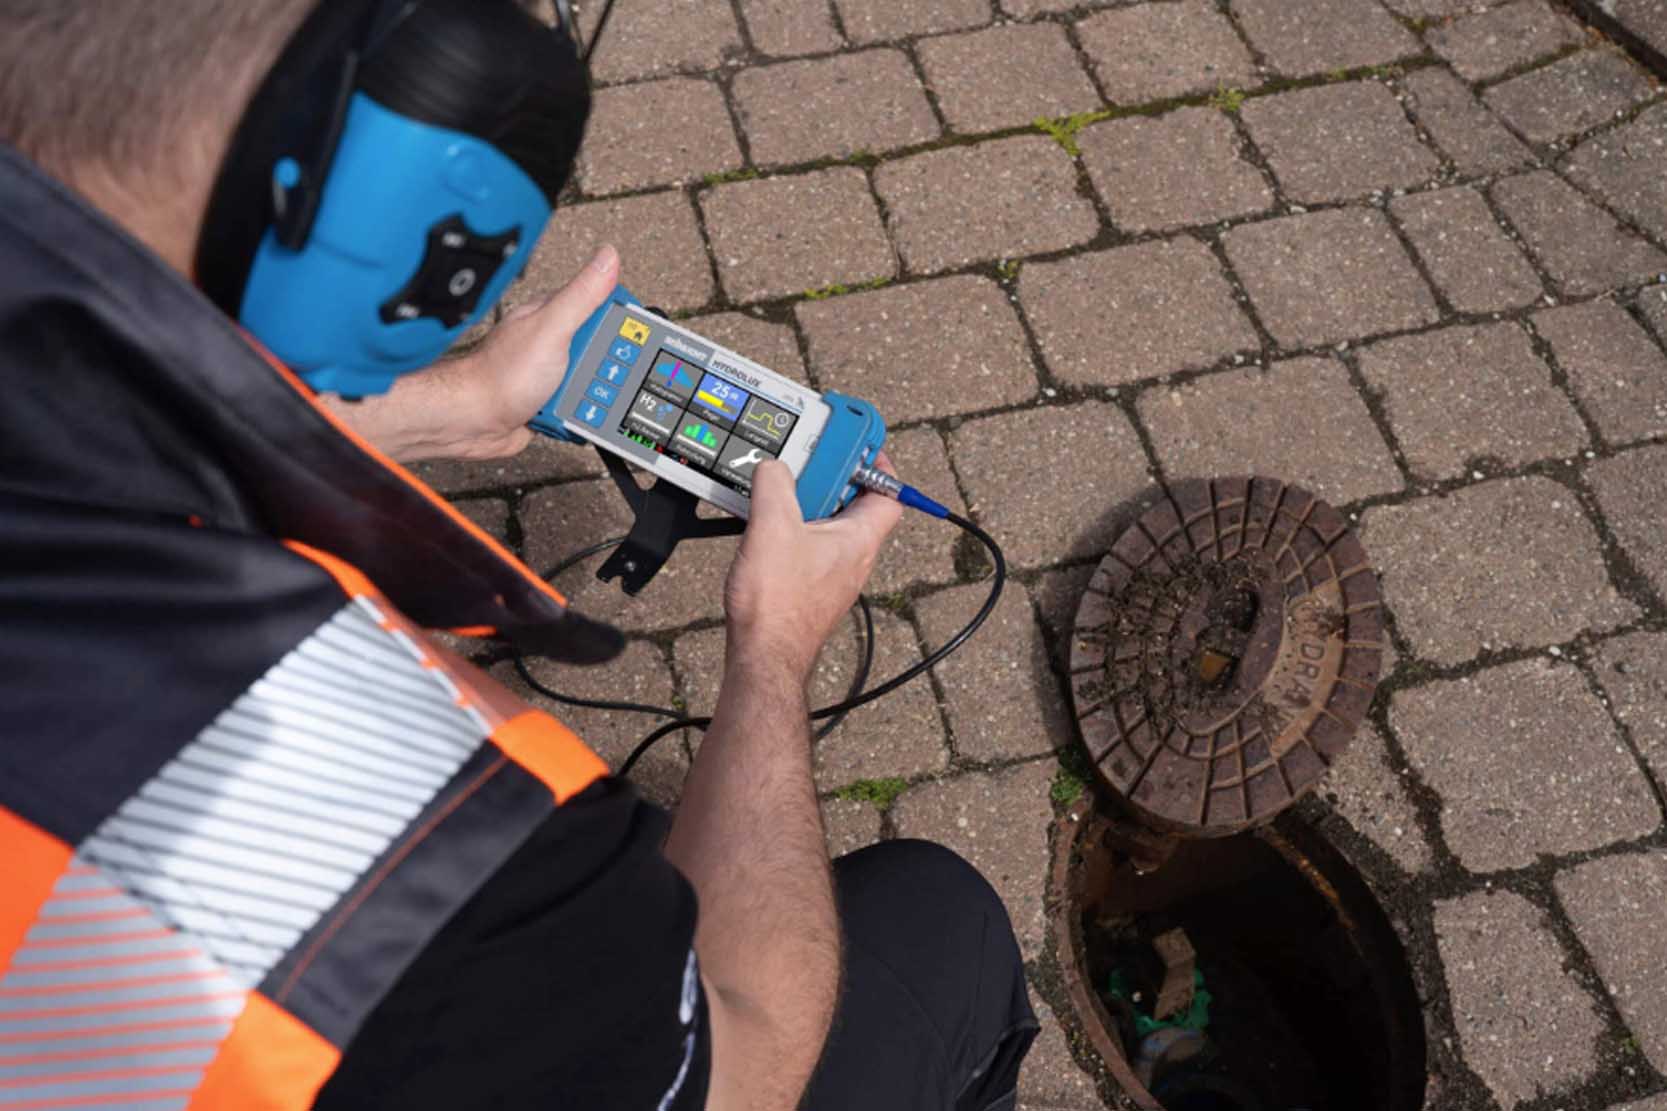
Before you can choose a repair method, you have to be a detective. The first clue is what you can see. Is it a slow weep at a joint or a steady stream from a crack? A simple visual check tells you a lot. But what about leaks you can't see? That’s where technology comes in. Acoustic detectors are like a stethoscope for your pipeline, letting you hear the "hiss" of escaping water underground. This helps you find the exact spot without massive excavation. I once consulted on a project where a city was losing millions of gallons a week. They couldn't find the source. With acoustic equipment, we located a single, hidden crack in a main line in under a day. The severity of the leak determines your next move. A small pinhole might be a simple clamp job, while a larger fracture might need a more robust coupling or even a section replacement.
What Is the Fastest Way to Repair a Water Pipeline Leak?
Your team is on-site, the water is leaking, and the clock is ticking. You need the fastest solution that is also reliable, without a full-scale construction project.
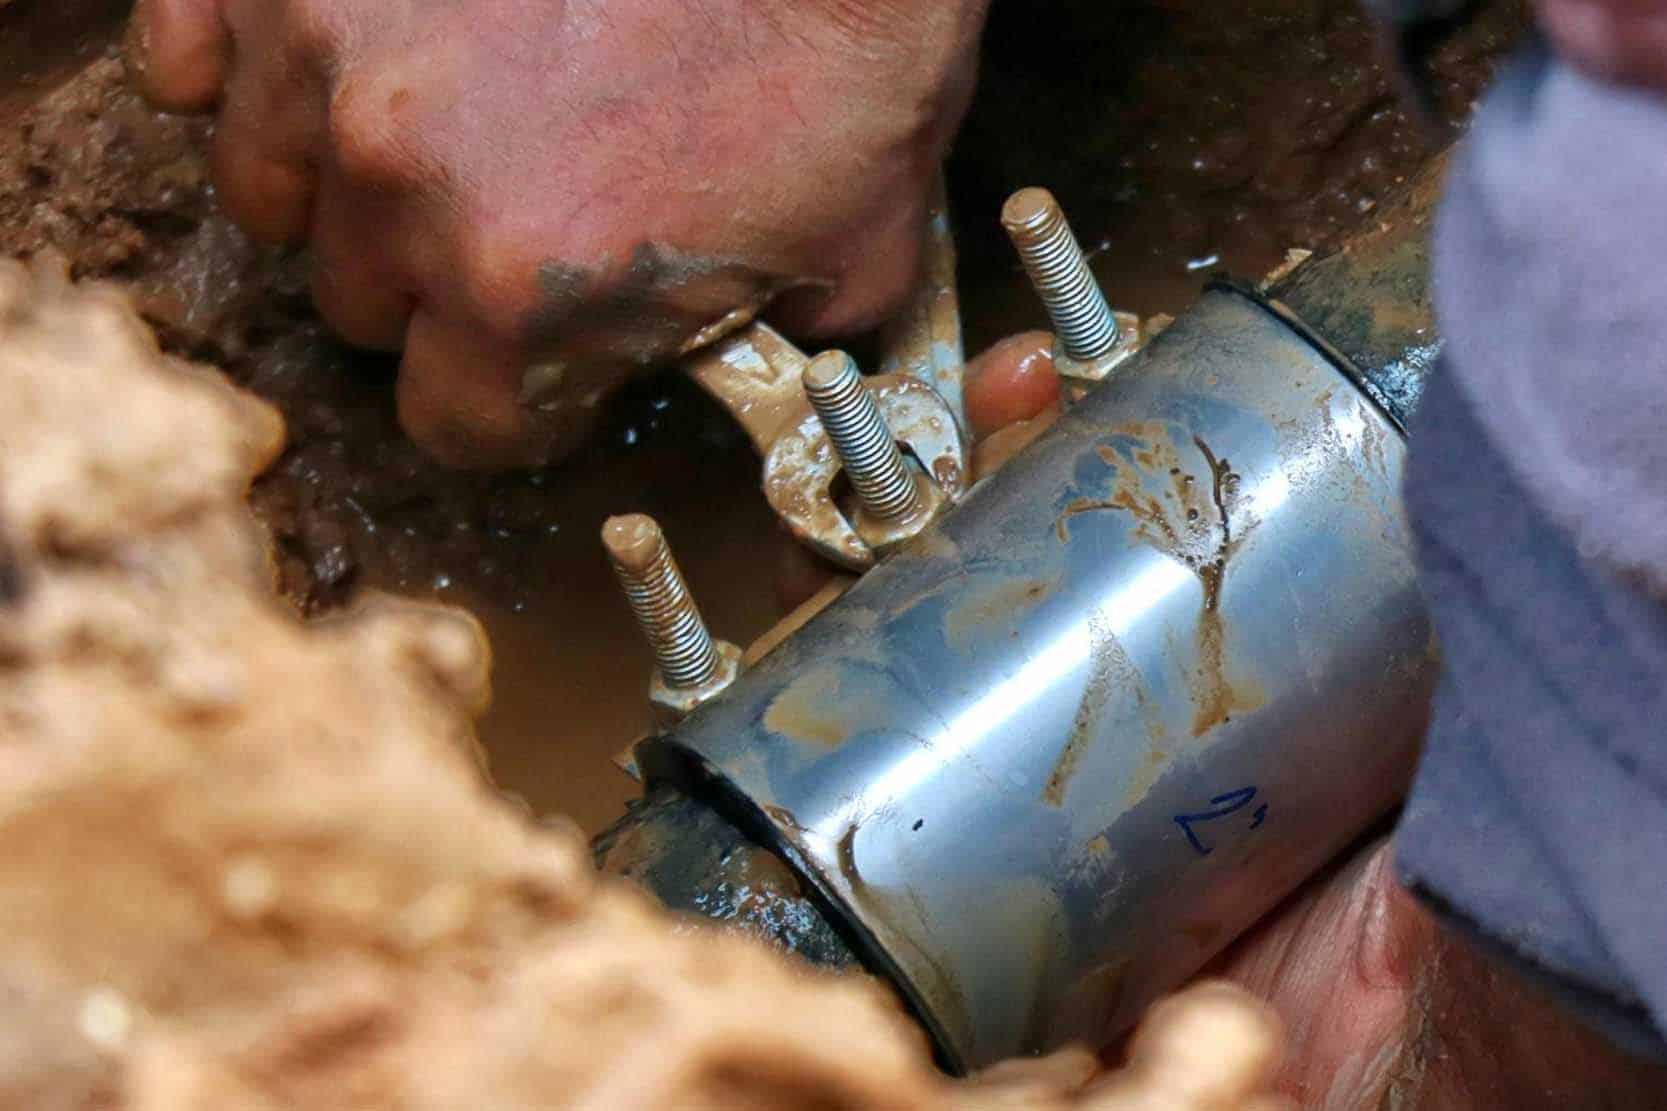
The quickest method is installing a repair clamp. These devices wrap around the pipe and use a gasket to seal the leak. They can often be installed in under an hour.
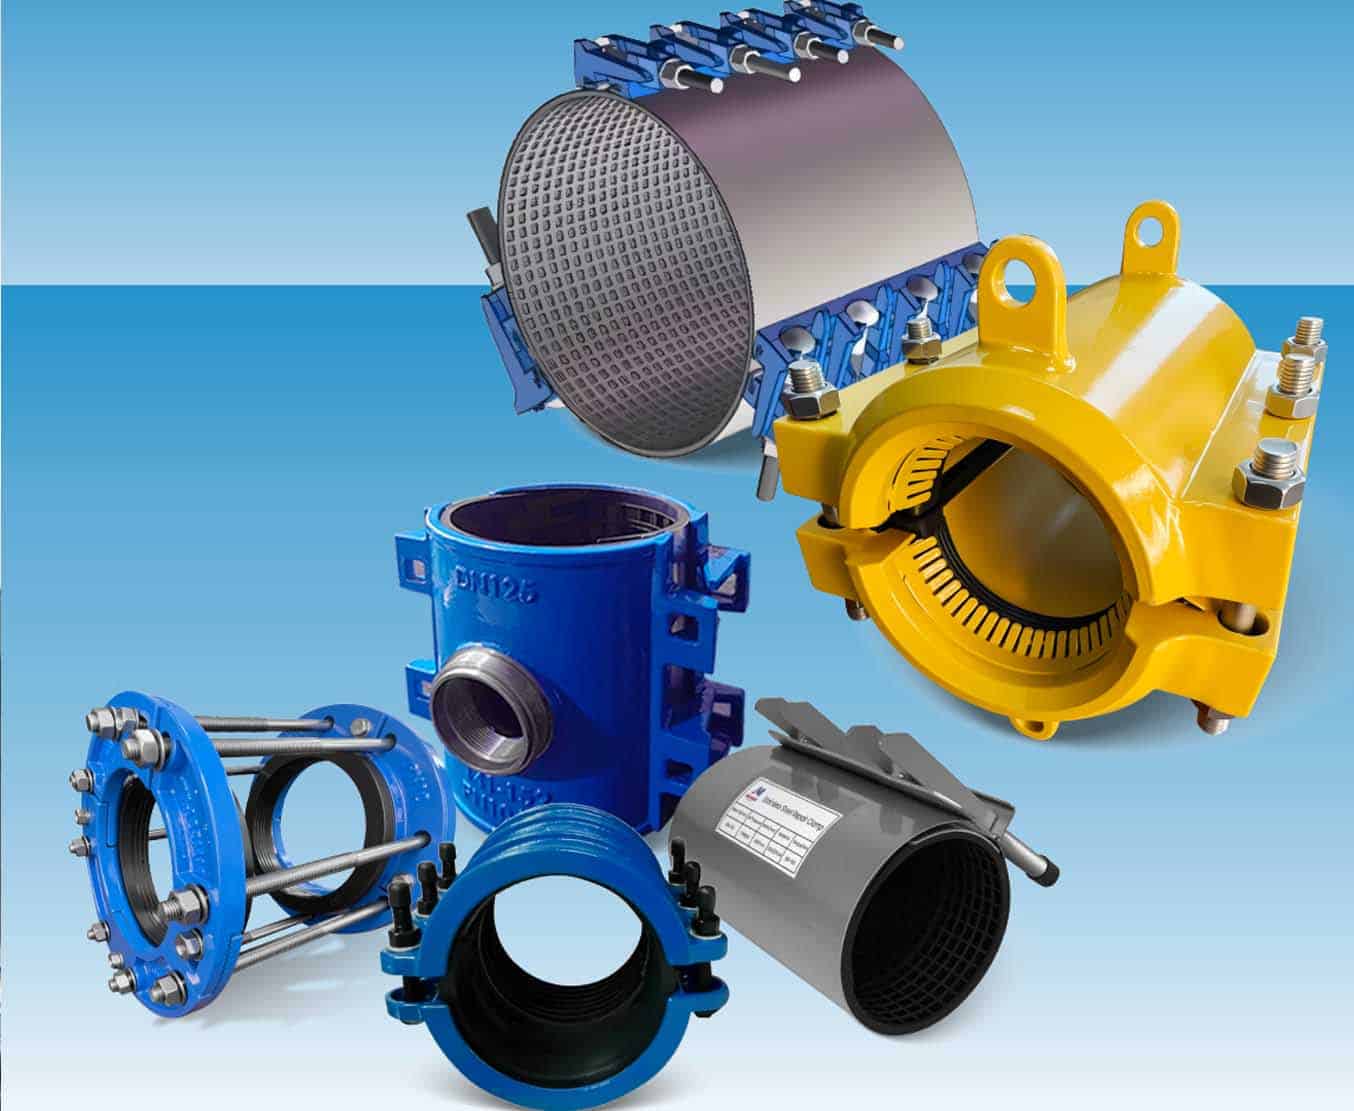
When it comes to speed, nothing beats a repair clamp. Think of it like a high-tech bandage for your pipe. You don't need to cut the pipe, which saves an incredible amount of time and avoids major service disruptions. Most municipal leaks—like pinholes from corrosion, small cracks, or joint drips—are perfect candidates for this fix. The process is straightforward: clean the pipe surface, open the clamp, position it over the leak, and tighten the bolts. The pressure from the clamp compresses a rubber gasket, creating a tight seal. In our factory, we've designed clamps with a special waffle-pattern gasket. This design creates multiple seal points and channels any escaping water, ensuring an even tighter grip as the bolts are torqued. For low-pressure municipal lines, a standard stainless steel or ductile iron repair clamp is usually all you need. It’s a low-cost, highly effective solution that gets the job done fast.
Clamp vs. Coupling vs. Pipe Replacement: Which Solution Should You Choose?
You have options for repair, but choosing the wrong one can be a costly mistake. A clamp is fast, but is it the right long-term choice for your specific problem?
Choose a repair clamp for small holes and cracks. Use a coupling for larger damage or joining pipe ends. Opt for full pipe replacement only for severe, widespread corrosion or structural failure.
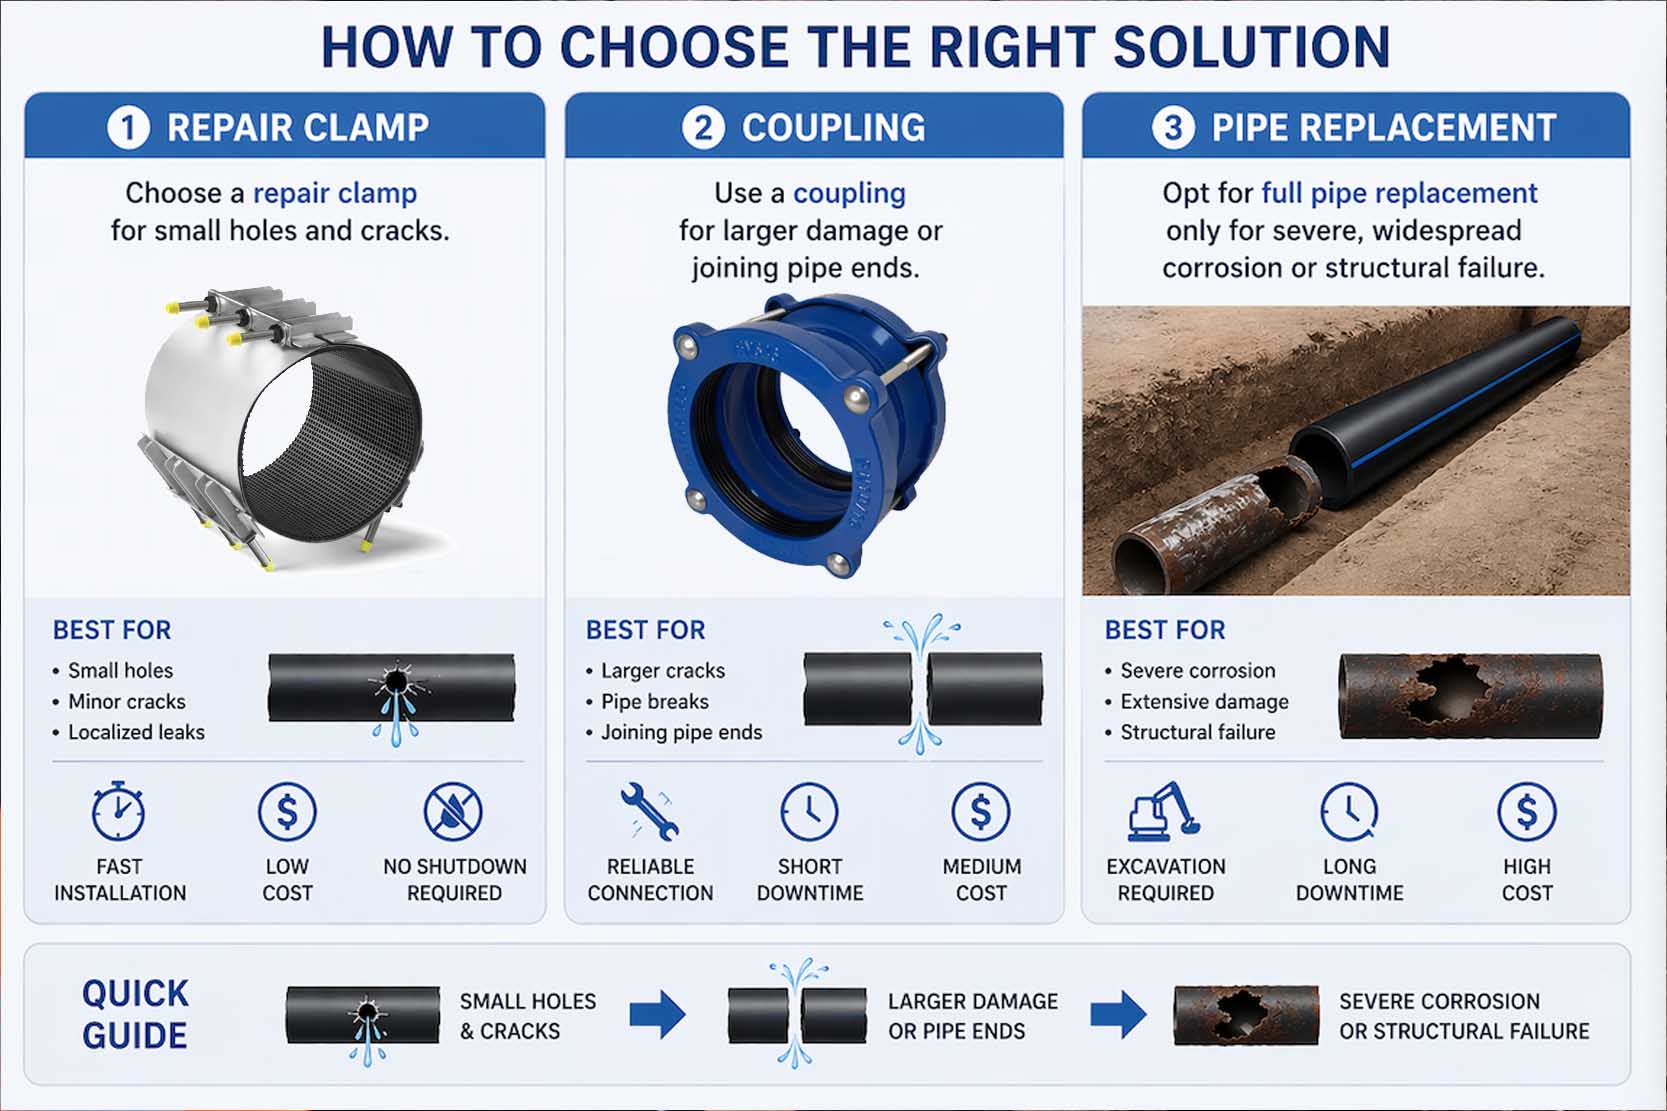
Making the right call here saves time, money, and future headaches. It’s about matching the solution to the problem. Over my 30 years, I’ve developed a simple framework for this decision. A repair clamp is your go-to for localized, non-structural damage. Think of pinholes, small longitudinal cracks, or minor joint leaks. It’s a patch. A pipe coupling, on the other hand, is more like a splint. It's used when you have to cut out a damaged section of pipe. The coupling reconnects the two healthy ends, restoring structural integrity. It's also great for situations where a pipe has pulled apart slightly. Full pipe replacement is the last resort. You only do this when the pipe is fundamentally compromised—for example, if a long section is severely corroded or has multiple fractures. It's the most expensive and disruptive option, so you should avoid it unless absolutely necessary.
Here’s a simple table to help you decide:
| Solution | Best For | Speed | Cost | When to Use |
|---|---|---|---|---|
| Repair Clamp | Pinhole leaks, small cracks, damaged joints. | Very Fast (under 1 hour) | Low | When the pipe's structural integrity is still good. |
| Repair Coupling | Large cracks, circumferential breaks, joining cut pipes. | Fast (1-3 hours) | Medium | When a damaged section must be removed. |
| Pipe Replacement | Severe corrosion, multiple large failures, pipe burst. | Slow (Days) | High | When the pipe is no longer safe to operate. |
How Do You Repair a Pipe Leak Using a Repair Clamp (Step-by-Step Guide)?
You've decided a repair clamp is the right tool for the job. But improper installation can cause the repair to fail. What are the exact steps for a perfect seal?
To install a clamp, first clean the pipe surface. Then, position the clamp over the leak, ensuring the gasket is centered. Finally, tighten the bolts evenly to the specified torque.
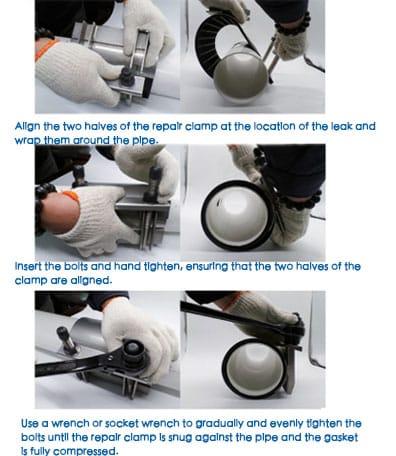
Using a repair clamp is simple, but precision is everything. A sloppy job will fail, I guarantee it. I've seen it happen. A crew rushes the job, doesn't clean the pipe properly, and a week later, they're back at the same spot. Don't be that crew. Follow these steps carefully for a lasting repair. First, shut off the pressure if possible and prepare the pipe surface. It must be free of dirt, rust, and old coatings. A wire brush is your best friend here. The goal is a smooth, clean surface for the gasket to seal against. Next, open the clamp and wrap it around the pipe. Make sure the center of the gasket is directly over the leak. This is critical. Then, begin tightening the bolts. Don't just crank down on one bolt. Tighten them in an alternating, even pattern, like you would with lug nuts on a car tire. This ensures even pressure across the gasket. Use a torque wrench to tighten to the manufacturer's specification. Overtightening can damage the clamp or pipe, while undertightening will cause it to leak.
How Do You Use Pipe Couplings for Emergency Leak Repair?
Sometimes the damage is too big for a simple clamp. A section of pipe is cracked all the way around, and you need a more heavy-duty solution fast.
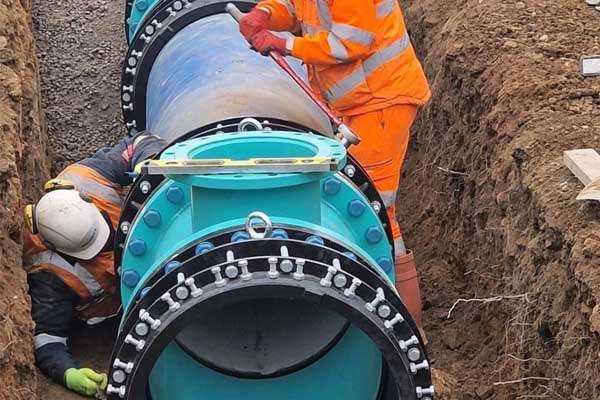
For large cracks or breaks, cut out the damaged pipe section. Slide a wide-range coupling over one pipe end, align the new pipe piece, and then center the coupling over the joint to connect them.
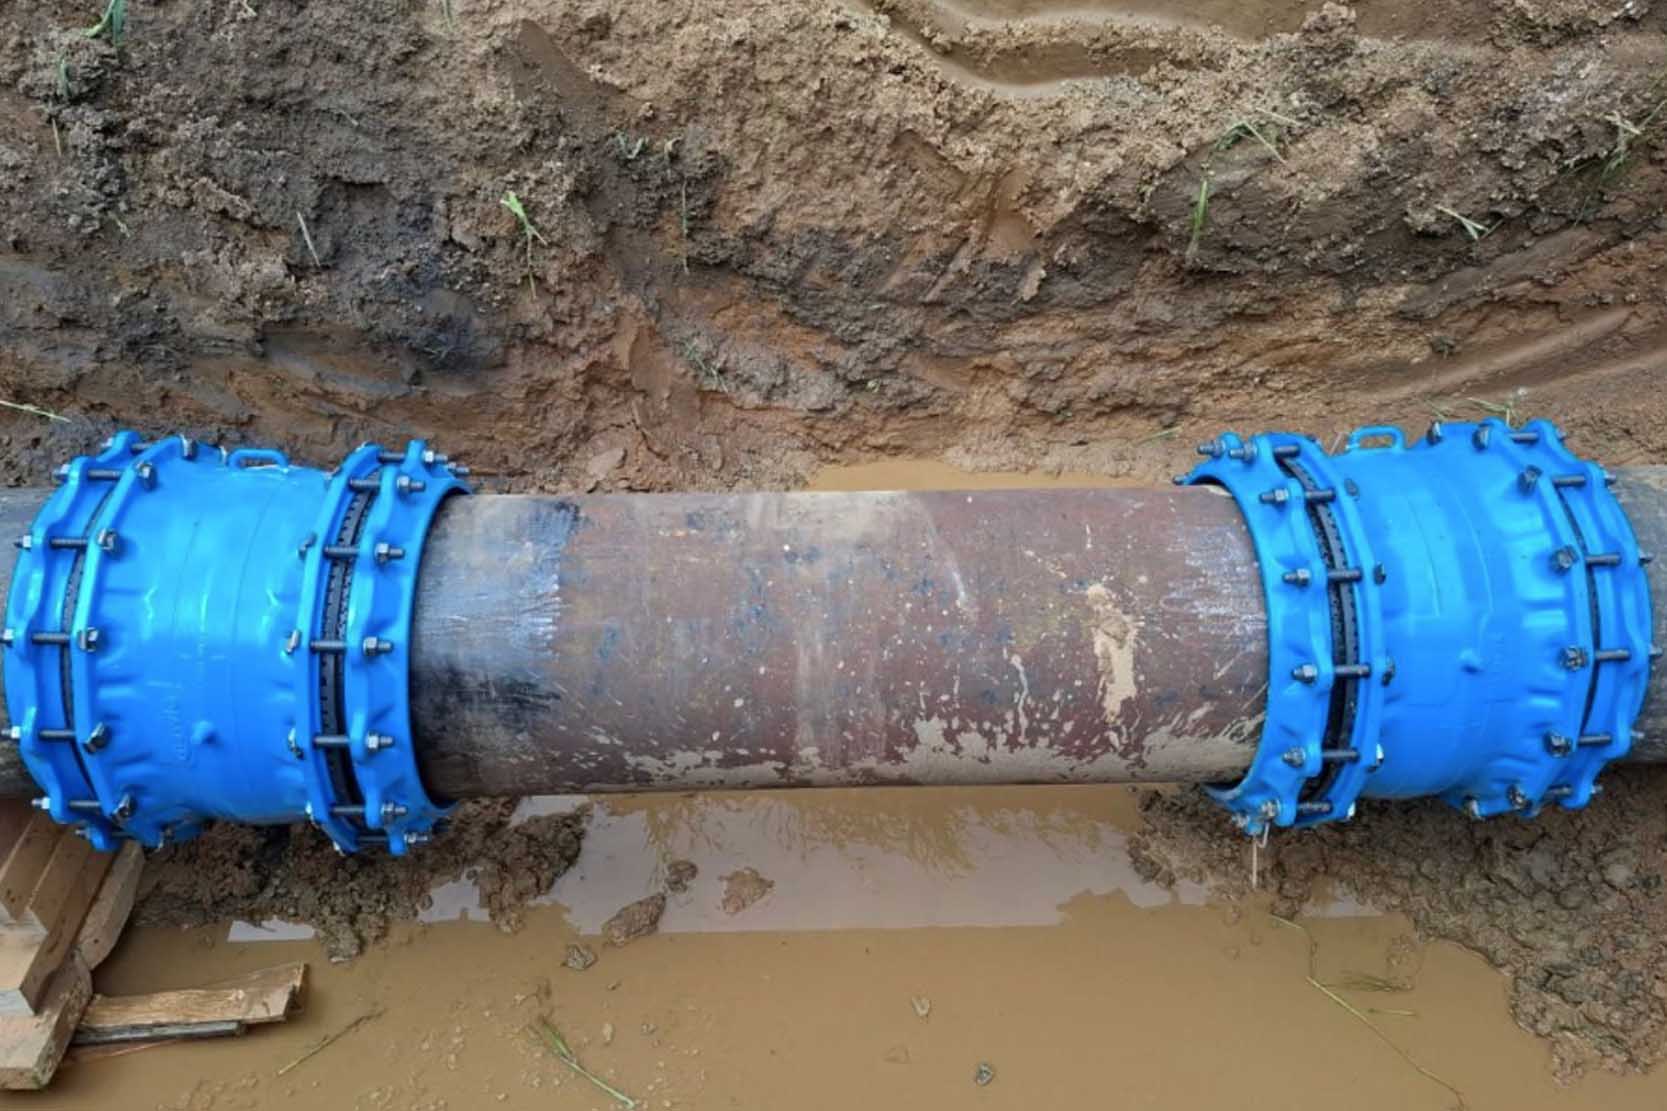
Couplings are your problem-solvers for more serious damage. Unlike a clamp that just patches a hole, a coupling creates a new, solid connection. They are perfect when you have to cut out a piece of damaged pipe. The process is a bit more involved than with a clamp but still much faster than replacing a full pipe length. First, you have to precisely cut out the failed section. Make sure your cuts are clean and square. Next, you prepare the ends of the existing pipe, cleaning them just like you would for a clamp. Then, you slide the coupling completely onto one side of the pipe. You can then insert your replacement pipe piece, and slide the coupling back over the gap so it's centered between the old and new pipe. Finally, tighten the bolts evenly to the correct torque. The coupling's gasket will seal both pipe ends, creating a strong, flexible, and leak-proof joint. Wide-range couplings are especially useful here because they can accommodate slight differences in pipe diameter.
How Do You Repair Leaks in Different Pipe Materials (DI, HDPE, PVC)?
A repair that works for a rigid ductile iron pipe might not be right for flexible HDPE. Do you need different clamps or techniques for different pipe materials?
Yes, the approach varies. For ductile iron and PVC, standard repair clamps work well. For HDPE, you may need clamps with wider bands or specific couplings designed for flexible pipes to prevent crushing.

While the basic idea of a clamp is universal, the details matter when dealing with different materials. Each pipe type has its own personality. Ductile iron (DI) is strong and rigid. Standard ductile iron or stainless steel repair clamps are perfect for it. The key is to address the common cause, which is often joint failure or external corrosion. For PVC pipes, you can also use standard clamps. However, be careful with brittle, aged PVC. Overtightening a clamp can cause it to crack further. Use a torque wrench and be gentle. HDPE is the tricky one. It's a flexible material. If you use a narrow, aggressive clamp, you risk crushing or deforming the pipe, which will create a new leak. For HDPE, it's better to use clamps with a wider band to distribute the pressure more evenly. Or, even better, use couplings specifically designed for poly pipes. These often have internal stiffeners to support the pipe wall during tightening, ensuring a secure seal without damaging the pipe itself.
What Are Common Mistakes That Cause Repair Clamp or Coupling Failure?
You've installed a brand-new clamp, but a week later, it's leaking again. What went wrong? A failed repair costs twice as much in time and resources.
The most common mistakes are poor surface preparation, uneven bolt tightening, and choosing the wrong size or type of clamp. These simple errors are the primary cause of repair failures.
I can't stress this enough: most repair failures are due to human error, not product defects. It's the small details during installation that make all the difference. I've seen crews make the same preventable mistakes over and over. The number one error is not cleaning the pipe surface properly. Any dirt, rust, or debris left under the gasket creates a path for water to escape. It must be perfectly clean. The second major mistake is uneven or incorrect bolt torque. Many people just tighten the bolts until they feel tight. This is wrong. You must use a torque wrench and tighten in a star or cross pattern to apply even pressure. This ensures the gasket seals uniformly. Another common issue is using the wrong product. Using a clamp that's too small or too large for the pipe diameter, or using a light-duty clamp on a high-pressure spot, is a guaranteed failure. Always measure the pipe's outside diameter carefully and select a clamp with the correct range.
When Is a Clamp Repair Not Enough (When to Replace the Pipe)?
A clamp is a quick fix, but it's not a miracle cure for every problem. How do you know when you're just putting a bandage on a problem that needs surgery?
A clamp is not enough when the pipe has lost its structural integrity. This includes long cracks, severe and widespread corrosion, or if the pipe is visibly deformed or oval-shaped.
Knowing the limits of a repair clamp is a mark of a true professional. A clamp seals a leak; it does not restore strength to a weakened pipe. If you put a clamp on a pipe that is about to burst, you are only delaying a catastrophe. You should opt for pipe replacement when you see signs of deep, widespread corrosion. If you can poke holes in the pipe with a hammer or screwdriver, the metal is too far gone. Also, look for long, running cracks. A small, localized crack can be clamped, but a crack that spans a significant portion of the pipe's length is a sign of systemic failure. Another red flag is pipe deformation. If the pipe is bent, oval, or misshapen, a standard clamp won't be able to create a proper seal. In these cases, you must cut out the compromised section and replace it. Trying to "save" a fundamentally bad pipe is not saving money; it's creating a bigger liability.
How Can You Prevent Future Pipeline Leaks in Municipal Systems?
Repairing leaks is reactive. A truly efficient system is proactive. How can you stop leaks from happening in the first place, saving money and preventing emergencies?
Prevent future leaks through proper design, correct installation, and targeted corrosion protection. Most leaks are preventable and are caused by human factors, not material failure.
After 30 years of manufacturing pipeline components, I am certain of one thing: prevention is always cheaper than repair. The most stable pipe in the world, like ductile iron, will fail if not installed or protected correctly. For example, in coastal areas or soils with high salinity, DI pipes need extra anti-corrosion coating. Without it, you're just waiting for pinhole leaks to appear. For above-ground pipes, you must account for axial thrust. Water pressure pushing against bends and ends can literally pull joints apart. Using thrust blocks or restrained joints is not optional; it's essential. The biggest factor, however, is installation quality. Gaskets must be clean and seated correctly. Bolts must be tightened evenly. The pipe trench must be prepared properly to avoid settlement. Investing in training your crews and enforcing strict quality control during installation will prevent 90% of the leaks you're currently fixing.
Conclusion
Fast and effective leak repair is possible with the right clamps and couplings. But the best strategy is always prevention through proper design, installation, and maintenance to ensure system integrity.
