Pump Control Valve
The Multi-Function Pump Control Valve is an automatic control valve installed at the pump outlet to protect the pump and the entire pipeline system.
It controls the pump start and stop process by opening slowly, closing quickly, and then closing slowly to ensure smooth operation without shock or water hammer.
When the pump starts, the valve opens slowly to prevent a sudden impact of flow.
When the pump stops, the valve closes quickly to prevent reverse flow, then closes slowly to absorb the pressure rise and prevent water hammer.
This valve is used widely in municipal water systems, buildings, pump stations, irrigation projects, and any application where pumps start and stop frequently.
Feature
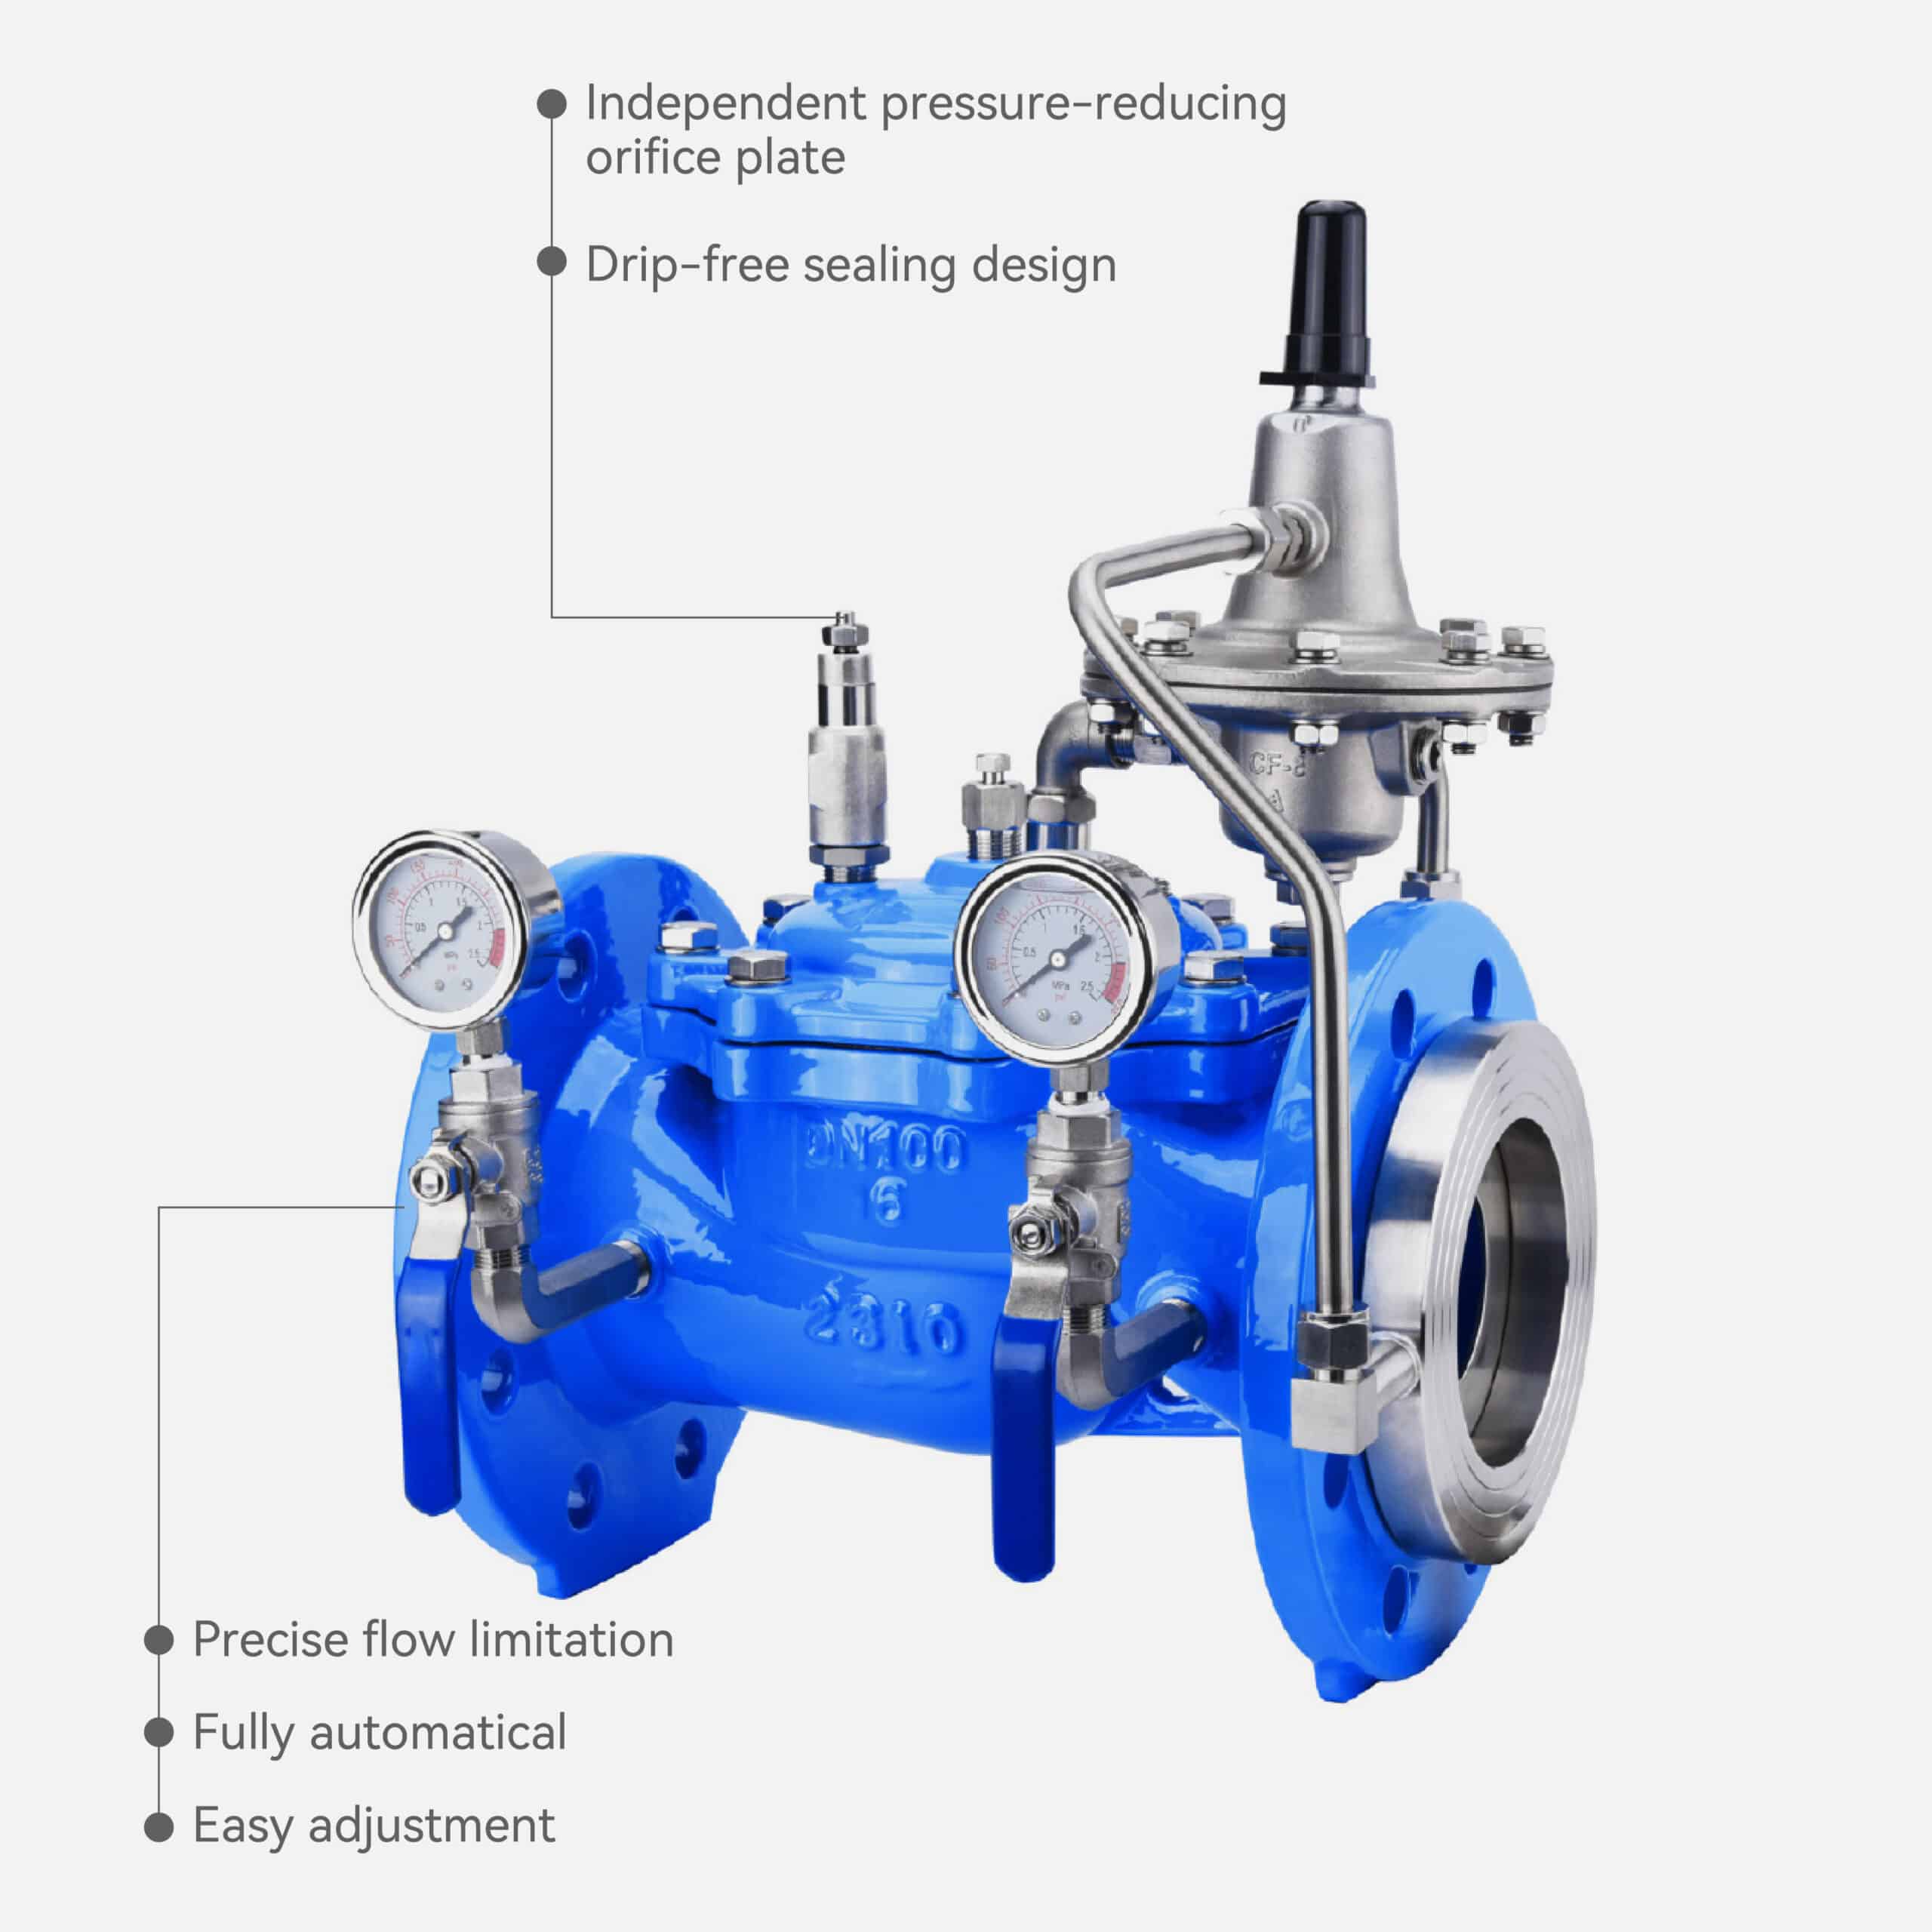
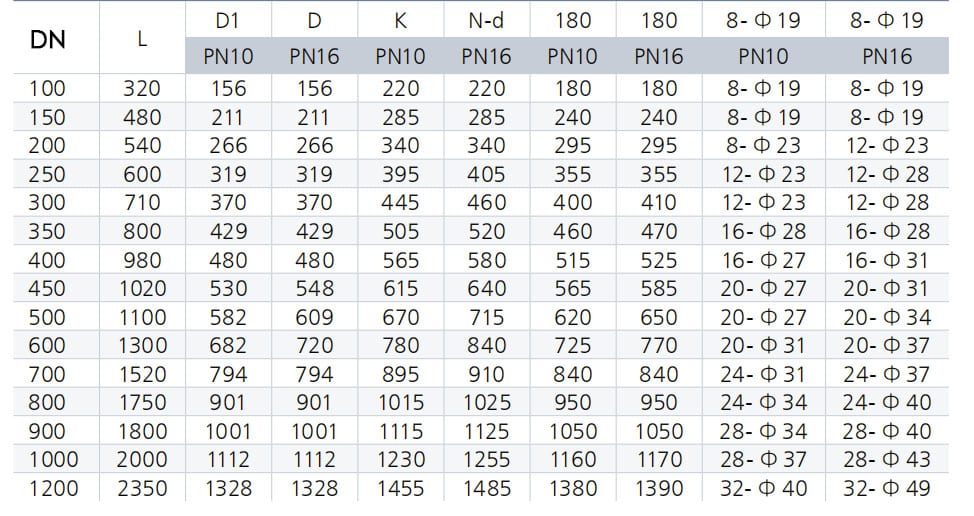
1, Size DN100-DN1200
2, Pressure PN10 and PN16
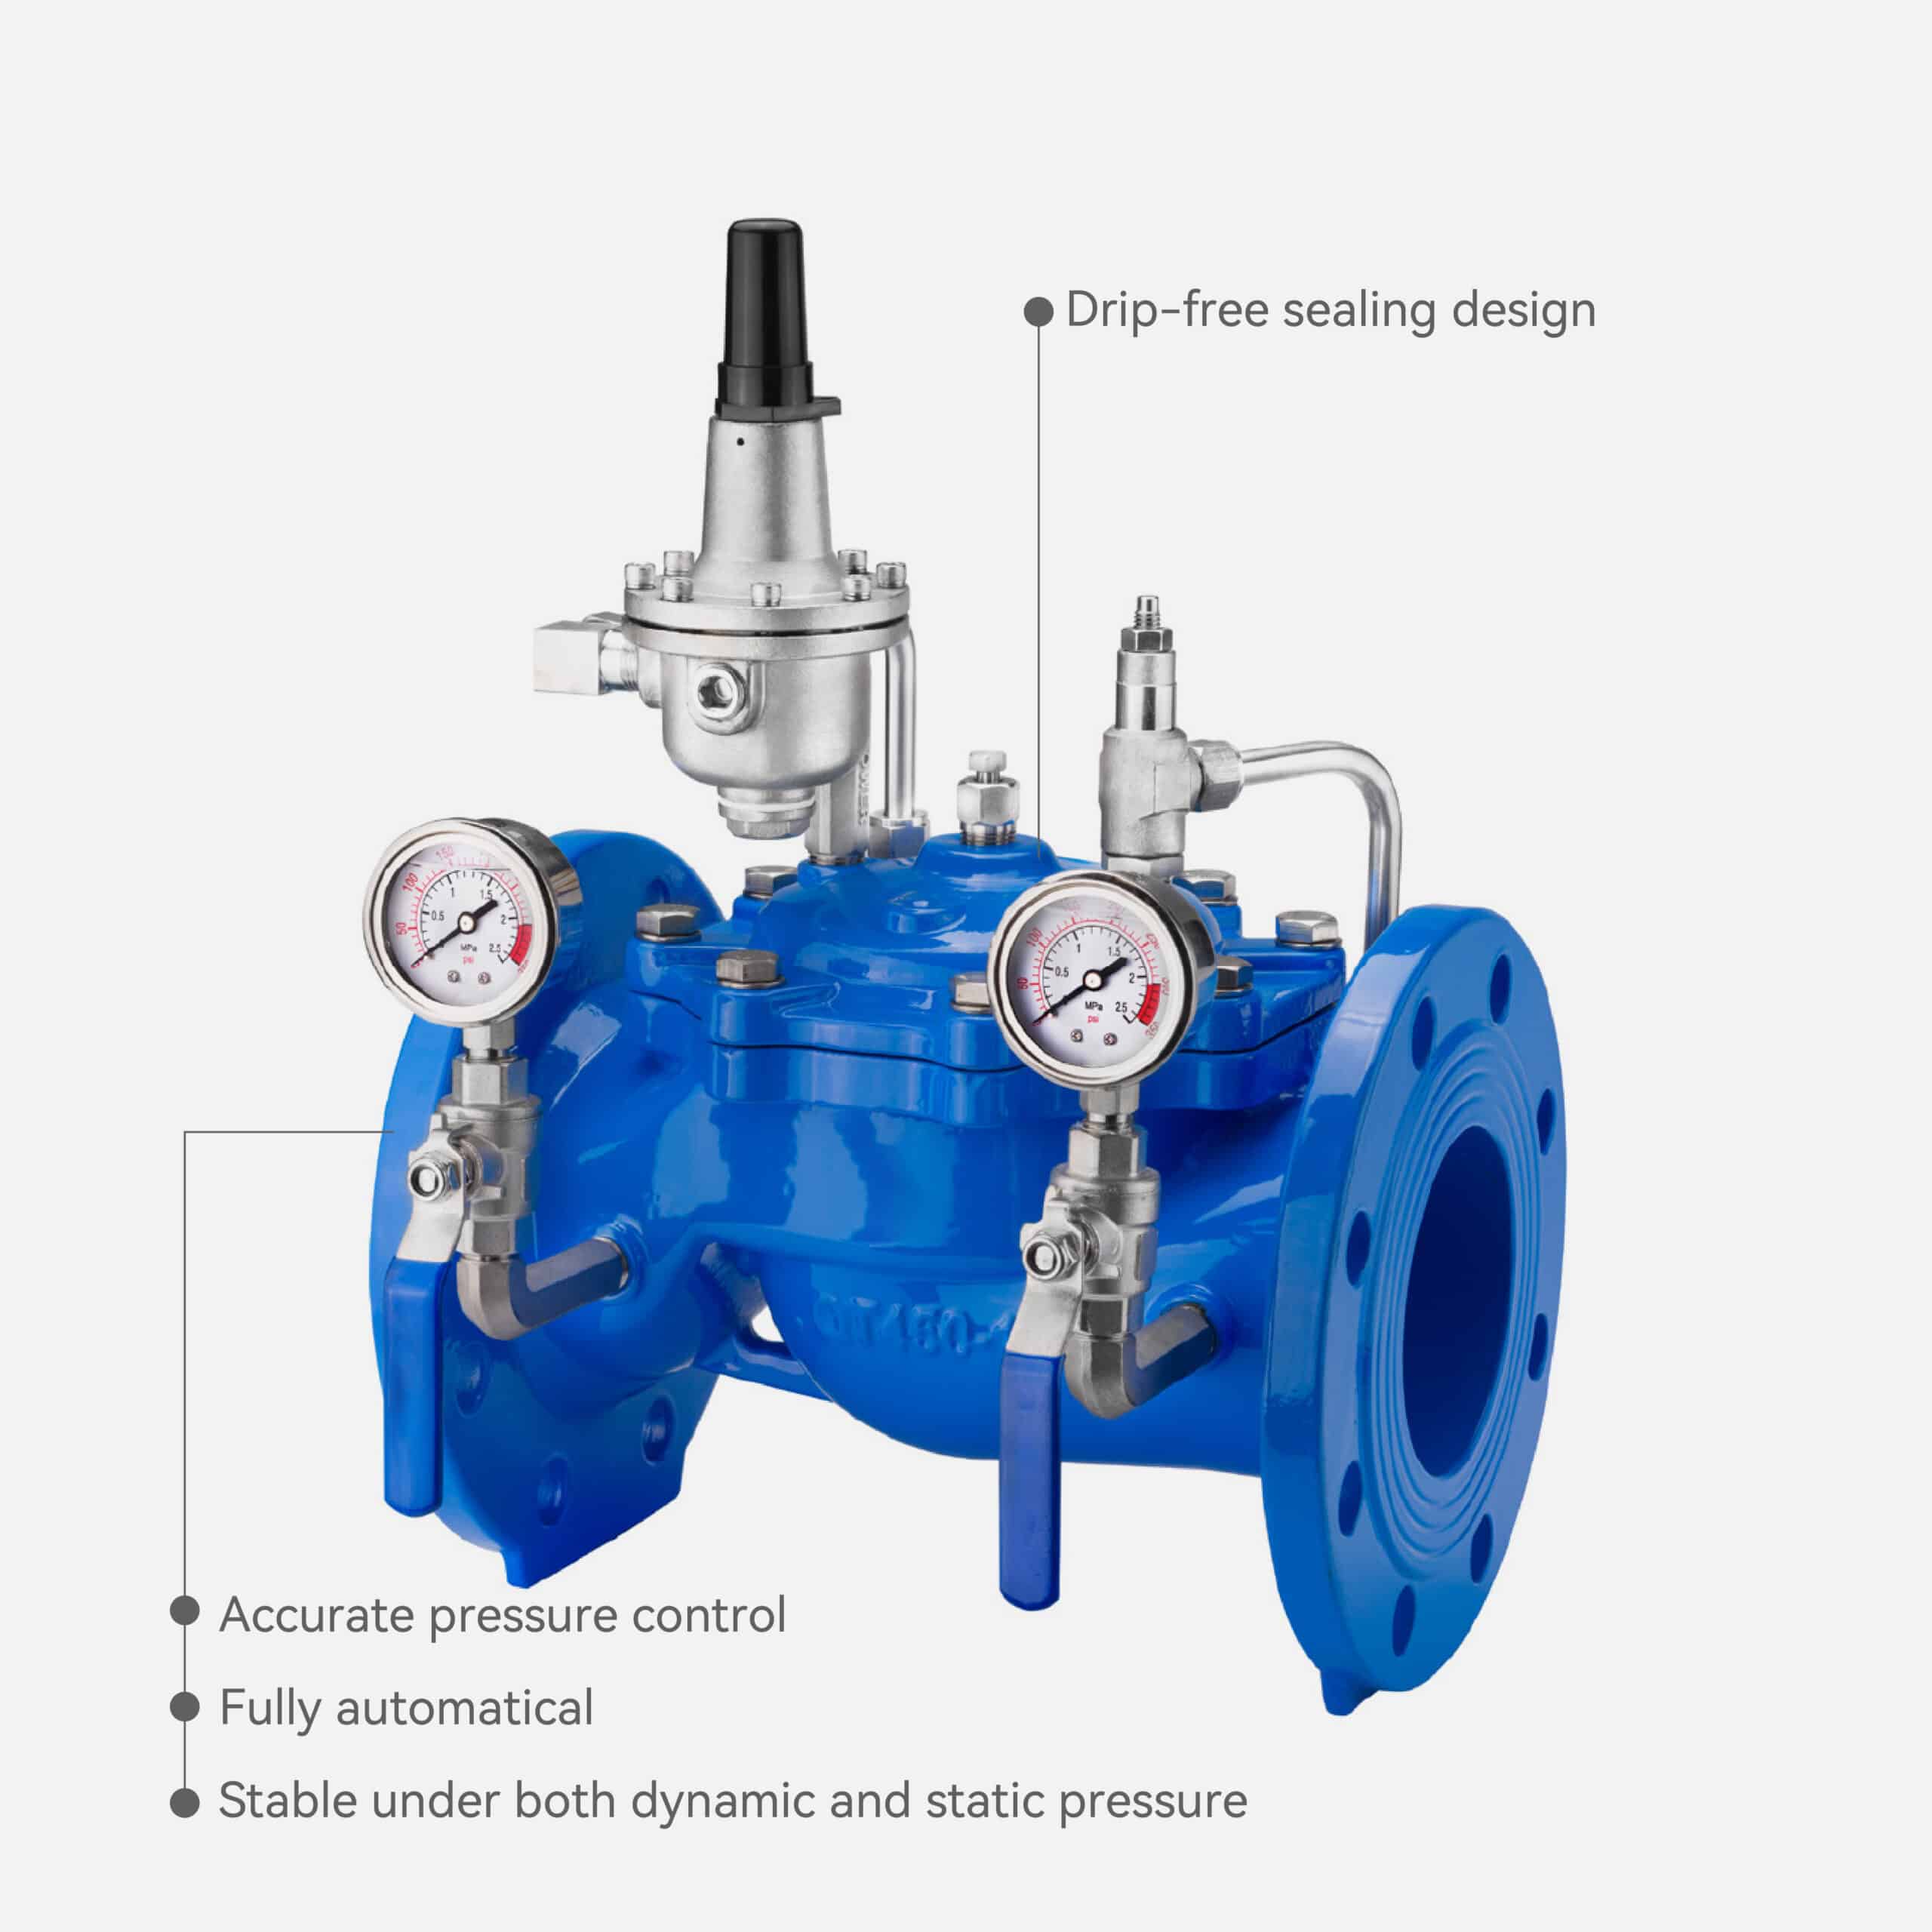
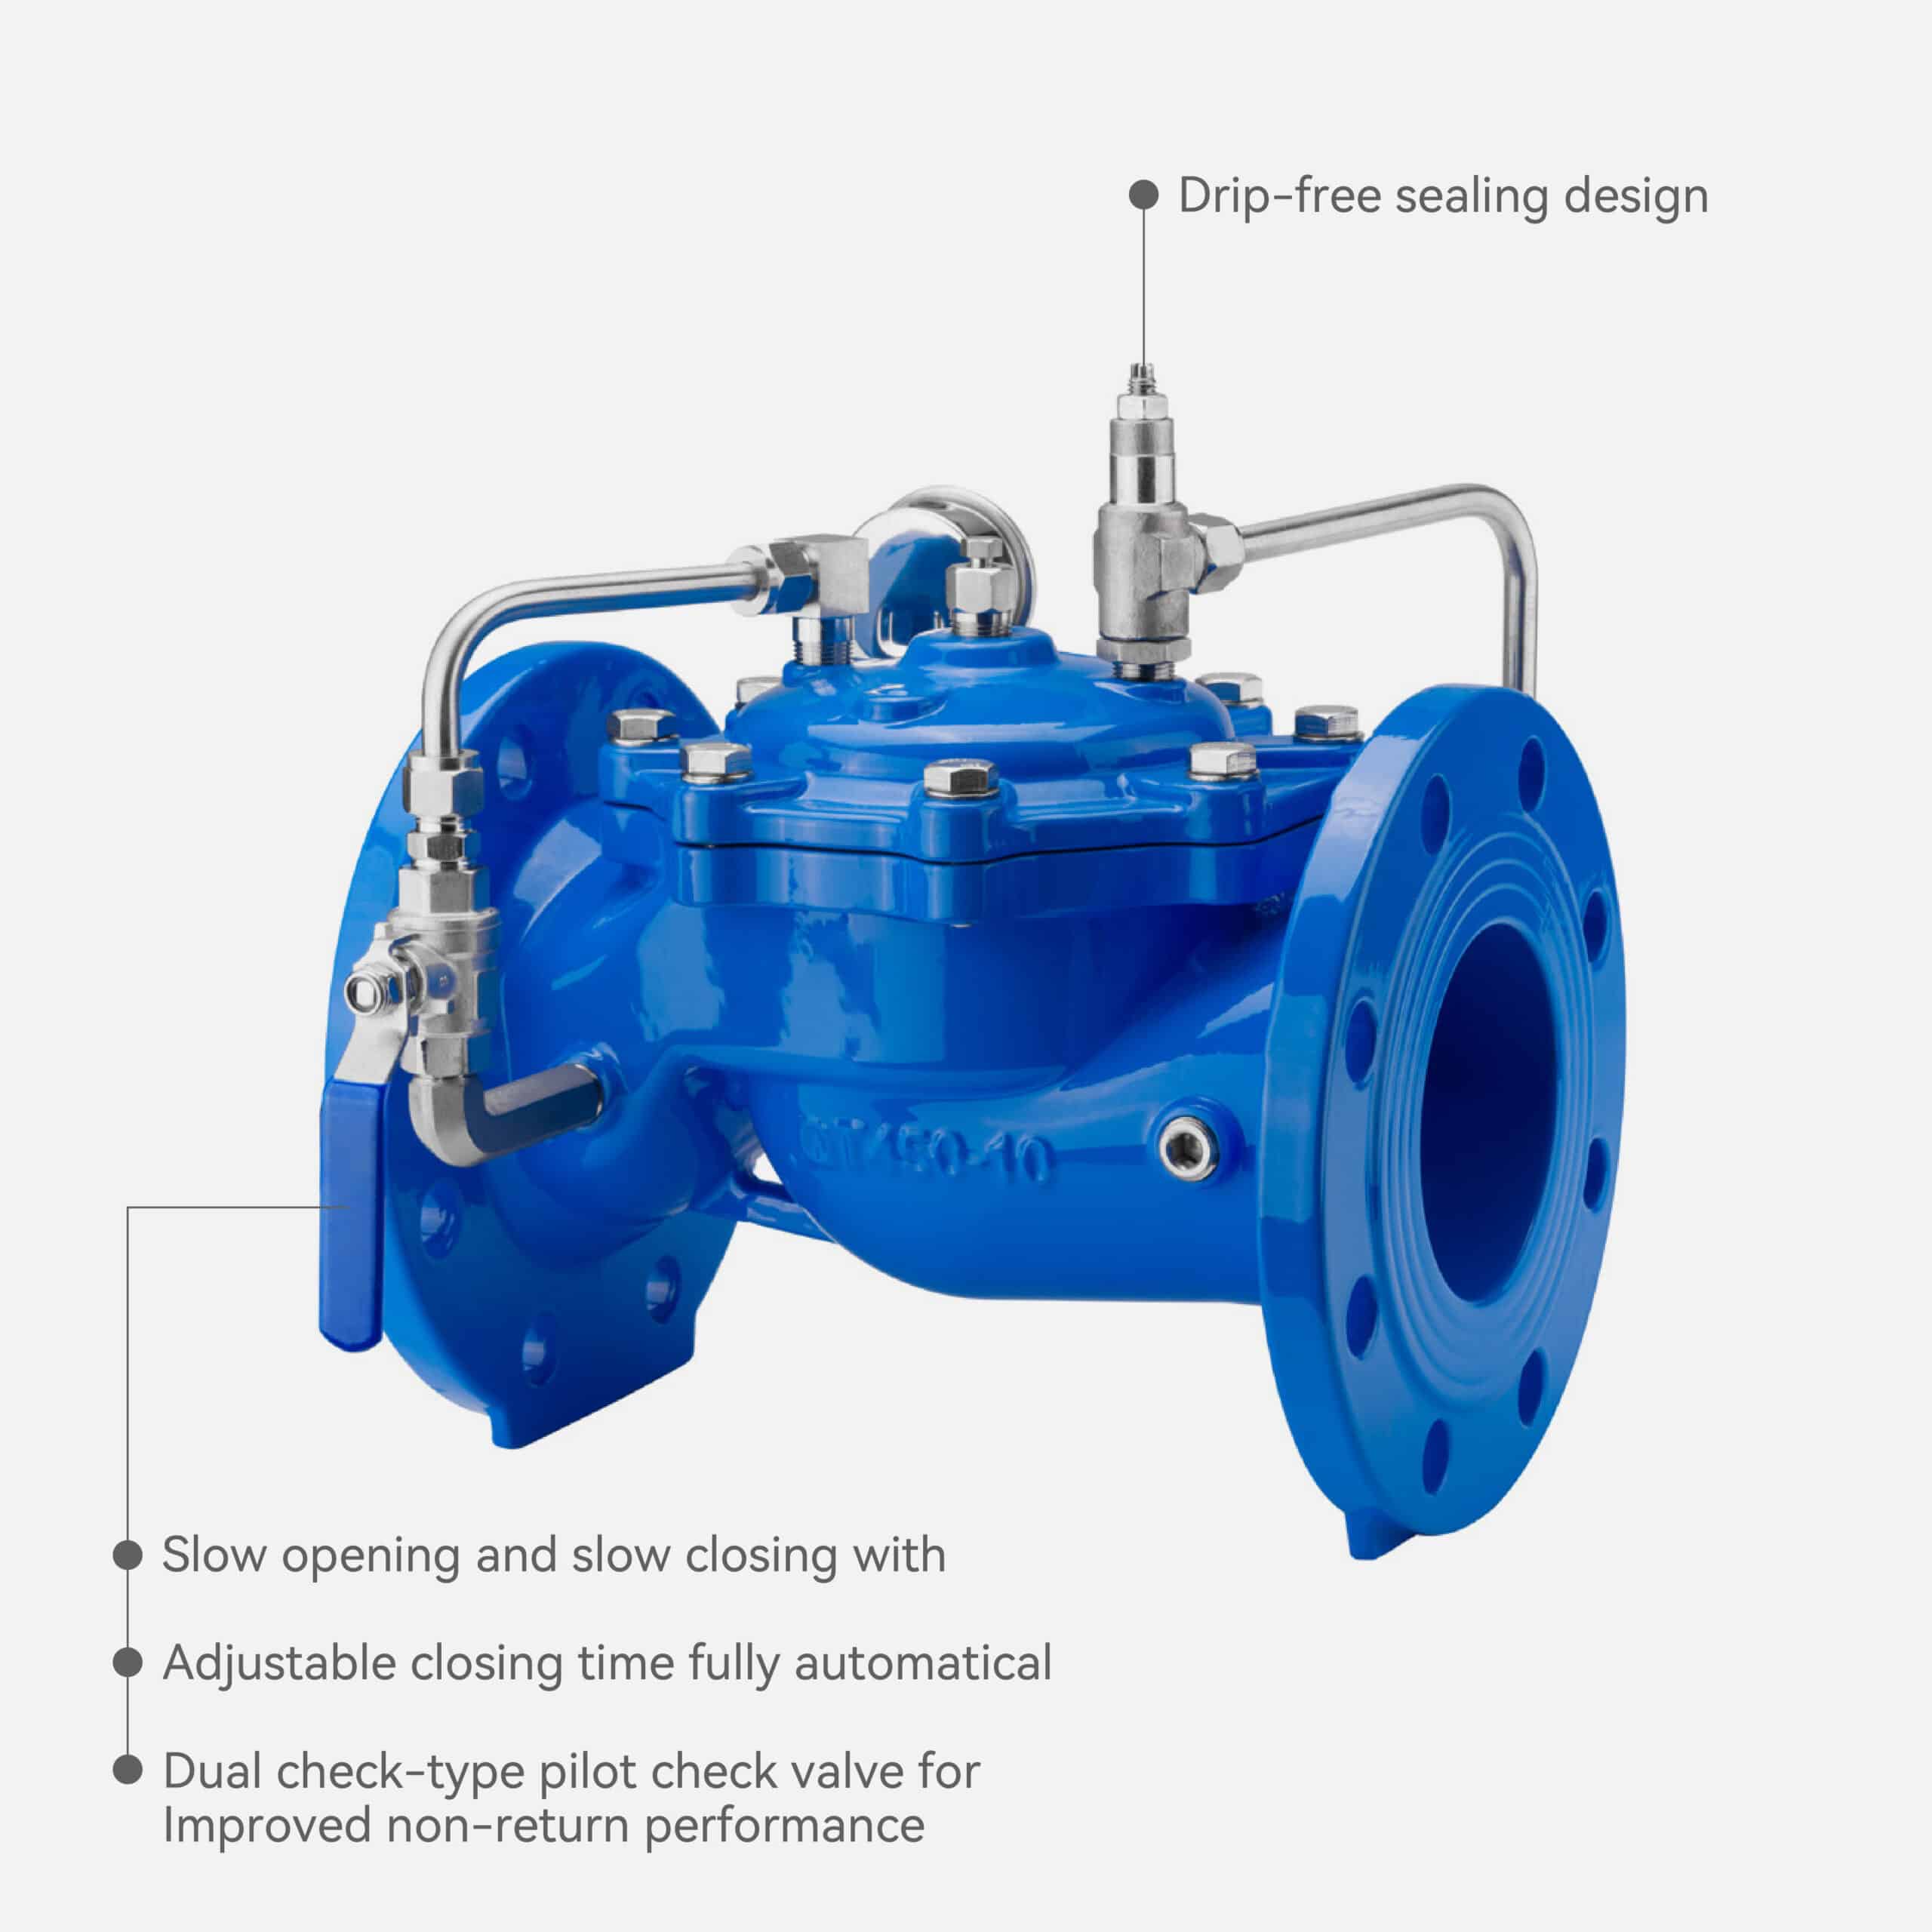
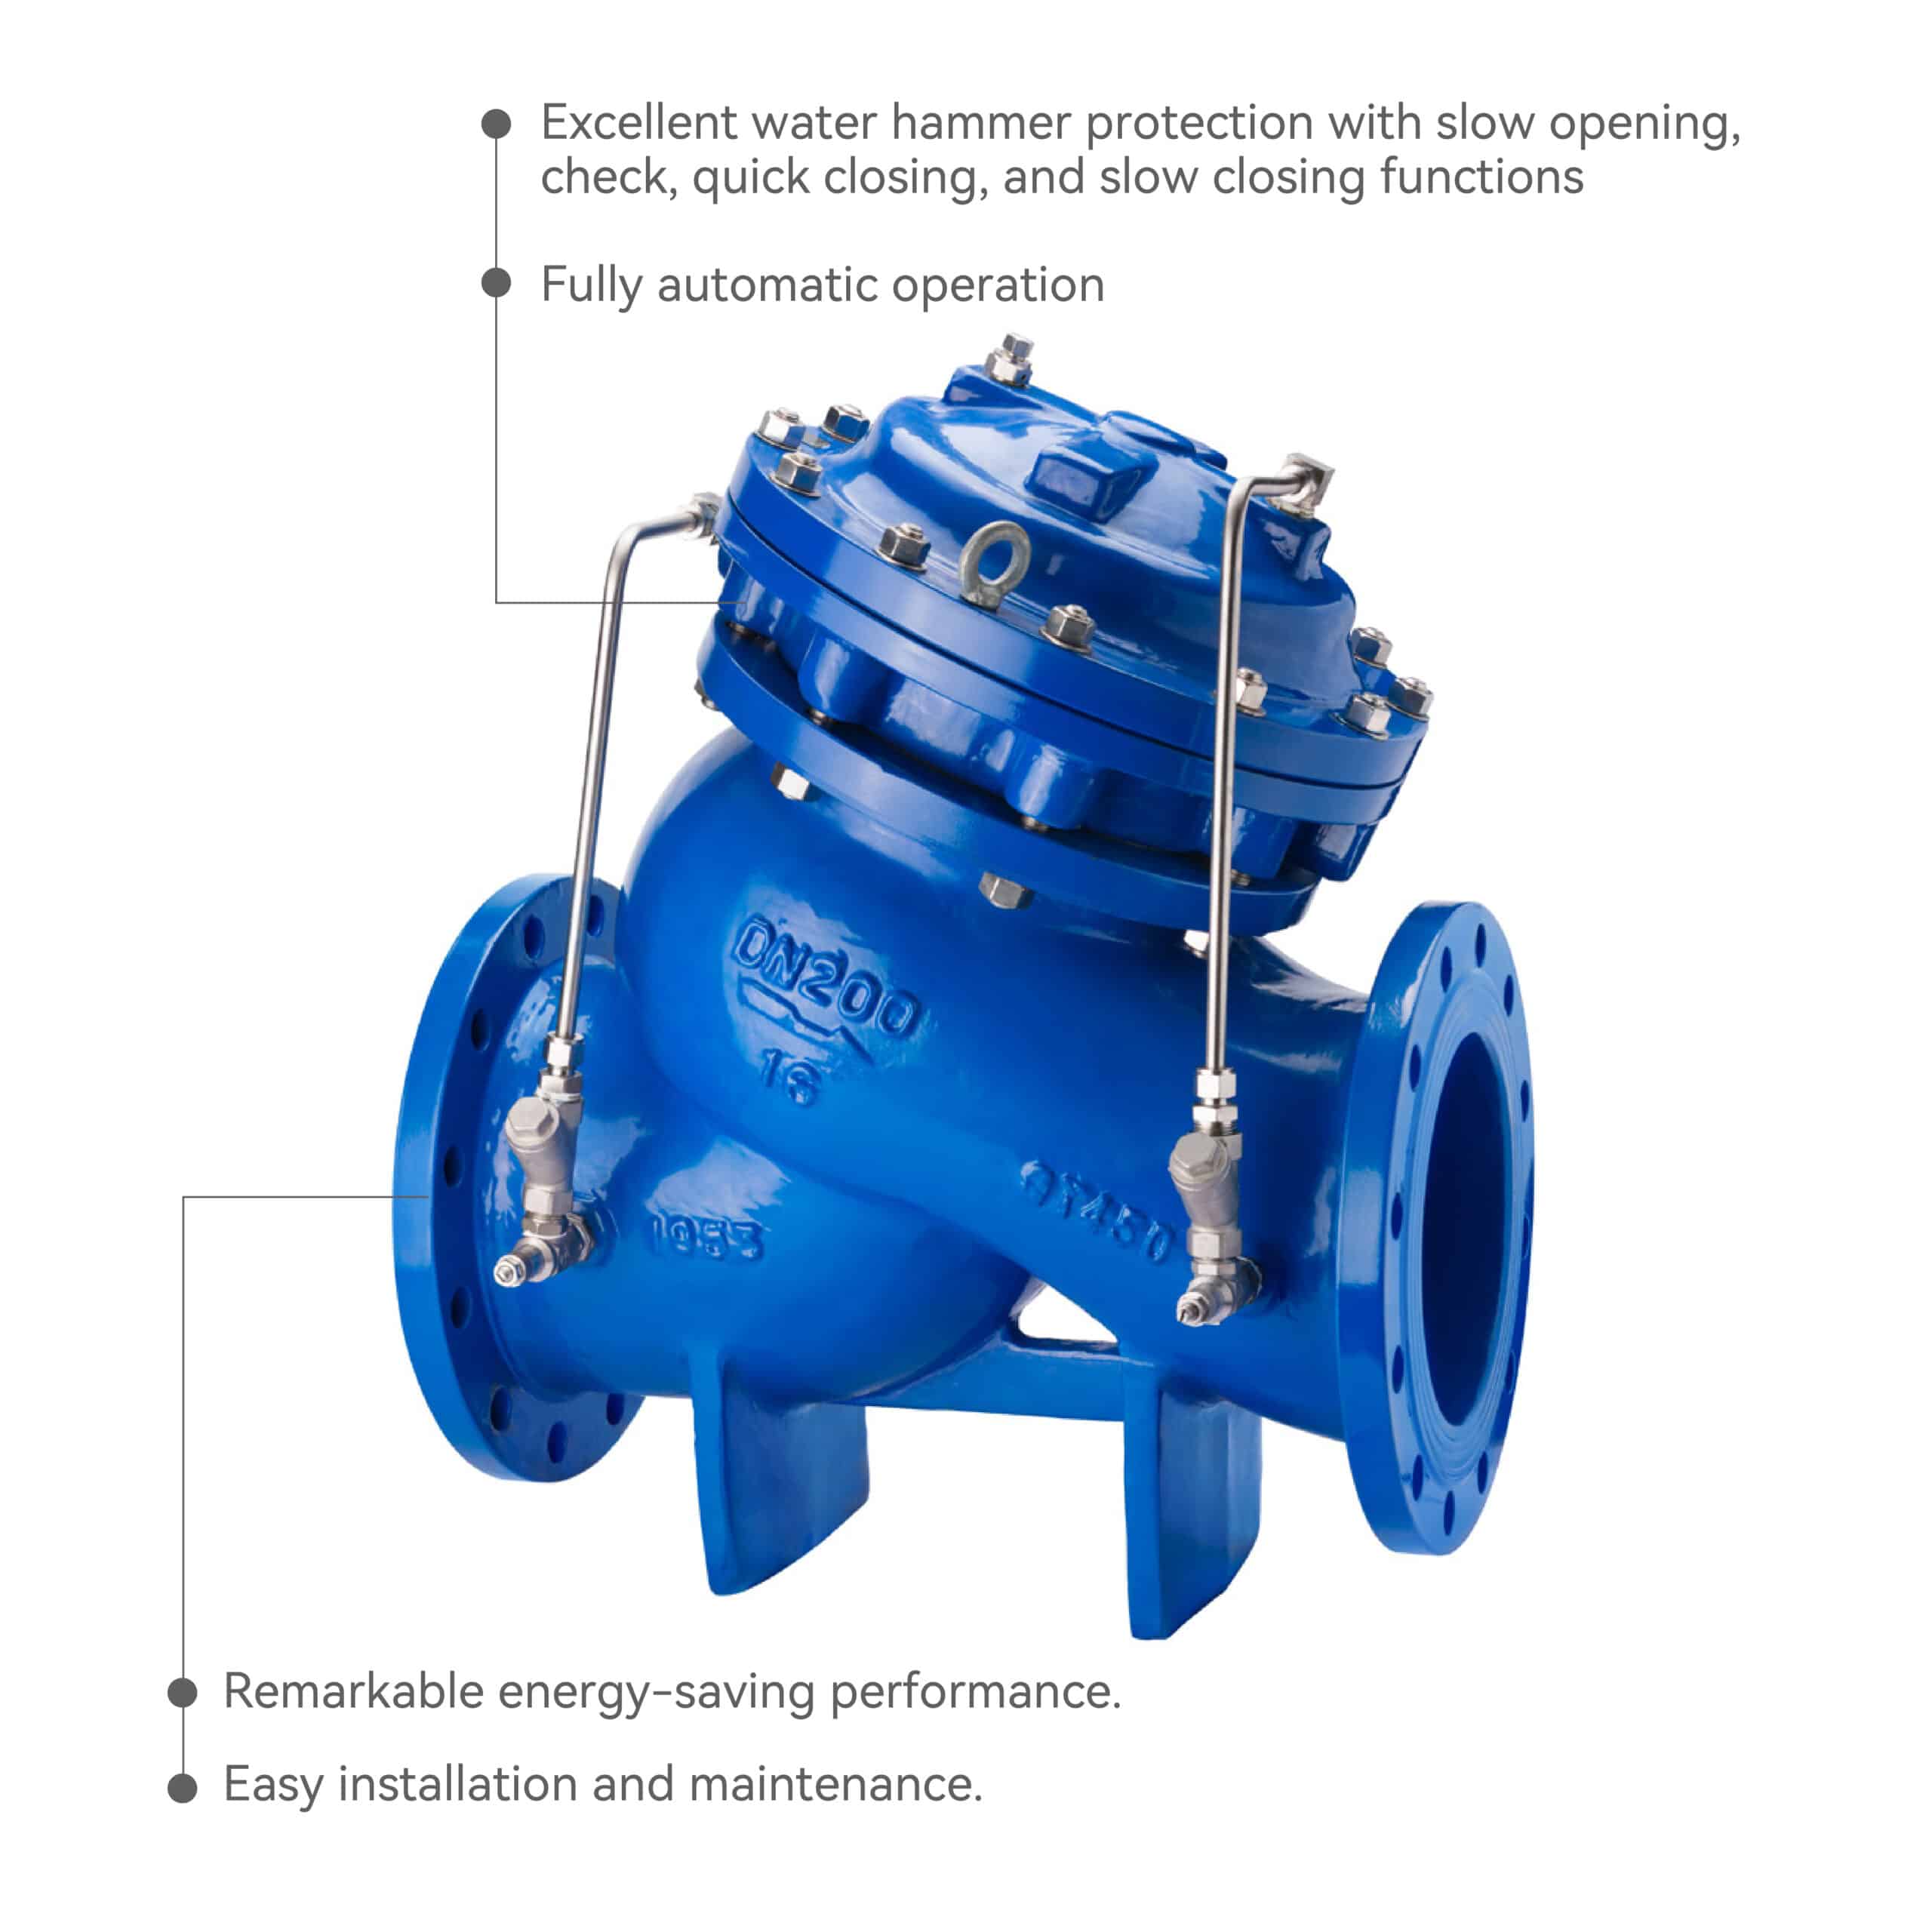
3, Excellent water hammer protection with slow opening, check, quick closing and slow closing functions
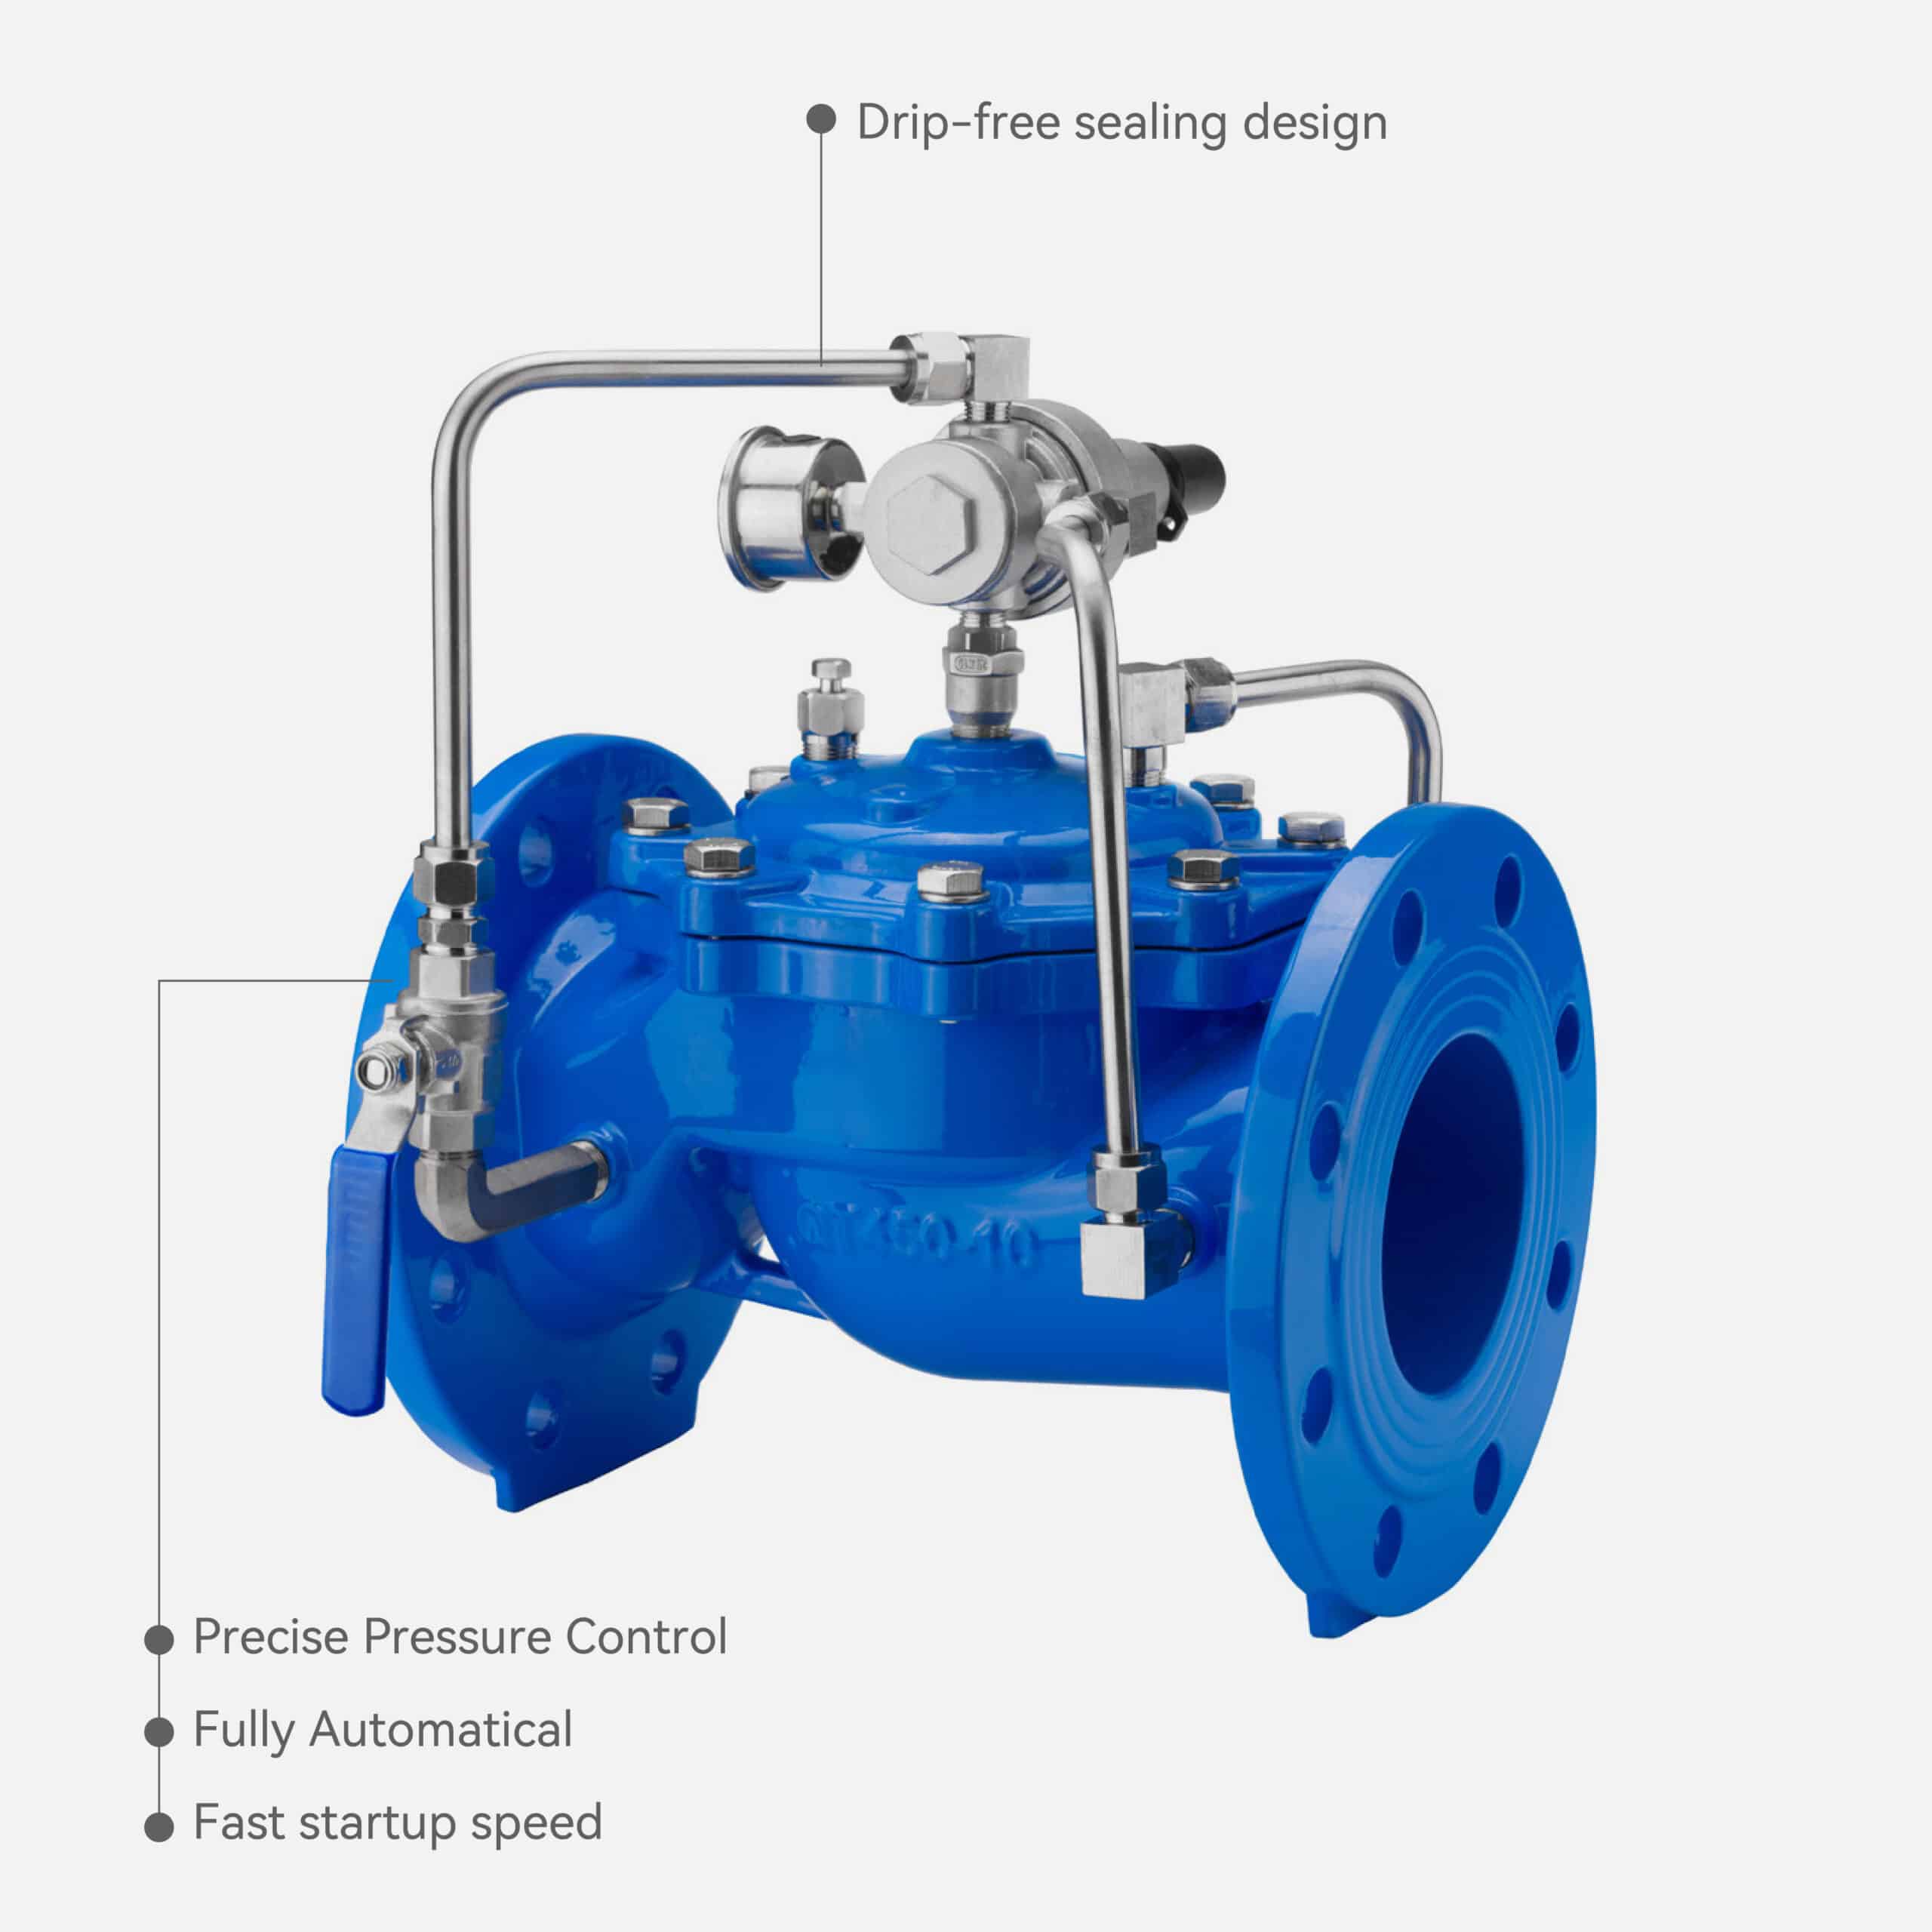
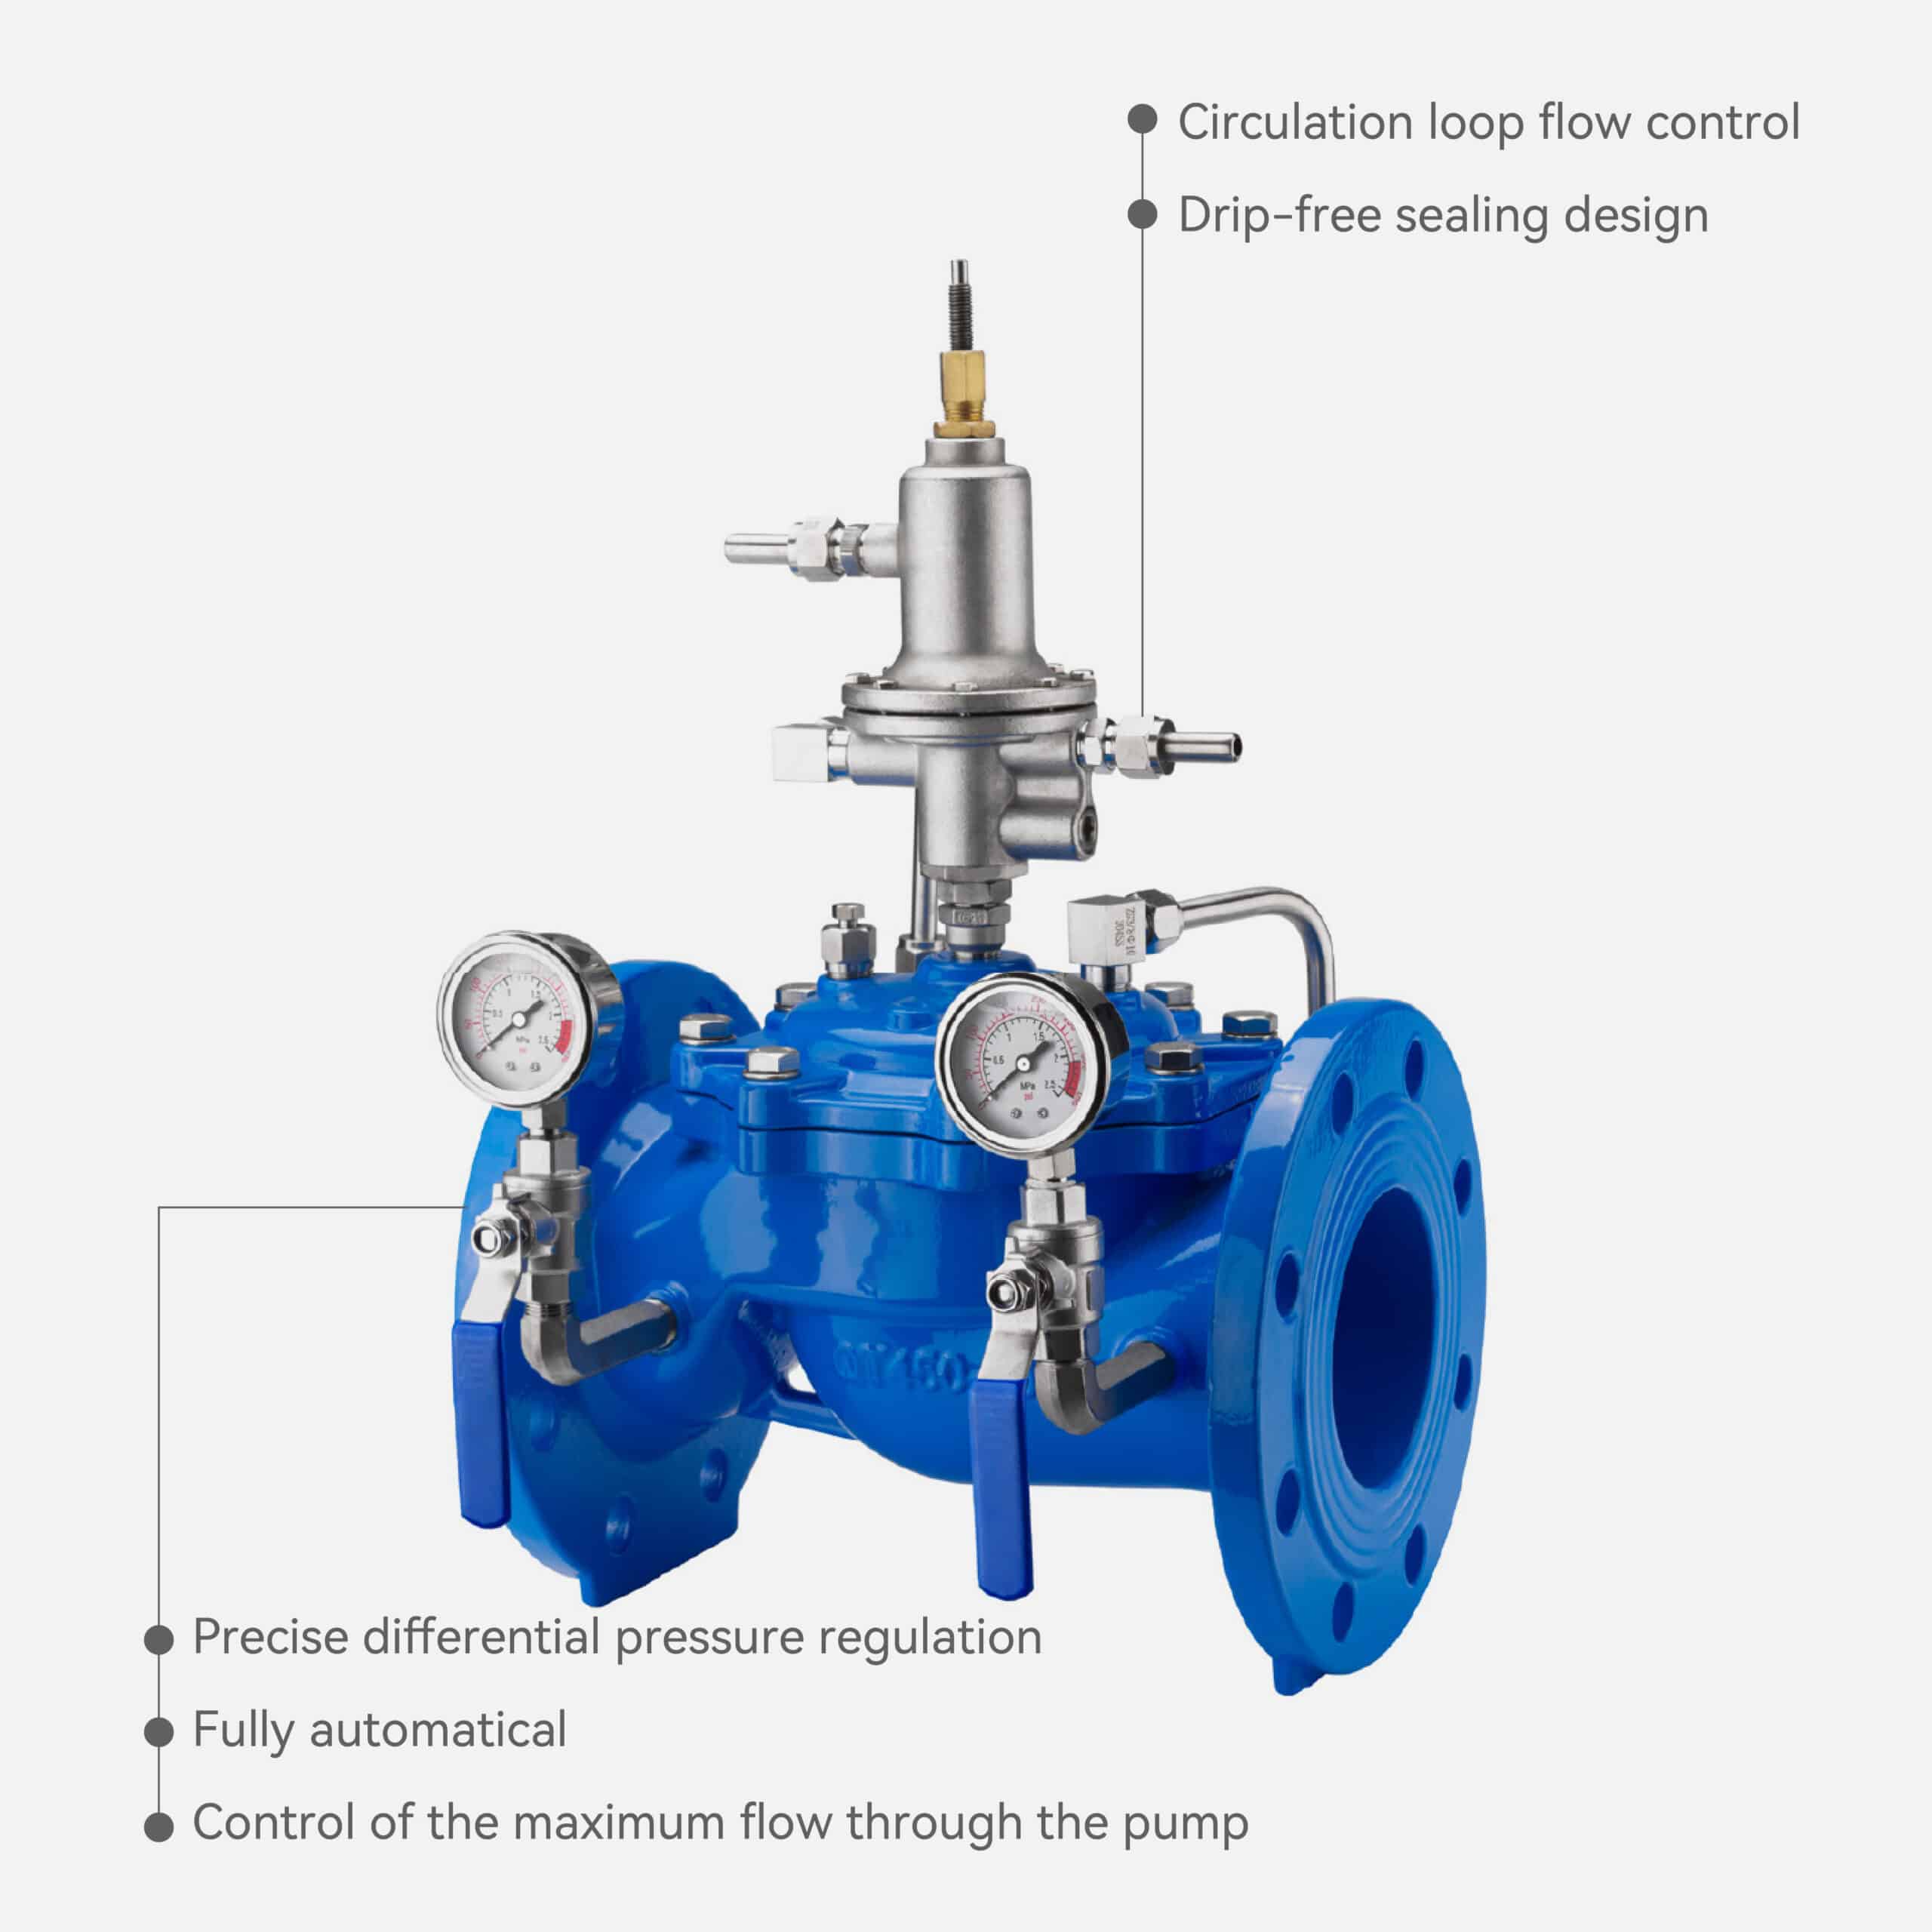
4, Fully automatic operation
5, Remarkable energy-saving performance
6, Easy installation and maintenance
Drawing
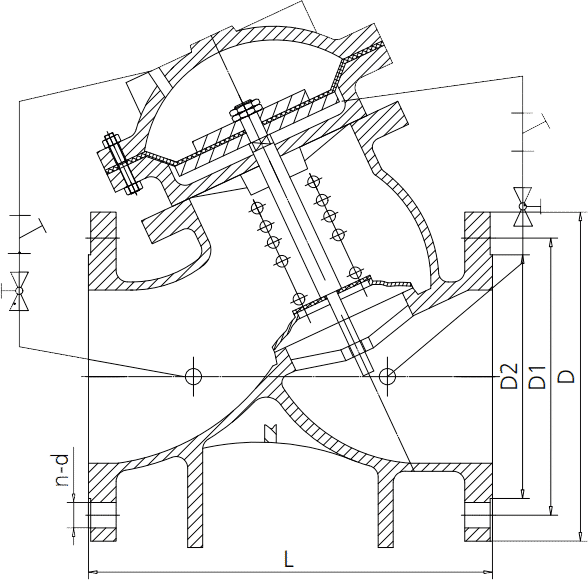
Dimension
Working Principle
Multi-Function Pump Control Valve uses the pressure difference between the upper control chamber, lower control chamber, and the main valve disc, combined with a pilot control system, to manage the pump’s start-up and shutdown process smoothly and safely.
1, How to choose the right valve size (DN size)
_
When the pump starts, Pump pressure enters the lower chamber of the main valve, pushing the valve disc upward, at the same time, pressure also enters the upper control chamber, keeping the valve closed initially, the pilot (needle-type regulating valve) allows water in the upper chamber to discharge slowly to the outlet, as the upper chamber pressure gradually decreases, the main valve opens slowly and smoothly.
Slow opening is important because it can prevents a sudden rush of water into the pipeline, avoids pump start-up shock, protects pipes and fittings from impact loads, the opening speed can be adjusted by setting the pilot valve opening.
2, Quick Closing When the Pump Stops
_
When the pump shuts down, Inlet pressure drops immediately, without upstream pressure, the main valve disc loses its upward force.
Then the spring force and the weight of the disc work together to rapidly close most of the valve’s opening.
It closes quickly at first to prevents reverse flow from rushing back into the pump, protects the pump impeller and motor from reverse rotation, ensures immediate backflow protection, this fast-close stage acts like a check valve, stopping reverse flow instantly.
3, Slow Closing to Avoid Water Hammer
_
After the first quick closure, the valve is still partially open, the pressure difference in the control chambers now takes over:
upper chamber pressure pushes the disc downward, lower chamber pressure resists the downward movement, water enters the upper control chamber slowly through the pilot valve, the main valve closes gradually and gently until fully shut.
Slow closing is essential because it can absorbs sudden pressure rise in the pipeline, prevents secondary water hammer, keeps system pressure stable, avoids noise, vibration, and surge.
This two-stage closing action — quick close + slow close — is the core reason the valve can eliminate water hammer.
4. How the Upper Chamber, Lower Chamber, and Pilot Valves Work Together
_
Component Function
Lower Control Chamber Receives inlet pump pressure; lifts the main valve during start-up
Upper Control Chamber Controls opening and closing speed by filling and draining water through the pilot
Pilot / Regulating Valve Controls how fast pressure changes occur in the upper chamber
Spring + Disc Weight Provides rapid closing force when pump stops
The pilot valve is the “brain” of the system—it meters flow into or out of the upper chamber, which directly controls the speed of valve movement.
5, How The Valve Prevents Water Hammer, Pressure Surge, and Backflow
_
It Prevents water hammer by slow opening avoids sudden surge, slow closing eliminates pressure spikes, dual-stage “quick + slow” action and absorbs pressure waves
It Prevents pressure overshoot by controlled upper chamber pressure ensures smooth movement and no sudden changes in valve position
It prevents backflow by quick close immediately blocks reverse flow when pump stops and works like a check valve but with far more controlled operation
The valve uses water pressure and a pilot system to open slowly when the pump starts, close quickly to stop reverse flow when the pump stops, and then close slowly to eliminate water hammer. This protects the pump, pipeline, and the entire water system.
Advantage
Why choose a Multi-Function Pump Control Valve instead of a normal check valve or slow closing valve?
When you design or upgrade a pump station, it is very common to ask:
“Why not just use a normal check valve?”
“Do I really need a multi-function pump control valve?”
“Can it really reduce water hammer and protect my pumps?”
Let’s go through these questions step by step
1, Why not just use a normal check valve?
A normal check valve has only one job , It closes when the flow reverses, to prevent backflow.
It does not control how fast the pump flow builds up at start-up, control how fast the flow stops at pump shutdown, manage pressure rise in the pipeline, actively reduce water hammer.
So with a normal check valve, you often see strong pressure spikes when the pump trips or stops, loud “bang” noises in the pipeline, vibration, movement of pipe supports, repeated stress on pipes, fittings, and the pump itself.
Check valve is a passive device. It only reacts when reverse flow occurs, and often it closes too fast and too late, which can actually create water hammer instead of solving it.
Multi-Function Pump Control Valve is different, It controls the whole process: pump start, normal running, and pump stop.
It is not just a check valve – it is a pump protection and water hammer control valve.
If your system is high head / long rising main, sensitive to pressure surges or in a building or area where vibration and noise are critical etc then a normal check valve alone is usually not enough.
2, Does a Multi-Function Pump Control Valve reduce water hammer?
Yes. Reducing water hammer is one of its main purposes.
It reduces water hammer in three ways:
1) Slow opening at start-up, When the pump starts, the valve opens slowly.This prevents a sudden rush of water and avoids a big pressure wave entering the pipeline.
2)Quick closing at the very beginning of shutdown, When the pump stops, the valve quickly closes most of the opening.This immediately stops reverse flow and prevents the water column from running back towards the pump.
3)Slow closing to fully closed position, After the quick close, the last part of the closing movement is slow and controlled, this absorbs the energy of the moving water and prevents high pressure spikes.
Check valve reacts to reverse flow and can cause water hammer. Meanwhile multi-function pump control valve actively manages the flow and pressure to prevent water hammer.
If your project has had complaints about banging noise at pump stop, vibrating pipes or pressure spikes on gauges then a multi-function pump control valve is normally the correct choice.
3, Do I still need an extra slow-closing check valve?
In most pump station designs, if you use a properly sized and correctly adjusted Multi-Function Pump Control Valve, you do not need a separate slow-closing check valve at the pump outlet.
Because the multi-function valve already acts as a check valve (it prevents reverse flow), It already has built-in slow closing to control pressure changes, So for a typical municipal, building, or irrigation pump station, Pump + Multi-Function Pump Control Valve at the outlet, No extra slow-closing check valve is required in series.
This means fewer valves, fewer potential leakage points, simpler control and maintenance, lower total cost for the whole system, not just the valve itself, Only in very special cases (very long high-pressure rising mains, extremely critical surge conditions, special standards) might an engineer consider additional surge control devices. But for normal and even demanding water supply systems, one multi-function pump control valve is usually enough.
4, Can it improve pump lifetime and protect the pump system?
Yes. Multi-function pump control valve directly helps to extend pump and system life.
It protects the pump from reverse rotation, the quick closing function stops reverse flow quickly, which prevents the pump from spinning backwards after shutdown.
It Reduces mechanical stress on the pump, slow opening at start-up avoids sudden high flow and torque on the pump, this reduces stress on bearings, seals, and the motor.
It Prevents repeated water hammer events, every strong water hammer wave is a “hammer hit” on your pipes, valves, and flanges, Reducing or eliminating these hits significantly extends the life of the pipeline and fittings.
It stabilizes system pressure, smooth opening and closing help keep pressure changes within a safe range, this reduces leaks, gasket failures, and fatigue in pipe supports.
From a life-cycle point of view, the cost of one multi-function pump control valve is usually much lower than the long-term cost of replacing pumps, repairing pipelines, and dealing with water hammer damage.
5, How should you choose: Check Valve vs Slow-Closing Valve vs Multi-Function Pump Control Valve?
You can guide your selection using this simple logic:
You can consider a normal check valve when the pump head is low, the pipeline is short, the system is not sensitive to noise or vibration and water hammer risk is low and acceptable.
You should consider a slow-closing check valve when you already have a simple system, you mainly want to reduce (not fully control) closing speed and you do not need start-up control, only shutdown smoothing.
You should choose a Multi-Function Pump Control Valve when the pump station is critical (municipal, building, waterworks, irrigation, industry), the rising main is long or high head, there have been water hammer, noise, or vibration problems, you want full control of pump start and stop.
You want one valve to handle slow opening, quick closing, slow closing, anti water hammer and anti backflow.
If your goal is “Protect my pumps and pipelines for the next 10–20 years”, not simply “Buy the cheapest check valve”, then the Multi-Function Pump Control Valve is almost always the better engineering choice.
“If you only want to prevent backflow in a simple system, a normal check valve may be enough.
But if you want to protect your pump, avoid water hammer, reduce maintenance, and make your system run smoothly, you should use a Multi-Function Pump Control Valve at the pump outlet.”
Application
When Do You Need a Multi-Function Pump Control Valve? When you choose valves for a pump station, the most important question is “Does my system really need a Multi-Function Pump Control Valve?”
Here is a clear, practical guide to help you decide. If any of the following situations match your system, you should strongly consider using this valve.
1, Pump outlet of any pump station (the most typical application)
If the valve is installed at the pump outlet, this valve is usually the best choice because it controls how the pump starts, it prevents backflow when the pump stops, it eliminates water hammer. If your project has a pump outlet, this valve is almost always recommended.
2, High-rise building water supply systems
In tall buildings, the pipeline is long, the pressure is high, water hammer can be very serious, If the pump stops suddenly, the pressure wave can damage pipes or create strong vibrations. So high-rise buildings should always use a multi-function pump control valve.
3, Municipal water pump stations
City water systems often run long pipelines, multiple pumps operating in sequence, high flow and pressure, Sudden pump shutdown can easily cause large water hammer events, so municipal pump stations normally require this valve for safety and stability.
4, Irrigation and agricultural pumping systems
Irrigation pipelines are usually very long, and pumps start/stop frequently, this leads to strong pressure surges, pipeline vibration and Valve failure or leaks, If your irrigation system has long pipes or frequent pump cycles, this valve is strongly recommended.
5, Large-flow or high-head pump systems
If your pump delivers large flow rate, or High head / high pressure, then any sudden change in pump operation will create strong pressure spikes, this is exactly when a normal check valve cannot protect your system. High-flow or high-head pumps should always use a multi-function pump control valve.
6, Systems where water hammer has already happened
If you have experienced banging noise when the pump stops, pipe shaking or vibrating, pressure gauges jumping, leaks at joints or gaskets or complaints about noise , these are clear signs of water hammer. If water hammer has occurred even once, you need this valve immediately.
7, Systems where pump protection is critical
Use this valve if your pump is expensive, Installed in a difficult-to-access chamber, running long hours, Part of a critical operation (hospital, industrial plant, municipal supply), Because it protects the pump from reverse rotation, sudden pressure shock and Overload at start-up, If pump reliability is important, this valve is necessary.
8, Remote or unattended pump stations
If your pump station is not always monitored, automatic protection becomes even more important , the valve will automatically manage start/stop without operator adjustment, Unmanned sites benefit greatly from automatic control, Simple decision rule.
If your pump system has long pipelines, high pressure, large flow, or any risk of water hammer, you should use a Multi-Function Pump Control Valve.
If you want the pump to start and stop smoothly without damaging the system, this is the right valve.
If you worry about water hammer, pump protection, or pipeline safety, this is the valve you must use.
Selection Guide
It’s easy to choose the right valve. Just follow these steps and you will choose the correct valve for your pump system.
1, How to choose the right valve size (DN size)
_
The valve size must match the pump outlet pipe size, If your pump outlet is DN100 ,then choose DN100 valve, If your pipe is DN150 ,then choose DN150 valve. Don’t try to save money by choosing a smaller valve or a larger valve.
The valve must be the same size as the pipe to make sure you have the right flow and the right pressure.
If you’re not sure: Look at the pipe tag Or tell us the pipe OD & material—we will tell you the correct DN.
2, How to choose the pressure rating (PN10 / PN16 / PN25)
_
Choose a PN value that is higher than the maximum pressure your pump will make.
If your pump pressure ≤ 10 bar, then use PN10;
If your pump pressure ≤ 16 bar, then use PN16;
If your pump pressure ≤ 25 bar, then use PN25;
If you choose too low, The valve will break when the pressure goes up, the water hammer will be more than the valve can take, You will have more risk of something going wrong with your pipe.
If you’re not sure of the pressure, tell us your pump head (meters), we will tell you the correct PN.
3, Single-chamber or Double-chamber? How to choose?
_
● Single-Chamber Valve (Most common)
Use this type when Your pump pressure is normal (typical municipal or building systems), your pipe length is short or medium and you don’t have a lot of water hammer.
Single-chamber valves already do slow opening, quick closing, slow closing, anti-water-hammer and backflow prevention.
Most people buy single-chamber because it works for 90% of the things you do.
● Double-Chamber Valve (For high-pressure / long pipeline systems)
Choose double-chamber when your pipe is very long, your pump head is very high , you have a lot of water hammer or water hammer that will hurt you or you need to have very precise control.
Advantages of double-chamber:
1)You can control the opening and closing more precisely
2)You can prevent water hammer better
3)You can use it for high-end municipal or industrial systems
If your system is long-distance or high-pressure, choose double-chamber.
If you tell us your pump head + pipe length, we can tell you the right one quickly.
4, Control Modes – How to choose and how to adjust
_
● The valve has three main things it does:
① Slow Opening (Pump Start-Up) , This keeps the pressure from going up too fast and the pump from working too hard You can adjust it by turning the needle valve (pilot valve):
Open more → faster opening Open less → slower opening (safer), For most people, medium slow opening is the best.
② Quick Closing (Pump Stops), This keeps the water from going back into the pump and the pump from spinning backwards This happens automatically when the pump pressure goes down, You don’t have to do anything to this—it works by itself.
③ Slow Closing (Final Stage of Pump Shutdown), this keeps the water hammer from happening, the pressure from going up and down and the noise and vibration from happening .
You can adjust it by
1) Close the pilot valve a little → slower closing → more protection
2) Open the pilot valve a little → faster closing → less protection
If you have water hammer, make the closing slower.
5, What media and temperature is it suitable for?
_
This valve works for Clean water, drinking water, Irrigation water and a little dirty water (with a filter), If you have seawater or water that will eat up the valve, we have stainless steel options.
The normal temperature range is 0°C to 80°C (normal ductile iron body), We can get higher temperatures if you need brass or stainless steel versions.
If your water is hotter than 80°C, tell us and we will pick the right material.
6, Material Selection (DI / Stainless / Bronze)
_
Ductile Iron (DI) is the cheapest one, works for 90% of the water systems, it is best for municipal, building, and irrigation use Stainless Steel (304 / 316) used for the situation
1) your water is bad
2) you are using seawater
3) you have food or industrial requirements
Bronze material is used for
1)You’re on a boat
2) You have very small sizes
3)You are in a place where everything is going to rust
You can get the right valve by follow below
01
Match valve size with pipe size.
02
Choose PN based on pump pressure.
03
Single-chamber for normal systems; double-chamber for long/high-pressure pipelines.
04
Adjust slow-open / slow-close based on pump behavior.
05
Use DI for normal water; stainless for bad water.
06
Temperature ≤ 80°C is fine for standard versions
Installation Guide
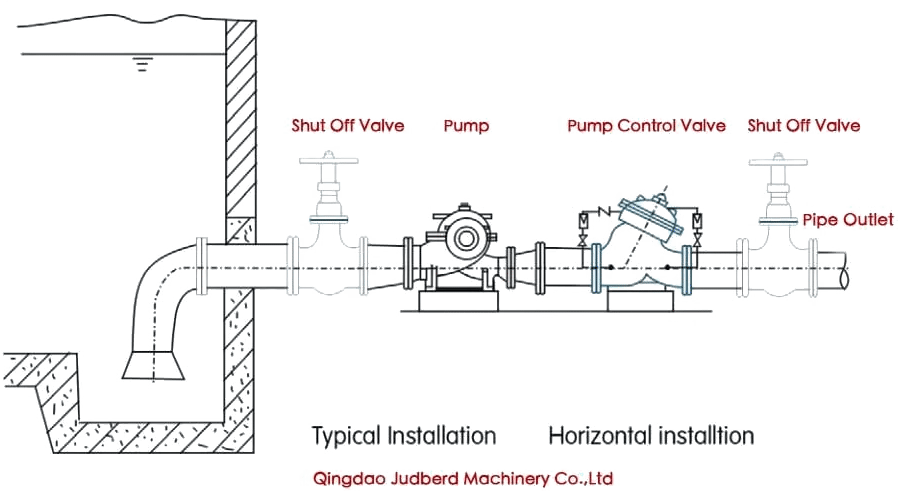
Installation Diagram
1, Before You Start – Important Preparation
Before you install the valve, make sure you do the following:
1) Flush the pipeline to get rid of all the welding slag, bolts, sand, and any other debris.Any little piece can block the pilot system and cause the valve to malfunction.
2) Check all control tubes and fittings to make sure all the little copper/stainless tubes and joints are tight and not damaged.
3) Confirm minimum operating pressure to make sure your pump pressure is at least the minimum pressure stated in the valve’s technical data.
4) Prepare pressure gauges, If you want to adjust or monitor the valve, install pressure gauges at both the inlet and outlet.
2, Installation Direction – Do NOT install backwards
Every valve has a flow direction arrow on the body.
The arrow must point from the pump toward the pipeline. If the arrow is backward, the valve will not open or close correctly.
3, Installation Position – Horizontal is best
The best way to install the valve is horizontal pipeline and Valve cover pointing up.
This ensures the pilot system works smoothly and is easy to access during maintenance.
If you install it inside a vault or pit, leave enough room for the technicians to adjust or repair the valve.
4, Do You Need a Strainer (Filter)? YES
Always install a strainer upstream of the valve. It protects the pilot system from debris. Without a filter, the valve may fail or react slowly.
Recommended sequence is Pump → Isolation Valve → Strainer → Multi-Function Pump Control Valve → Pipeline
Mesh size 80–120 is generally recommended.
5, Straight Pipe Requirements (Very Simple)
This valve does not require long straight pipes. Upstream need about 3 × DN straight pipe length is enough, downstream need about 3 × DN is enough,
If space is tight, it still works fine.
6, Connecting to the Pump Outlet – What to pay attention to
When you install the valve right after the pump
1) Make sure the pipeline is properly supported, Do not let the valve carry the weight of the pipe.
2) Tighten flange bolts in a cross pattern, this ensures uniform sealing.
3) Remove trapped air, air pockets around the valve may cause the valve to malfunction.
4) If you use it on deep-well pumps, install an air release valve, this prevents airlock and ensures the valve opens smoothly.
7, Do You Need a Check Valve? (In most cases: NO)
The Multi-Function Pump Control Valve already prevents backflow, Closes fast to stop reverse rotation, Closes slowly to prevent water hammer
So in 90% of installations, you do NOT need a separate check valve.
Only install an additional check valve if your pipeline is extremely long, system pressure is extremely high, local standards specifically require one, Otherwise not required.
8, Step-by-Step Installation Procedure
Step 1
Flush the pipeline
_
Make sure there is no debris left inside.
Step 2
Check the flow direction arrow
_
The arrow must point from the pump to the pipeline outlet.
Step 3
Install the strainer upstream
_
This protects the pilot system from particles.
Step 4
Install the valve horizontally
_
Valve cover upwards. Leave space for inspection.
Step 5
Connect the flanges
_
Valve cover upwards. Leave space for inspection.
Step 6
Do NOT lift the valve using control tubes
_
Always lift using the main body, not the pilot tubing.
Step 7
Make sure all pilot lines are intact
_
Do not bend, crush, or loosen the control tubes.
Step 8
Slowly pressurize the system
_
Open the upstream isolation valve gradually and check for leaks.
Step 9
Test the pump start
_
Valve should open slowly. If it opens too fast , slightly close the needle valve.
Step 10
Test the pump stop
_
Valve should quick-close first, then slow-close. If you feel water hammer , adjust the slow-close needle valve to slow down the closing.
9, Additional Safety & Maintenance Tips
When you install the valve right after the pump
1) Install pressure gauges at inlet & outlet for adjustment
2) If used for fire systems → run periodic start-up tests
3) Keep the pilot system clean and dry
4) Do not hit, bend, or pull the control tubing
5) Keep space for technicians to work in front and above the valve
If you install another valve downstream (gate valve or butterfly valve), keep some distance (minimum 3×DN) to avoid turbulence.
If you follow the flow arrow, install a strainer, and avoid damaging the pilot tubing, your Multi-Function Pump Control Valve will work perfectly—from day one.
Commissioning Guide
The Multi-Function Pump Control Valve is controlled mainly by one small needle valve (regulating valve) in the pilot system.
By adjusting this needle valve, you can control slow opening speed (pump start) and slow closing speed (pump stop), the quick-closing part is automatic and does not need adjustment.
1, Before You Start – Basic Rules
The pump must be able to supply the minimum operating pressure.
The needle valve controls the speed,
Open more → faster movement,
Close more → slower movement,
Never fully close the needle valve.
Always make adjustments slowly, 1/4 turn at a time.
2, How to Adjust the Slow-Opening Speed (Pump Start)
When the pump starts, the main valve should open slowly and smoothly.
If it opens too fast, it may cause pressure shock or pipe vibration.
How to adjust slow opening
_
Find the needle valve labeled “Opening Speed” or connected to the upper control chamber.
Turn the needle valve clockwise (close slightly) → Opening becomes slower.
Turn it counterclockwise (open slightly) → Opening becomes faster.
What is the correct setting?
_
The pump should start without pressure spikes, The valve should reach full-open in 3–10 seconds depending on pipe size, Flow should increase smoothly without sudden jumps
① If the valve opens too fast Turn the needle valve clockwise little by little, Make the opening slower
② If the valve opens too slow Turn the needle valve counterclockwise, Increase speed slightly
3, How to Adjust Quick-Close + Slow-Close (Pump Stop)
When the pump stops, the valve performs fast Close – stops backflow immediately, Slow Close – prevents water hammer
Only the slow-close speed can be adjusted.
How to adjust slow closing
_
Find the needle valve controlling the upper chamber fill (often labeled “Closing Speed”).
Turn clockwise → Slower closing,
Turn counterclockwise → Faster closing
What is the correct slow-close speed?
_
No water hammer, No loud “bang”, No shaking of pipes, Valve should close gently in 3–20 seconds depending on pipe length, then mean correct slow-close speed.
① If you hear water hammer, you need slow the closing speed by turn the needle valve clockwise 1/4 turn at a time.
② If the valve closes too slowly, then Faster closing needed, you need turn the needle valve counterclockwise slightly.
4, What Needle Valve Opening Means (Effect Table)
5, Step-by-Step Commissioning Procedure
Step 1
Start the pump
_
Observe how the valve opens.
Step 2
Adjust the slow-open
_
If it opens too quickly, please turn needle valve clockwise; If too slow, please turn counterclockwise
Step 3
Stop the pump
_
Watch the quick-close + slow-close behavior.
Step 4
Adjust slow-close
_
If you hear water hammer , then please slow the closing; If closing takes too long, increase speed slightly.
Step 5
Repeat once more
_
Normally 1–2 cycles are enough to get perfect settings.
Step 6
Record the final needle valve positions
_
So future operators know the correct settings.
6, Systems where water hammer has already happened
Never Fully closing the needle valve
→
Valve stops moving or reacts extremely slowly.
Don’t adjusting too fast
→
Always adjust in small increments (1/4 turn).
Don’t testing with air inside the pipeline
→
Air pockets cause false results.
Do flushing the pipeline before commissioning
→
Dirt blocks pilot system and causes malfunction
No Pilot tubing leaking
→
Even a small leak will affect valve behavior.
Never trying to adjust quick-close
→
Quick-close is automatic; do NOT modify it.
Don’t skipping pressure gauges
→
Without gauges, you cannot judge pressure shock correctly.
If the valve moves too fast , please close the needle valve slightly.
If the valve moves too slow, please open the needle valve slightly.
Adjust slowly, and you will get perfect pump protection.
Troubleshooting
| Symptoms | Possible Causes | Solutions |
|---|---|---|
| 1. Valve does not close fully / backflow occurs | – Needle valve (closing control) too open → closing too fast, cannot seal – Dirt or particles stuck in main valve seat – Pilot tubing blocked or leaking – Insufficient inlet pressure to push valve fully closed | – Slightly close the closing needle valve to increase slow-close time – Flush pipeline / clean strainer – Check pilot lines for blockage or leakage – Verify pump pressure meets minimum requirement |
| 2. Strong water hammer during pump shutdown | – Slow-close speed too fast – Air trapped in pipeline – Strainer clogged → unstable pressure – Very long pipeline with high surge energy | – Turn closing needle valve clockwise to slow the closing – Remove trapped air (open air release valve) – Clean upstream strainer – For extremely long pipelines: add surge tank / air valve |
| 3. Strong pressure shock when pump starts (start-up impact) | – Slow-opening speed too fast – Needle valve (opening control) too open – Air in pipe causing unstable flow – Pump starts too aggressively | – Turn opening needle valve clockwise to slow the opening – Bleed air from pipeline – Clean the strainer – Start pump at low speed if VFD is available |
| 4. Valve makes humming noise or pipeline vibrates | – Opening/closing speed too fast – Air in the pipeline – Debris stuck in control valve or main disc – Pipeline not supported properly | – Adjust needle valve to slower movement – Remove air from system – Clean the strainer and inspect disc – Add proper pipe supports |
| 5. Valve opens too slowly or too quickly | – Needle valve incorrectly adjusted – Pilot system clogged or partially blocked – Inlet pressure too low | – Adjust needle valve: clockwise = slower, counterclockwise = faster – Clean strainer / check pilot lines – Ensure pump provides enough pressure |
| 6. Valve closes too slowly / takes too long to shut | – Closing needle valve too closed – Inlet pressure too low – Pilot tubing leaking | – Slightly open the closing needle valve – Check pressure supply – Tighten or replace leaking fittings |
| 7. Valve leaks at body or flange | – Flange bolts uneven or loose – Damaged gasket – Foreign material stuck inside – Body/pilot pipe damaged during transport | – Tighten bolts evenly in a cross pattern – Replace gasket – Flush pipeline – Inspect tubing for bends or cracks |
| 8. Pressure is unstable during operation | – Air in the system – Dirty strainer causing fluctuating flow – Needle valve too open → reaction too fast – Pilot system leakage | – Release air – Clean or replace strainer element – Slightly close the needle valve to stabilize response – Check and tighten pilot fittings |
| 9. Valve does not respond / no movement | – Needle valve fully closed – Serious blockage in strainer or pilot system – Inlet pressure below minimum – Incorrect installation direction | – Ensure needle valve is not fully closed – Clean strainer / flush pipeline – Verify pump pressure – Check flow direction arrow |
| 10. Pump reverse rotation or backflow at shutdown | – Quick-close not functioning – Inlet pressure drops too slowly – Pilot tubing leaking – Debris stuck in disc | – Inspect and clean main valve disc – Check pilot tubing – Ensure isolation valve upstream is fully open – Verify correct installation sequence |
Simple Rules for Troubleshooting
● If movement is too fast → Close the needle valve slightly
● If movement is too slow → Open the needle valve slightly
● If pressure or movement is unstable → Clean the strainer first
● If valve does not react → Check pilot tubing & minimum pressure
“80% of problems come from incorrect needle valve adjustment or a dirty strainer — fix these first before checking anything else.”
Maintenance Guide
Taking care of the valve is easy. If you follow the steps below, your valve will run smoothly for 10–20 years or even longer.
1, How often should you maintain the valve?
Once per year is enough for most systems, like municipal water systems, building pumps, irrigation, etc. If the water is dirty or contains sand , then maintain twice a year.Because debris can enter the pilot system.For fire systems, test and operate the valve regularly, This prevents scale buildup and keeps the valve responsive.
2, Do you need to replace the diaphragm?
Yes , but not very often.Typical diaphragm lifetime is 3–5 years (Depending on water quality and working pressure), replace it when you notice the valve does not move smoothly, Slow-open or slow-close becomes irregular or Leakage from the cover. Changing the diaphragm is simple and only requires removing the top cover.
3, What are the wear parts (spare parts)?
The main wear or service parts are diaphragm (rubber membrane inside the main valve),Pilot needle valve (can get clogged if water is dirty), O-rings and rubber gaskets, Strainer screen (if installed upstream) and Small control tubing fittings, These parts are inexpensive and easy to replace.
4, What needs to be checked during yearly maintenance?
1. Clean or replace the upstream strainer This is the MOST important maintenance step. a clogged strainer is the No. 1 cause of malfunction.
2. Check the pilot system (tubing & fittings) Look for loose connections, leaks or blocked small tubes, tighten or clean as needed.
3. Inspect the diaphragm Remove the top cover and check if the diaphragm cracked, Hardened or Deformed, If any happened , then replace it.
4. Check the main valve disc and seat Look for scale buildup, debris or rubber wear, if any happened, clean with a soft brush or cloth.
5, Re-adjust opening and closing speeds After cleaning, test the valve to start the pump → confirm slow opening, Stop the pump → confirm fast-close + slow-close, if any problem happened, adjust the needle valves if needed.
5, Do you need to remove the whole valve from the pipeline?
No. 95% of maintenance can be done without removing the valve.
You only need to remove the top cover, the pilot valve or the strainer element, everything else stays in place.
6, How to keep the valve working at its best — simple rules
1) Keep the strainer clean Dirty water = blocked pilot system = malfunction.
2) Protect the control tubes Do not bend, hit, or use them for lifting.
3) Exercise the valve occasionally Open and close the pump to prevent scale accumulation.
4) Replace the diaphragm every 3–5 years Cheap part, big improvement in reliability.
5) Check for air in the pipeline Air pockets cause unstable pressure and strange valve behavior.
7, Typical lifetime of the valve
With regular yearly maintenance body lifetime can be 20+ years, Pilot system lifetime can be 5–10 years, Strainer lifetime can be Indefinite (replace screen when needed), Diaphragm 3–5 years per replacement, This is why routine maintenance is important — it keeps the valve working like new.
Clean the strainer, check the pilot tubing, and replace the diaphragm every few years — do this, and your pump control valve will last decades.