Slow Closing Check Valve
Judberd Hydraulic Slow Closing Check Valve, also known as a Non-Slam Check Valve, is a hydraulic control, pilot-operated diaphragm valve designed to prevent water hammer and protect water supply systems when pumps start or stop.
It provides quiet closing, stable operation, and long service life in water, irrigation, and industrial pipeline systems.
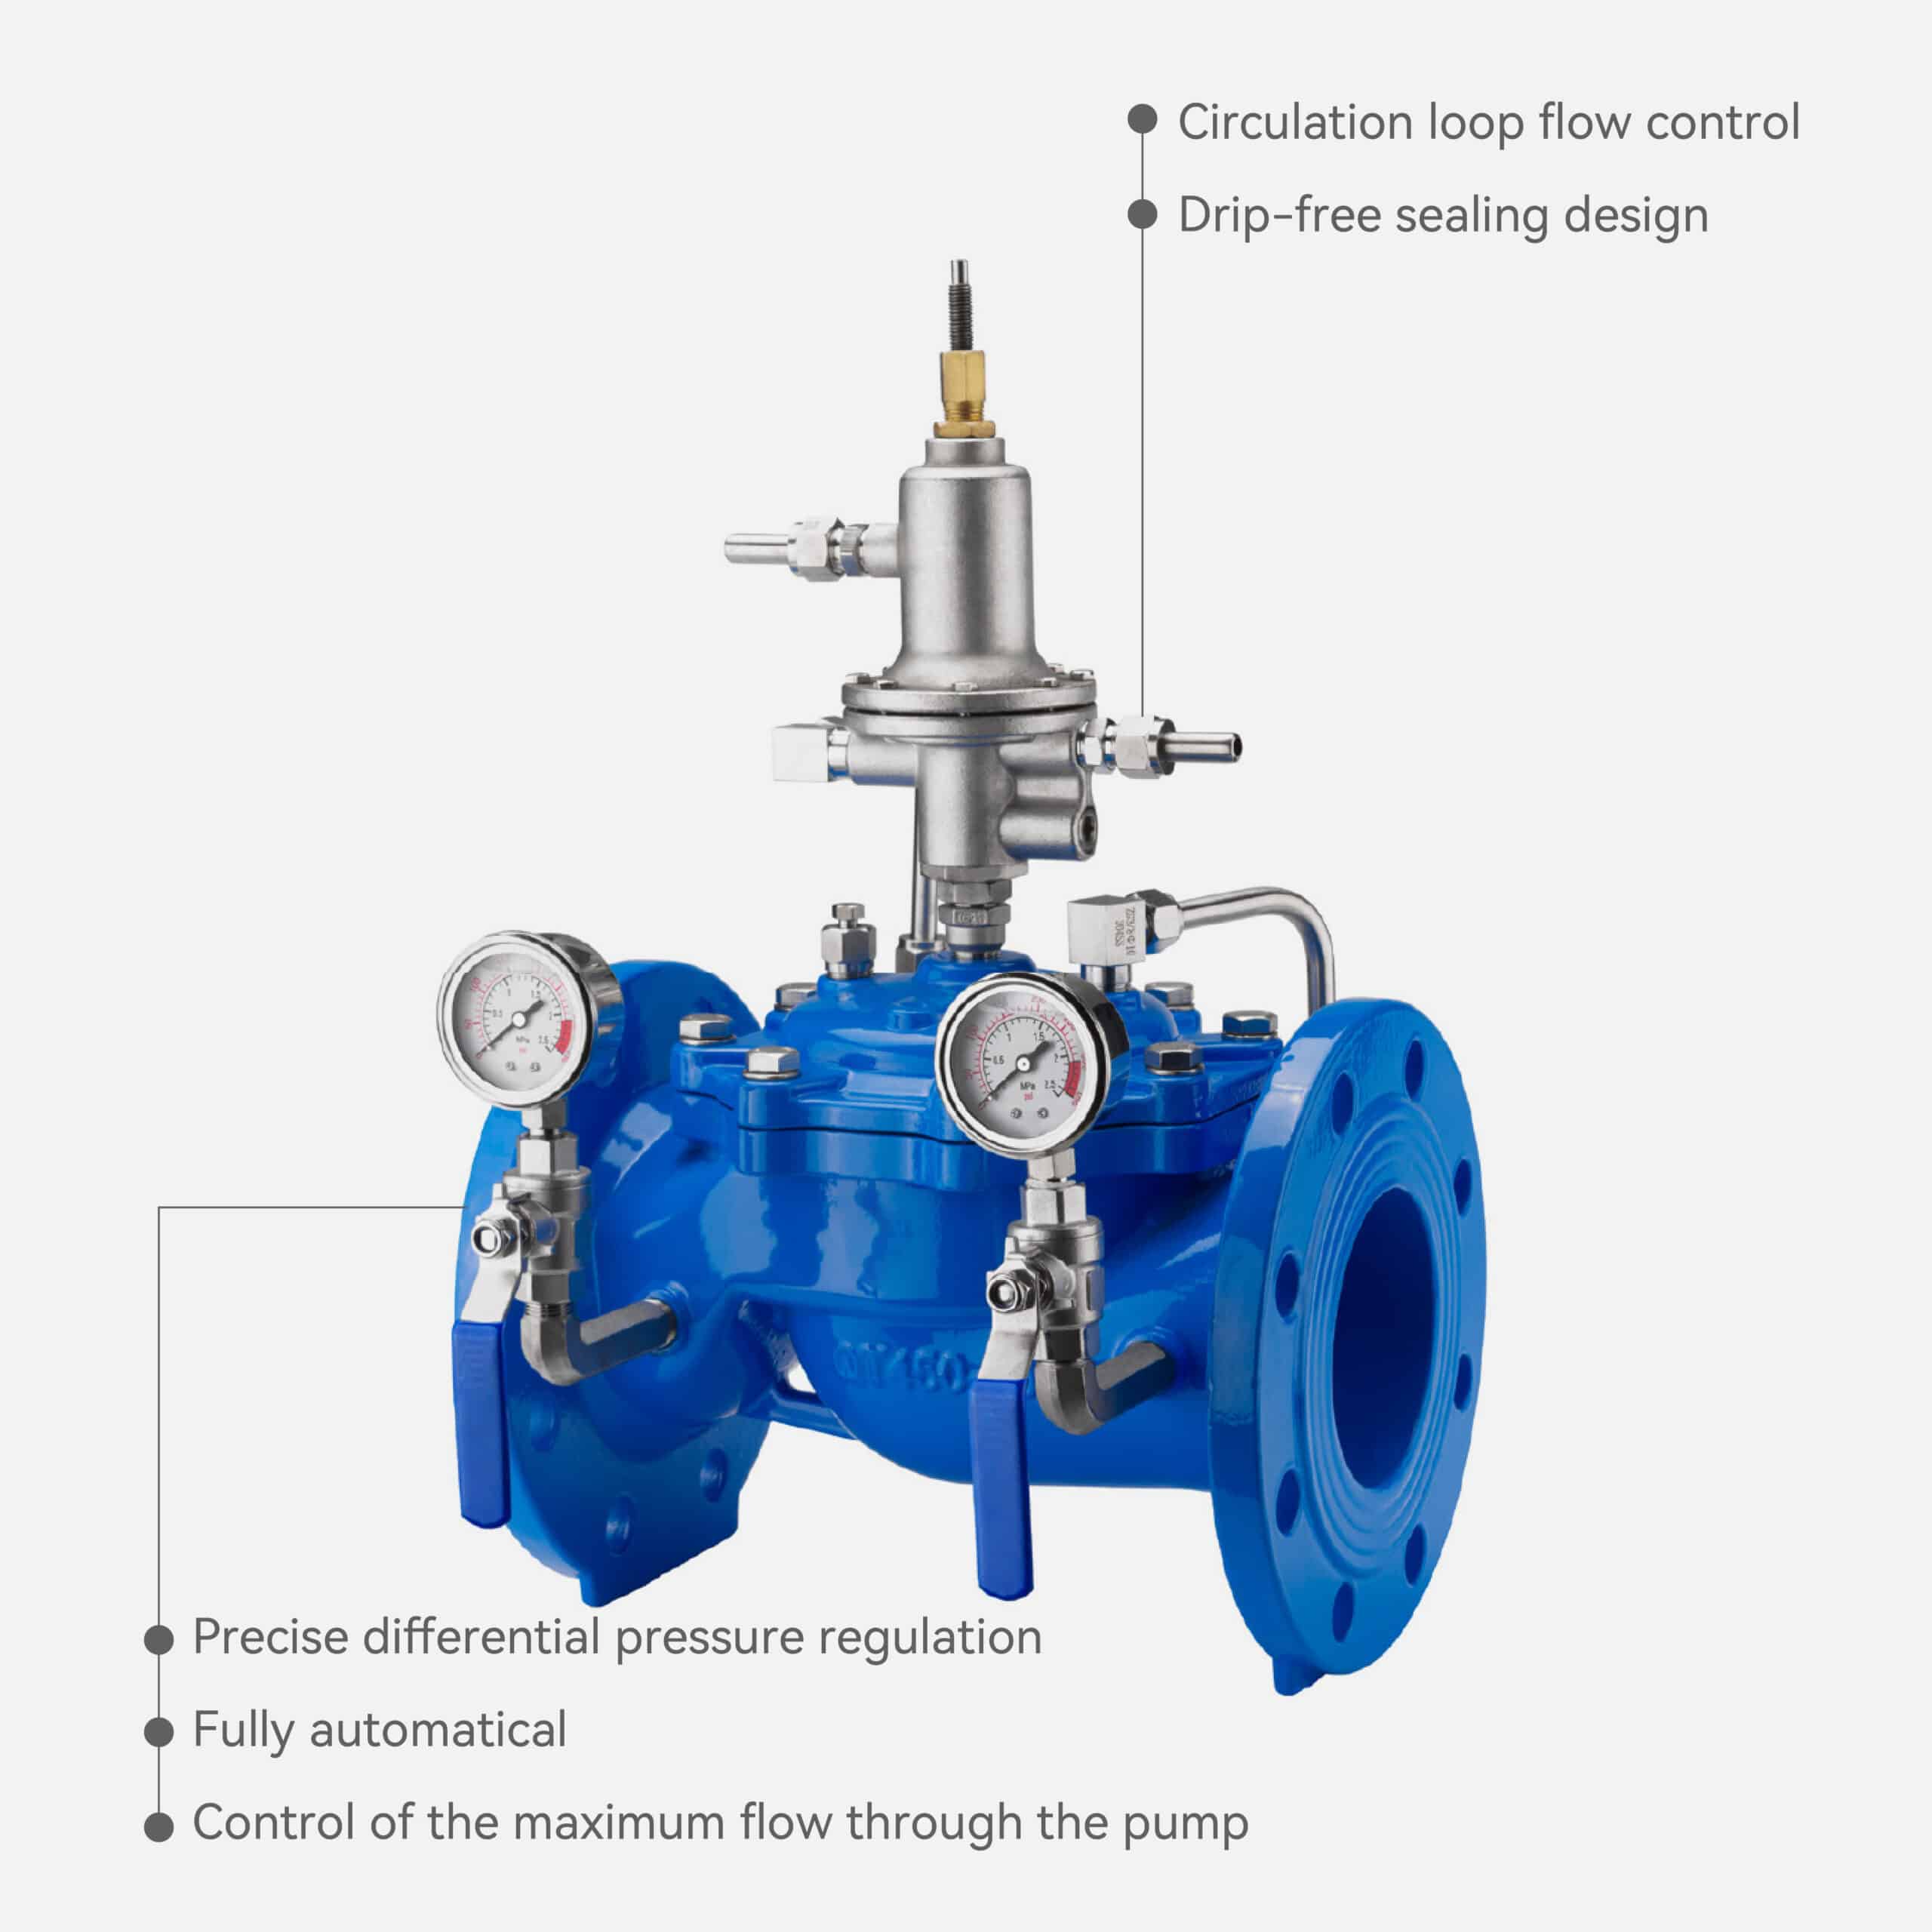
Water enters from the inlet side, flows through the needle valve into the main valve control chamber.
Water flows out of the control chamber through the double check pilot valve and ball valve, keeping the chamber pressure low — so the main valve stays wide open.
When the pump stops, the water in the control chamber cannot flow out.
The pressure in the chamber rises, pushing the diaphragm assembly down to close the main valve slowly.
This slow closing prevents water hammer and pipe vibration, ensuring a smooth, quiet shut-off.
Feature
● Nominal Diameter: DN40–DN800
● Connection Type: Flanged (EN1092-2 / ANSI / JIS standards available)
● Sealing Material: EPDM or NBR
● Applicable Temperature: ≤ 80°C
● Applicable Medium: Clean water
● Body Material: Ductile iron, brass, or stainless steel 304/316
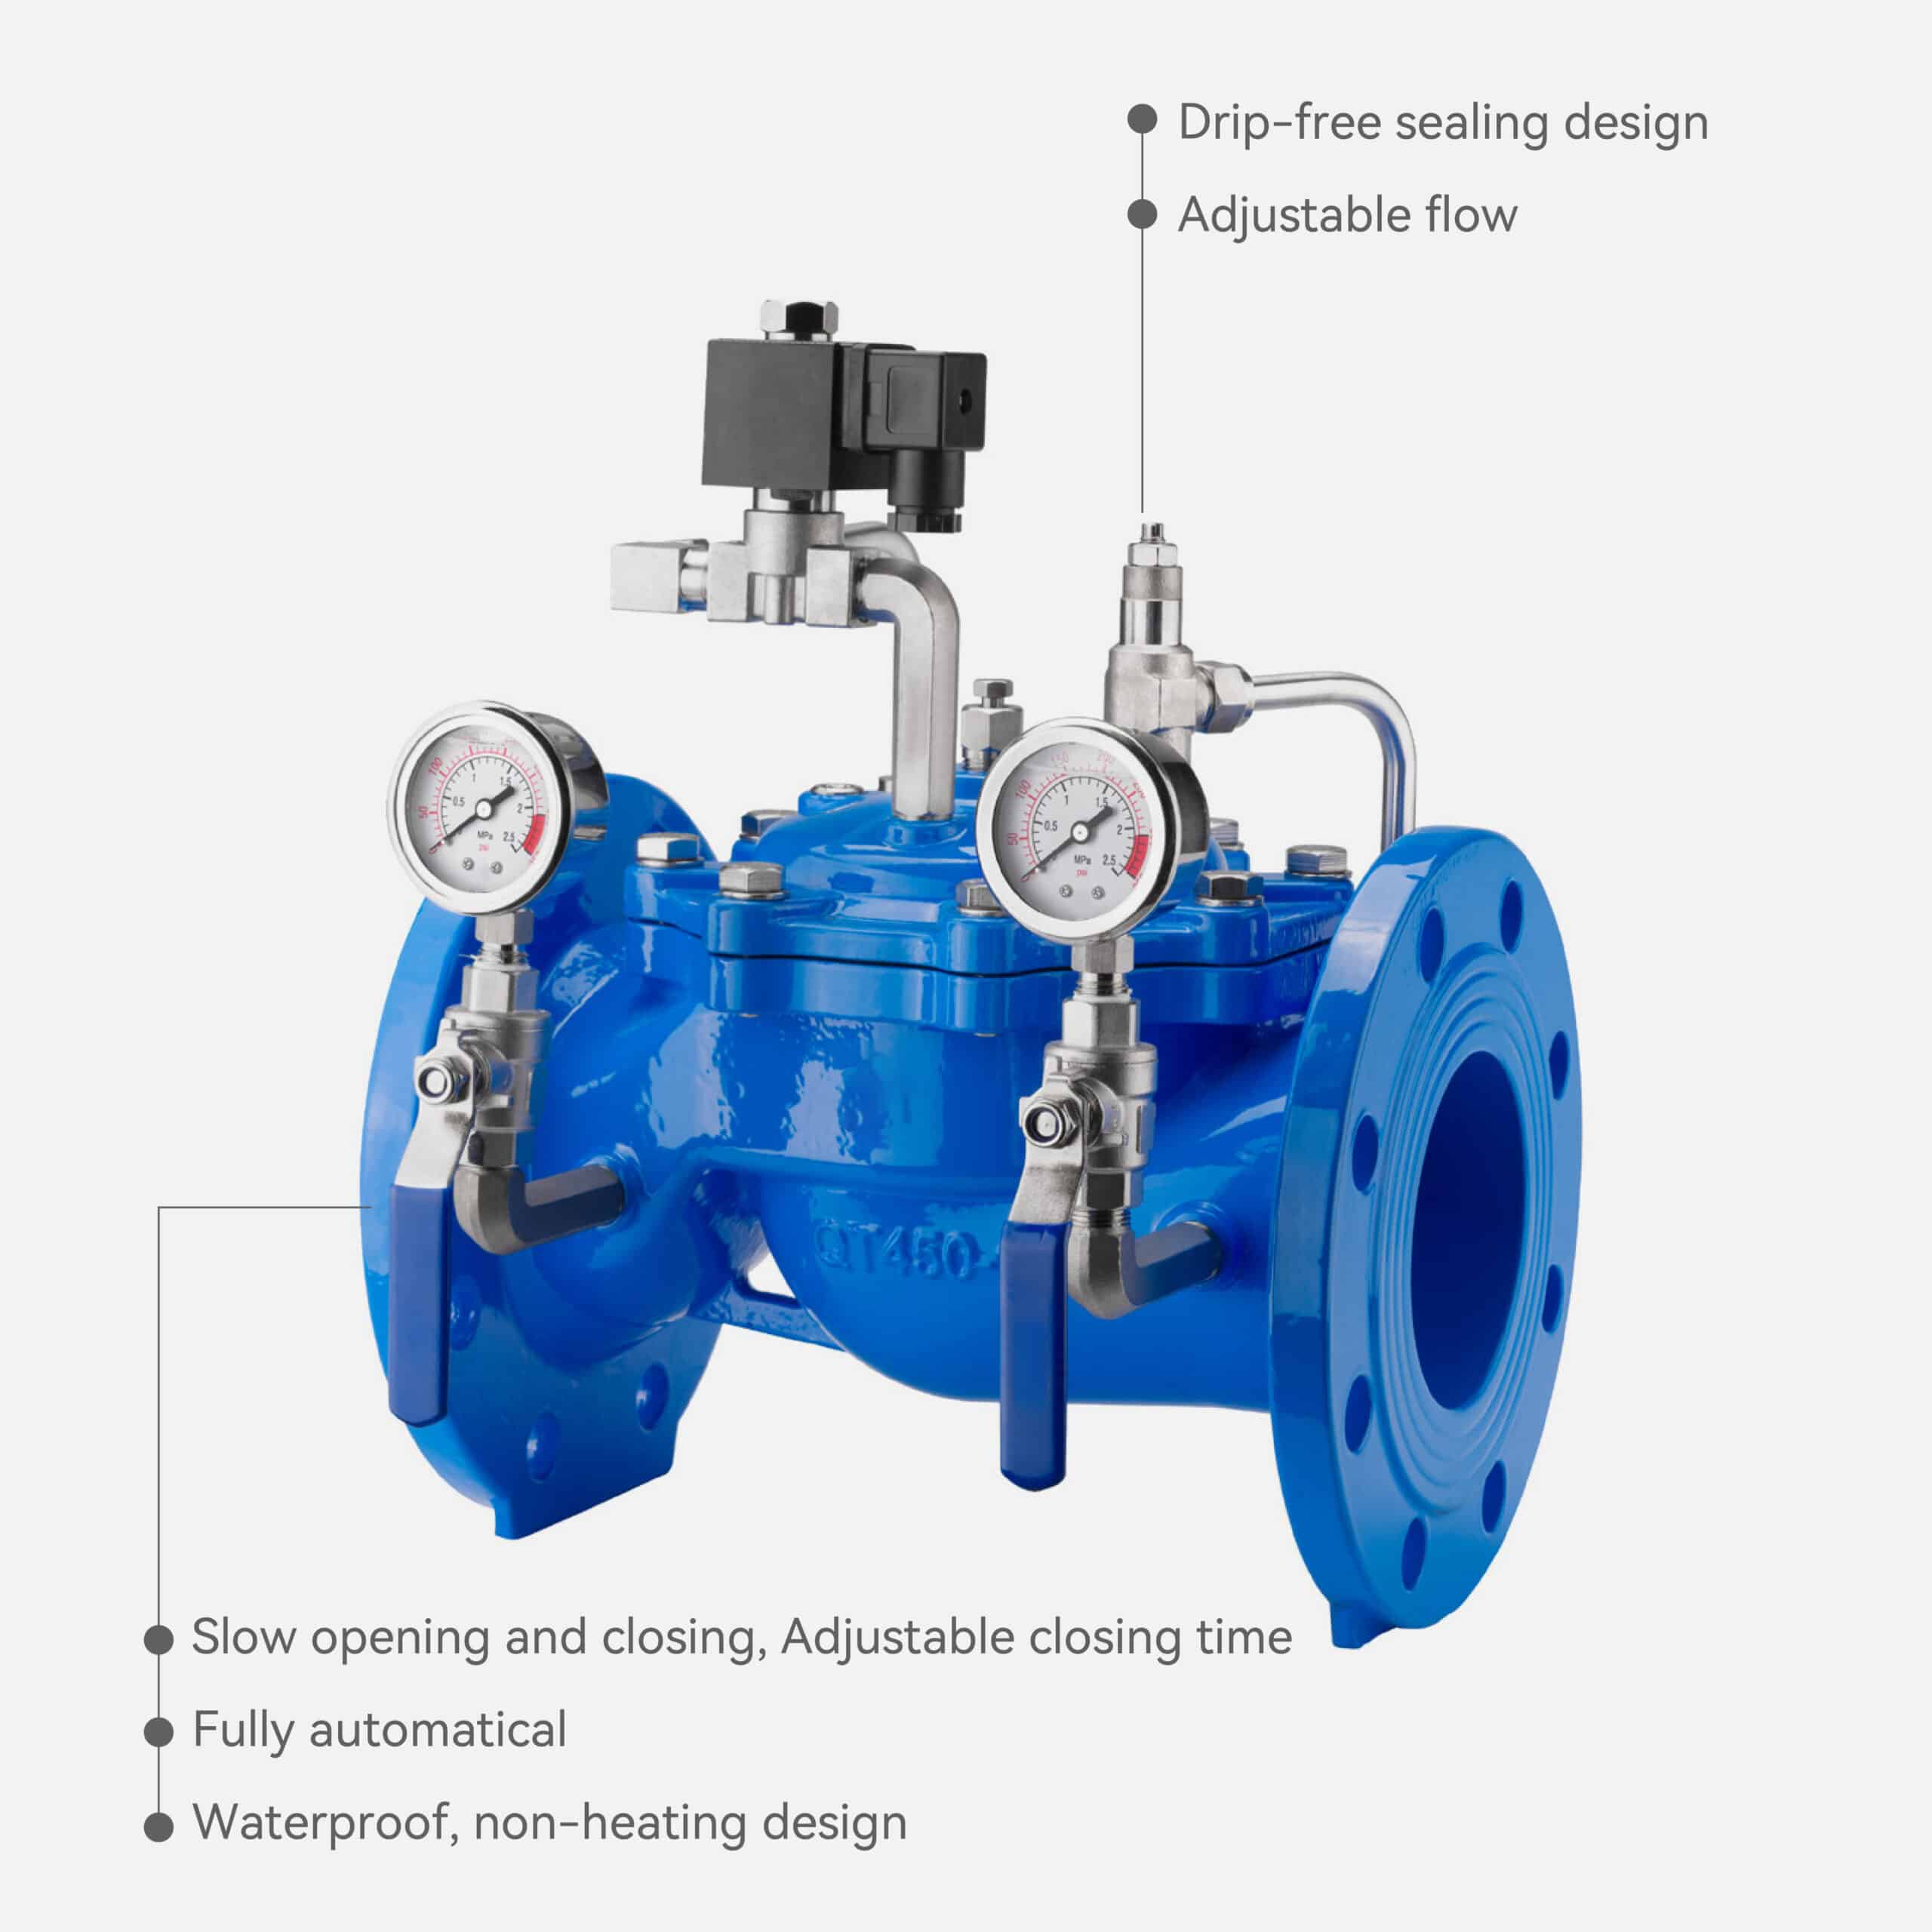
● Closing Time: Adjustable within 3–60 seconds
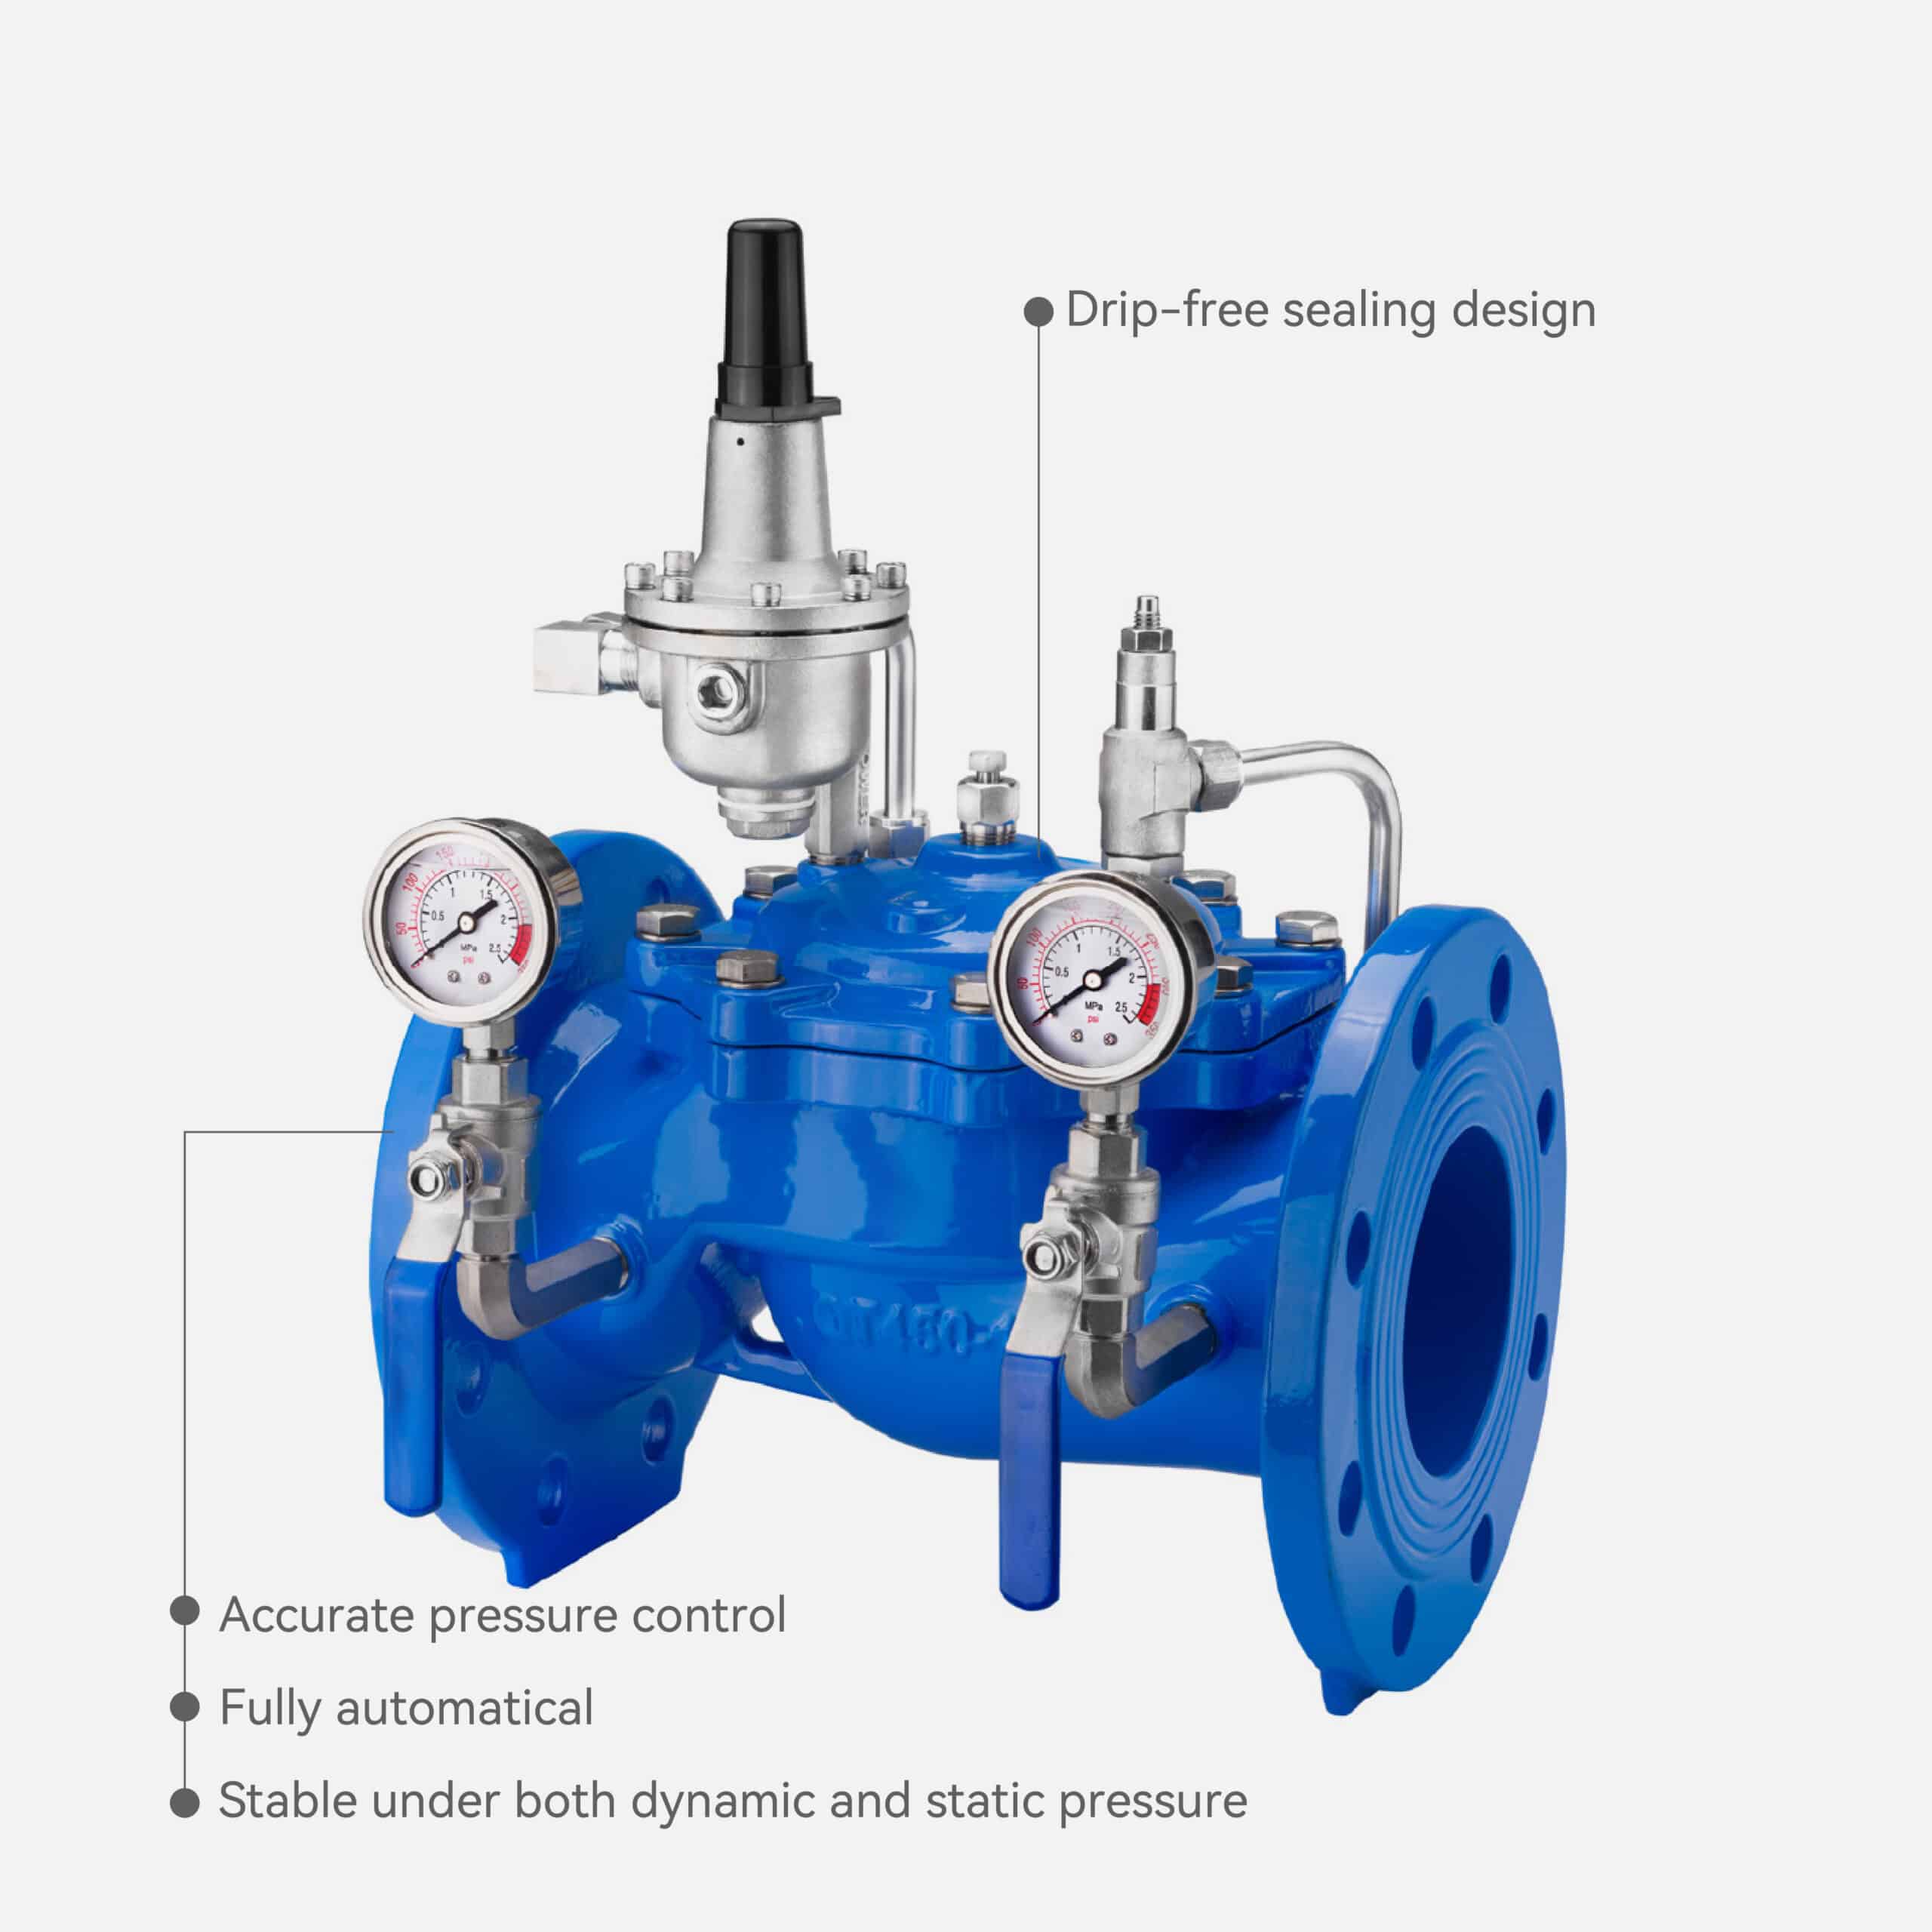
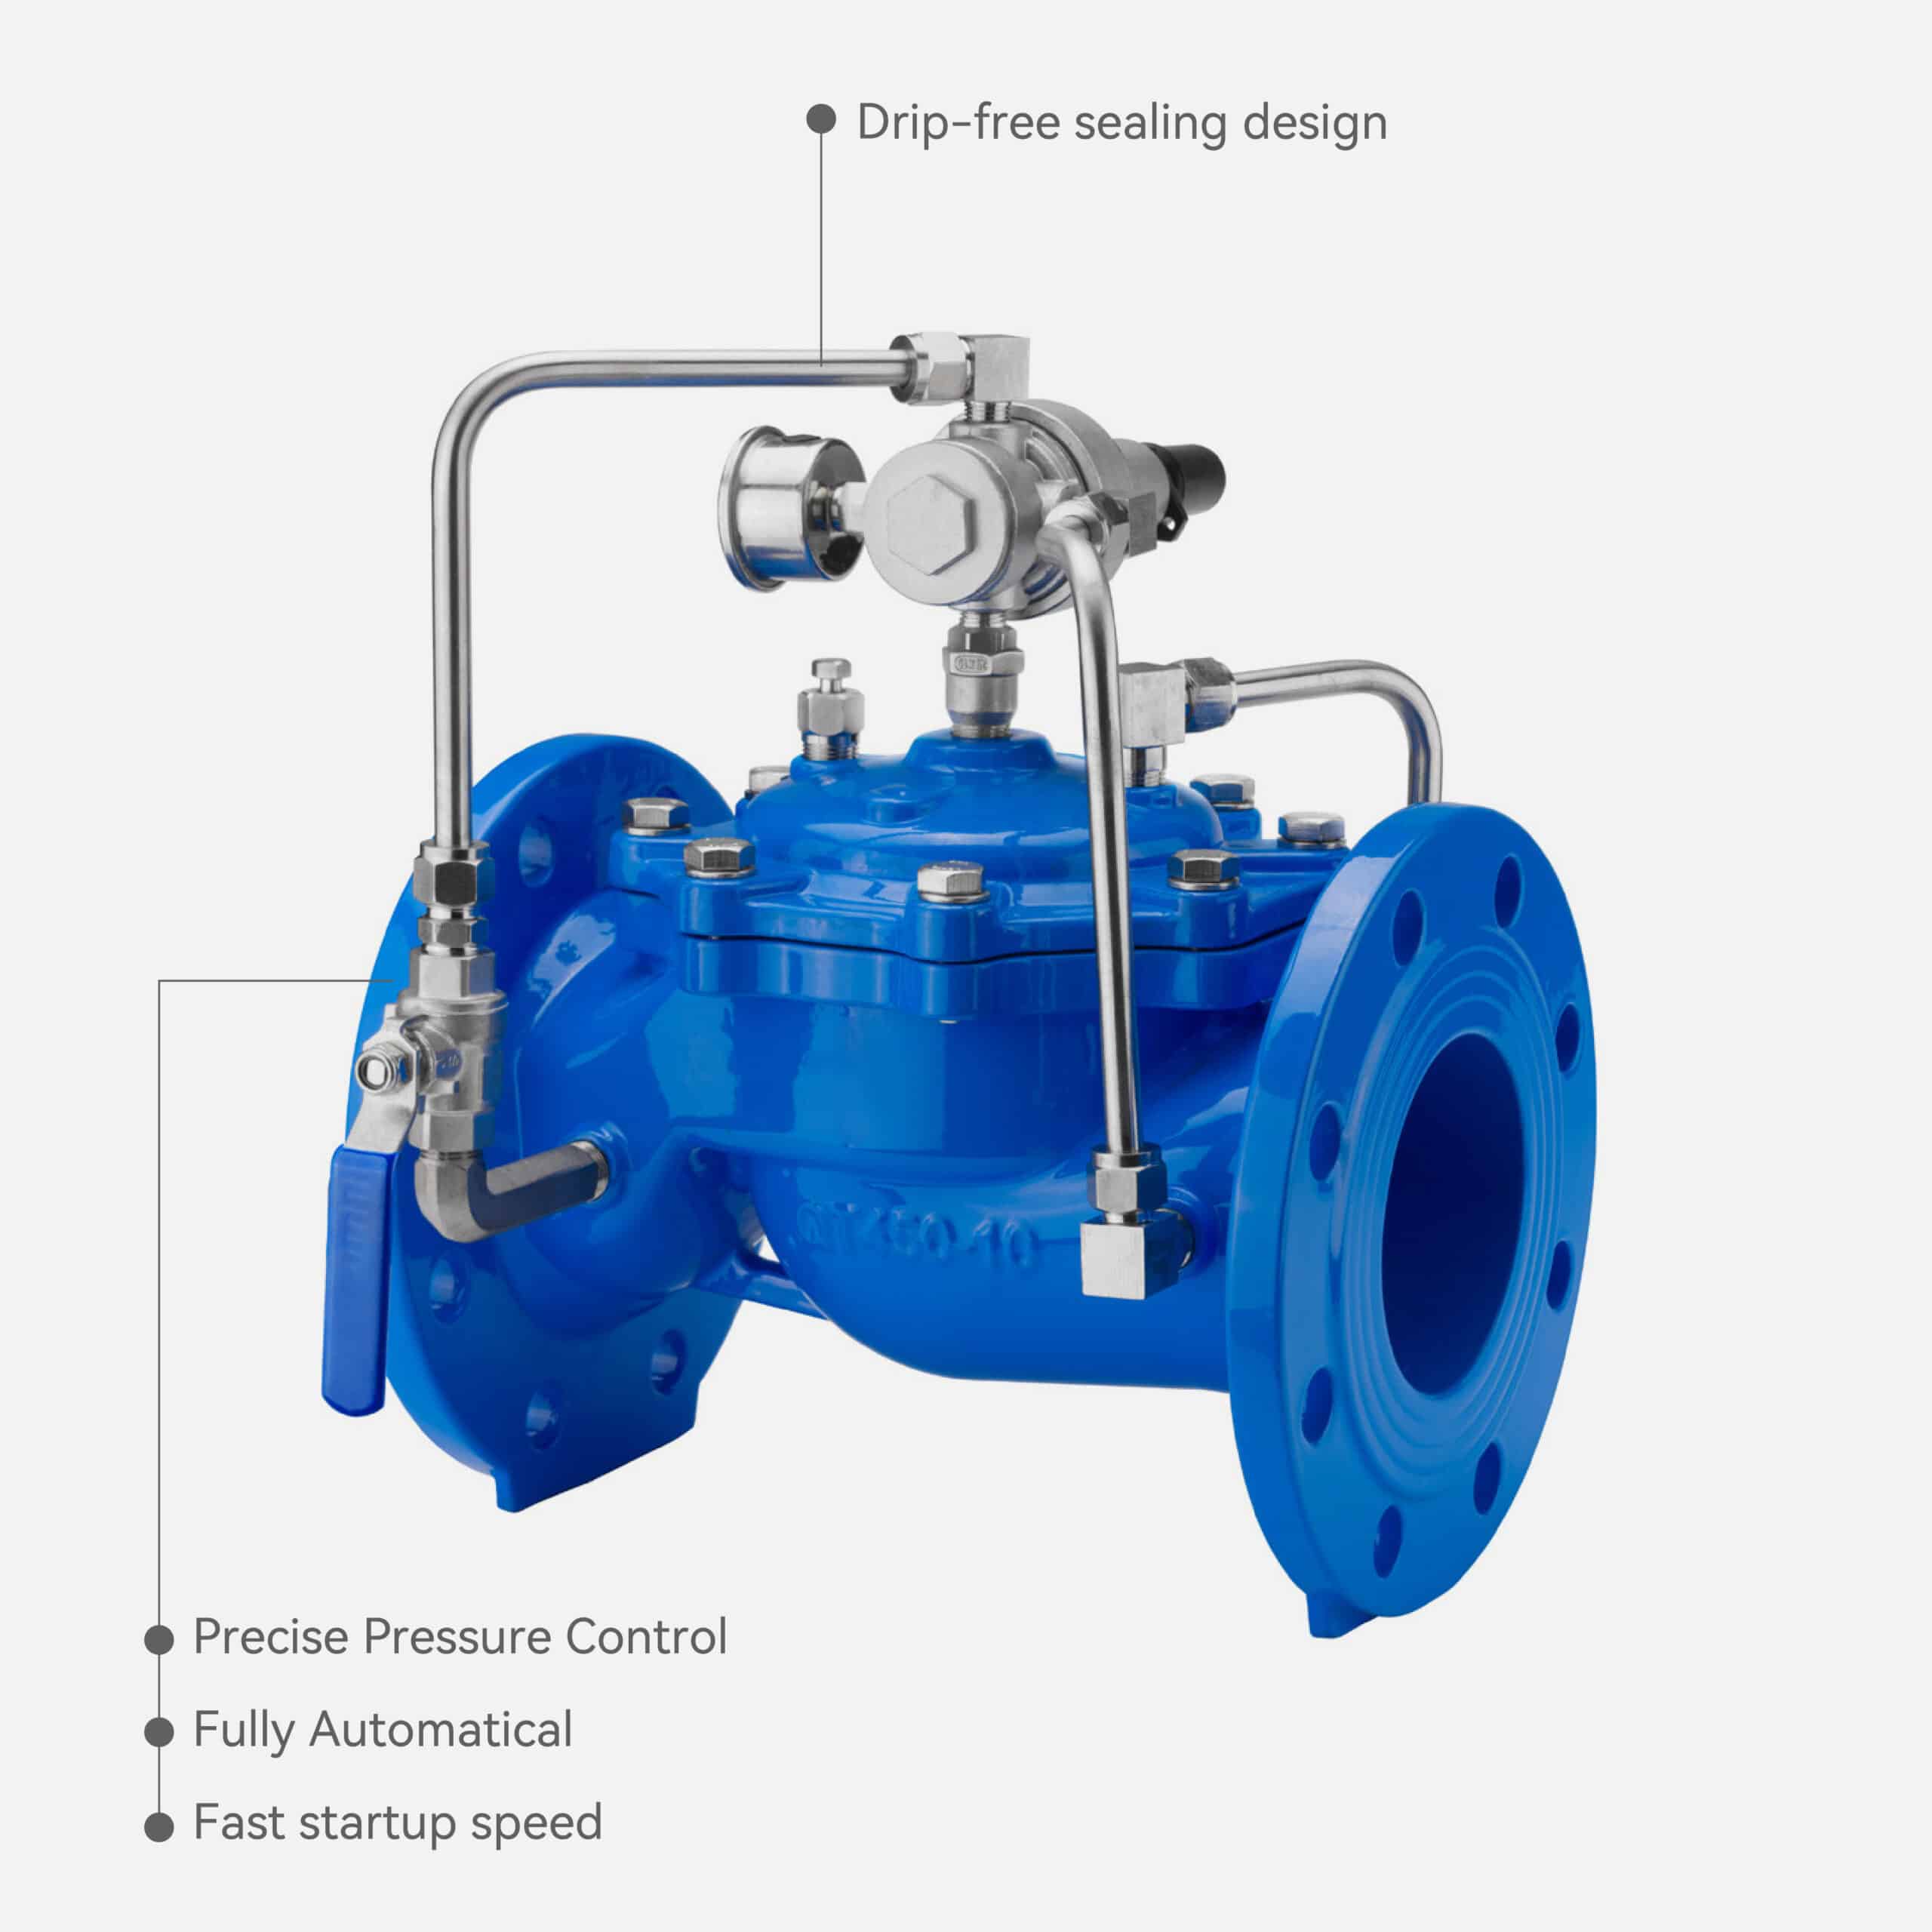
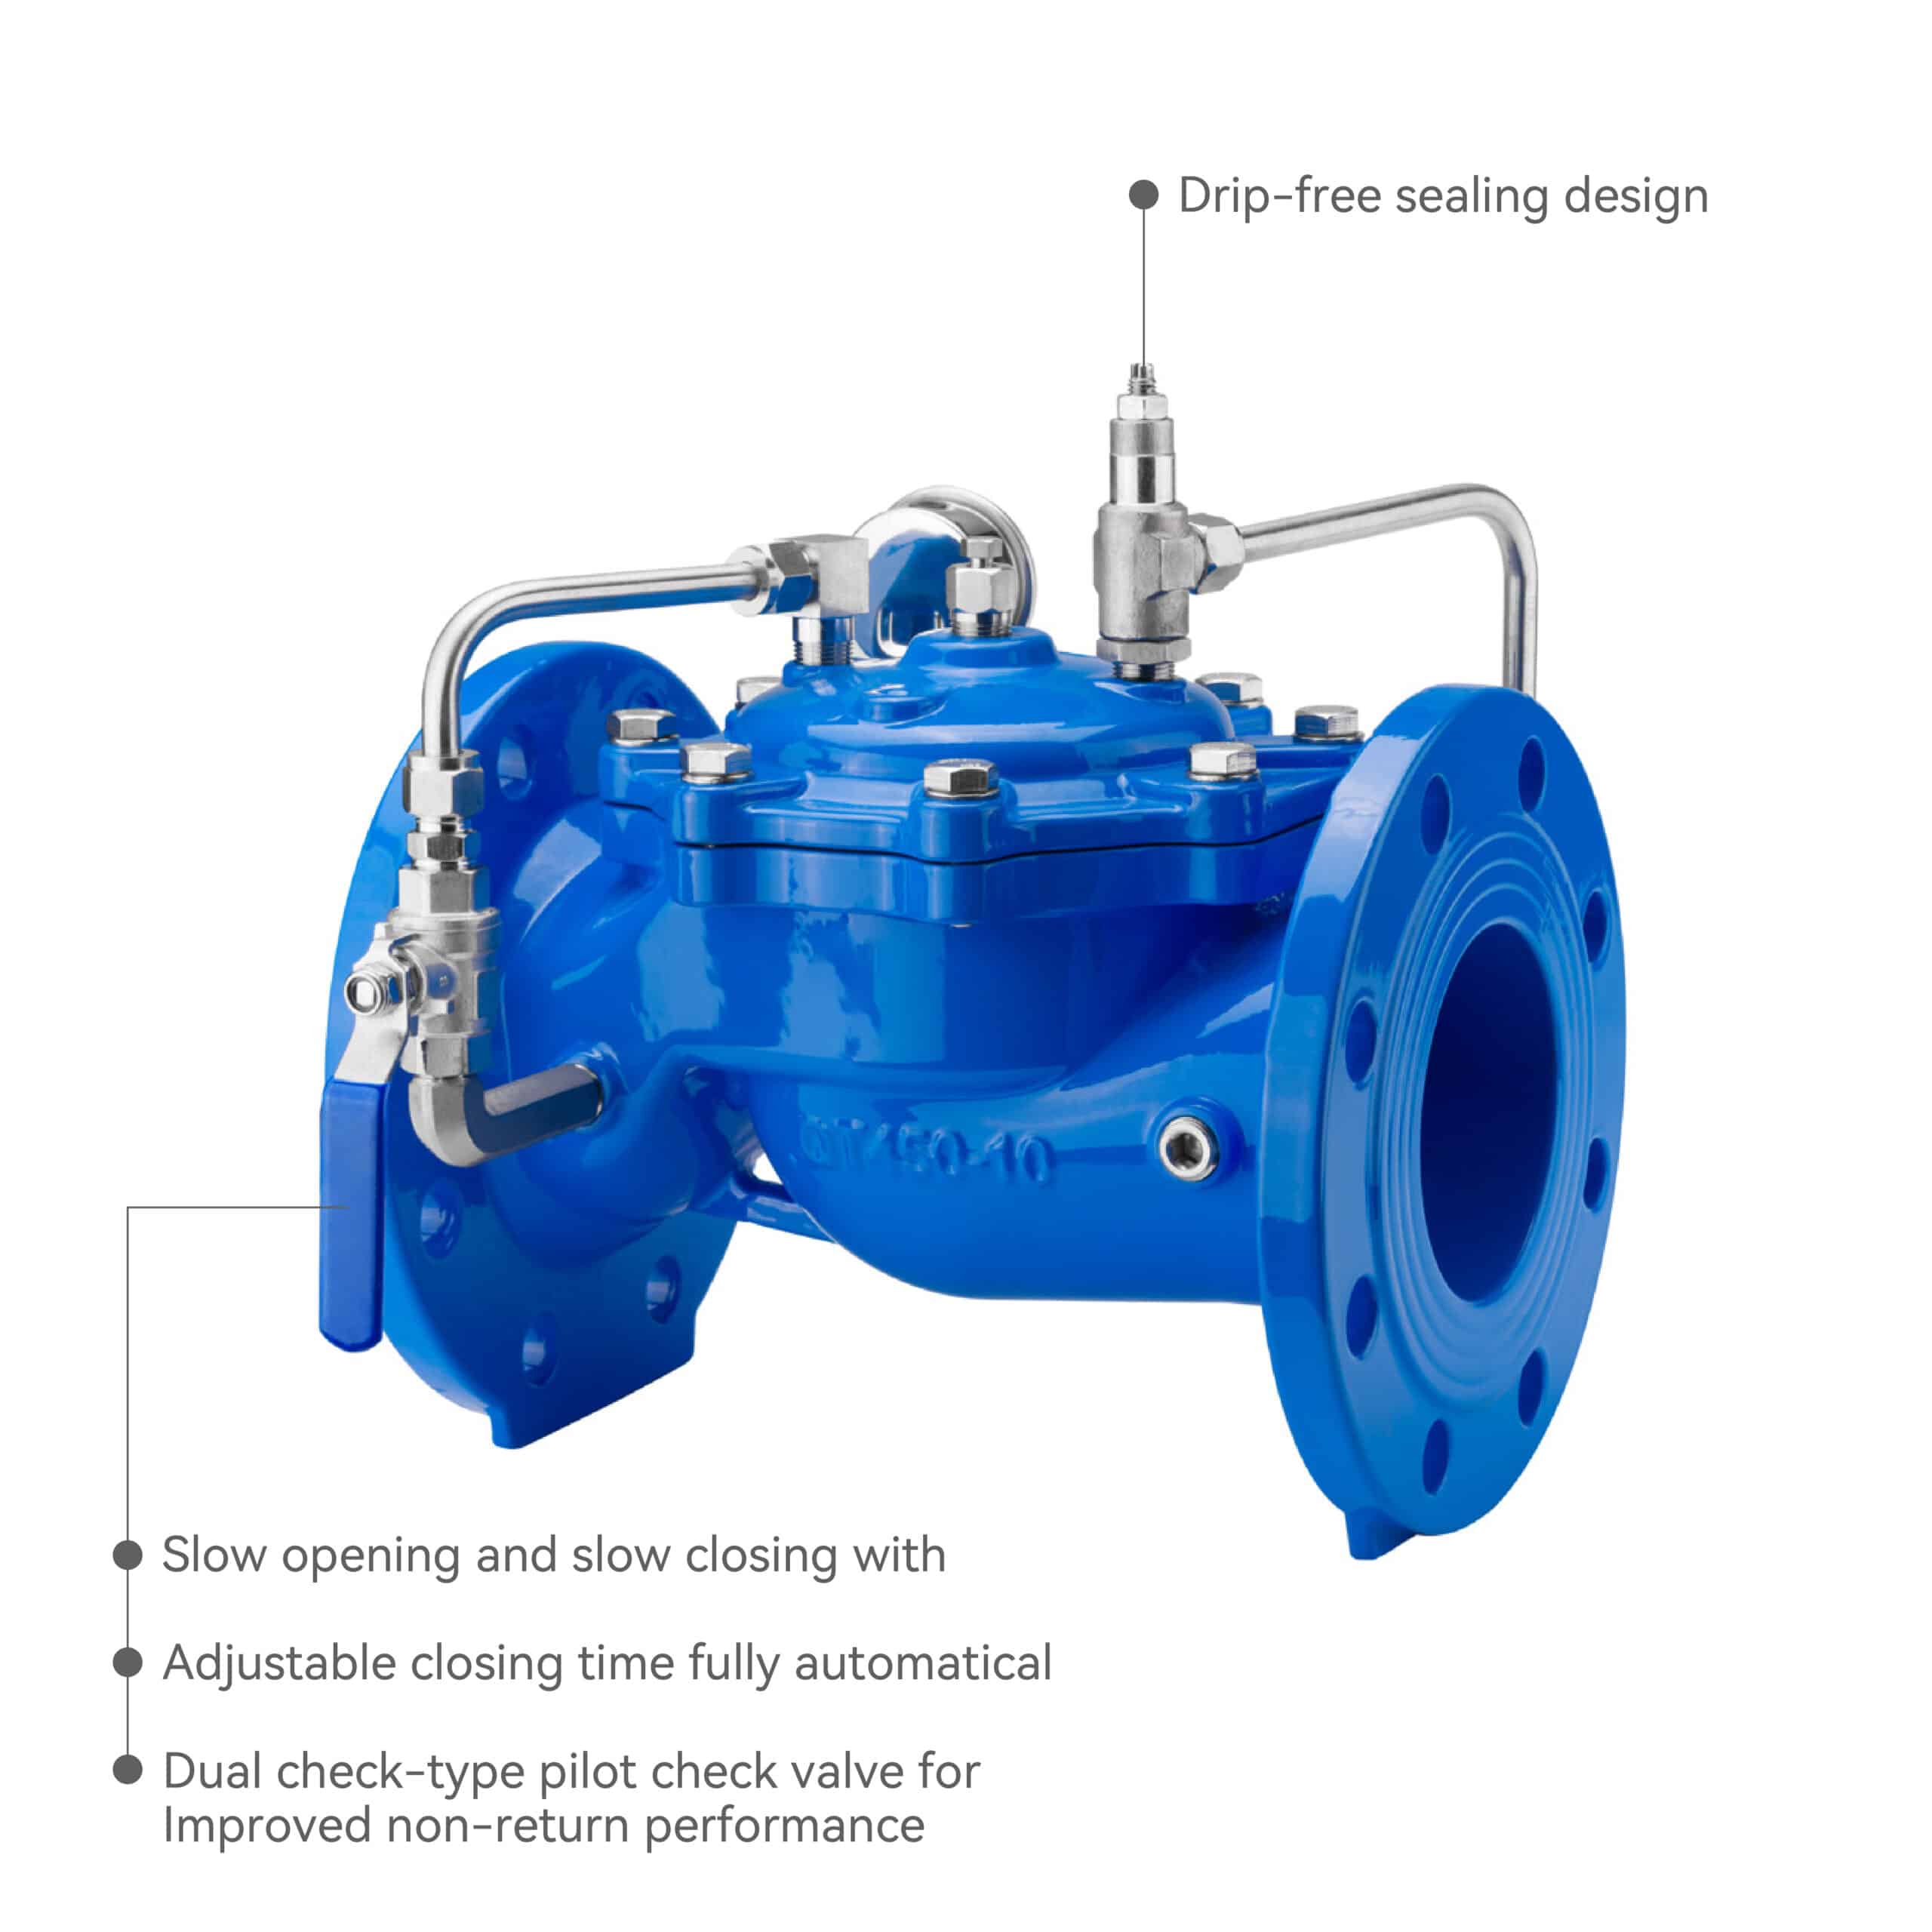
● Hydraulic & Pilot Control: Closes smoothly without hydraulic shock.
● Non-Slam Design: Prevents water hammer and protects pumps and pipes.
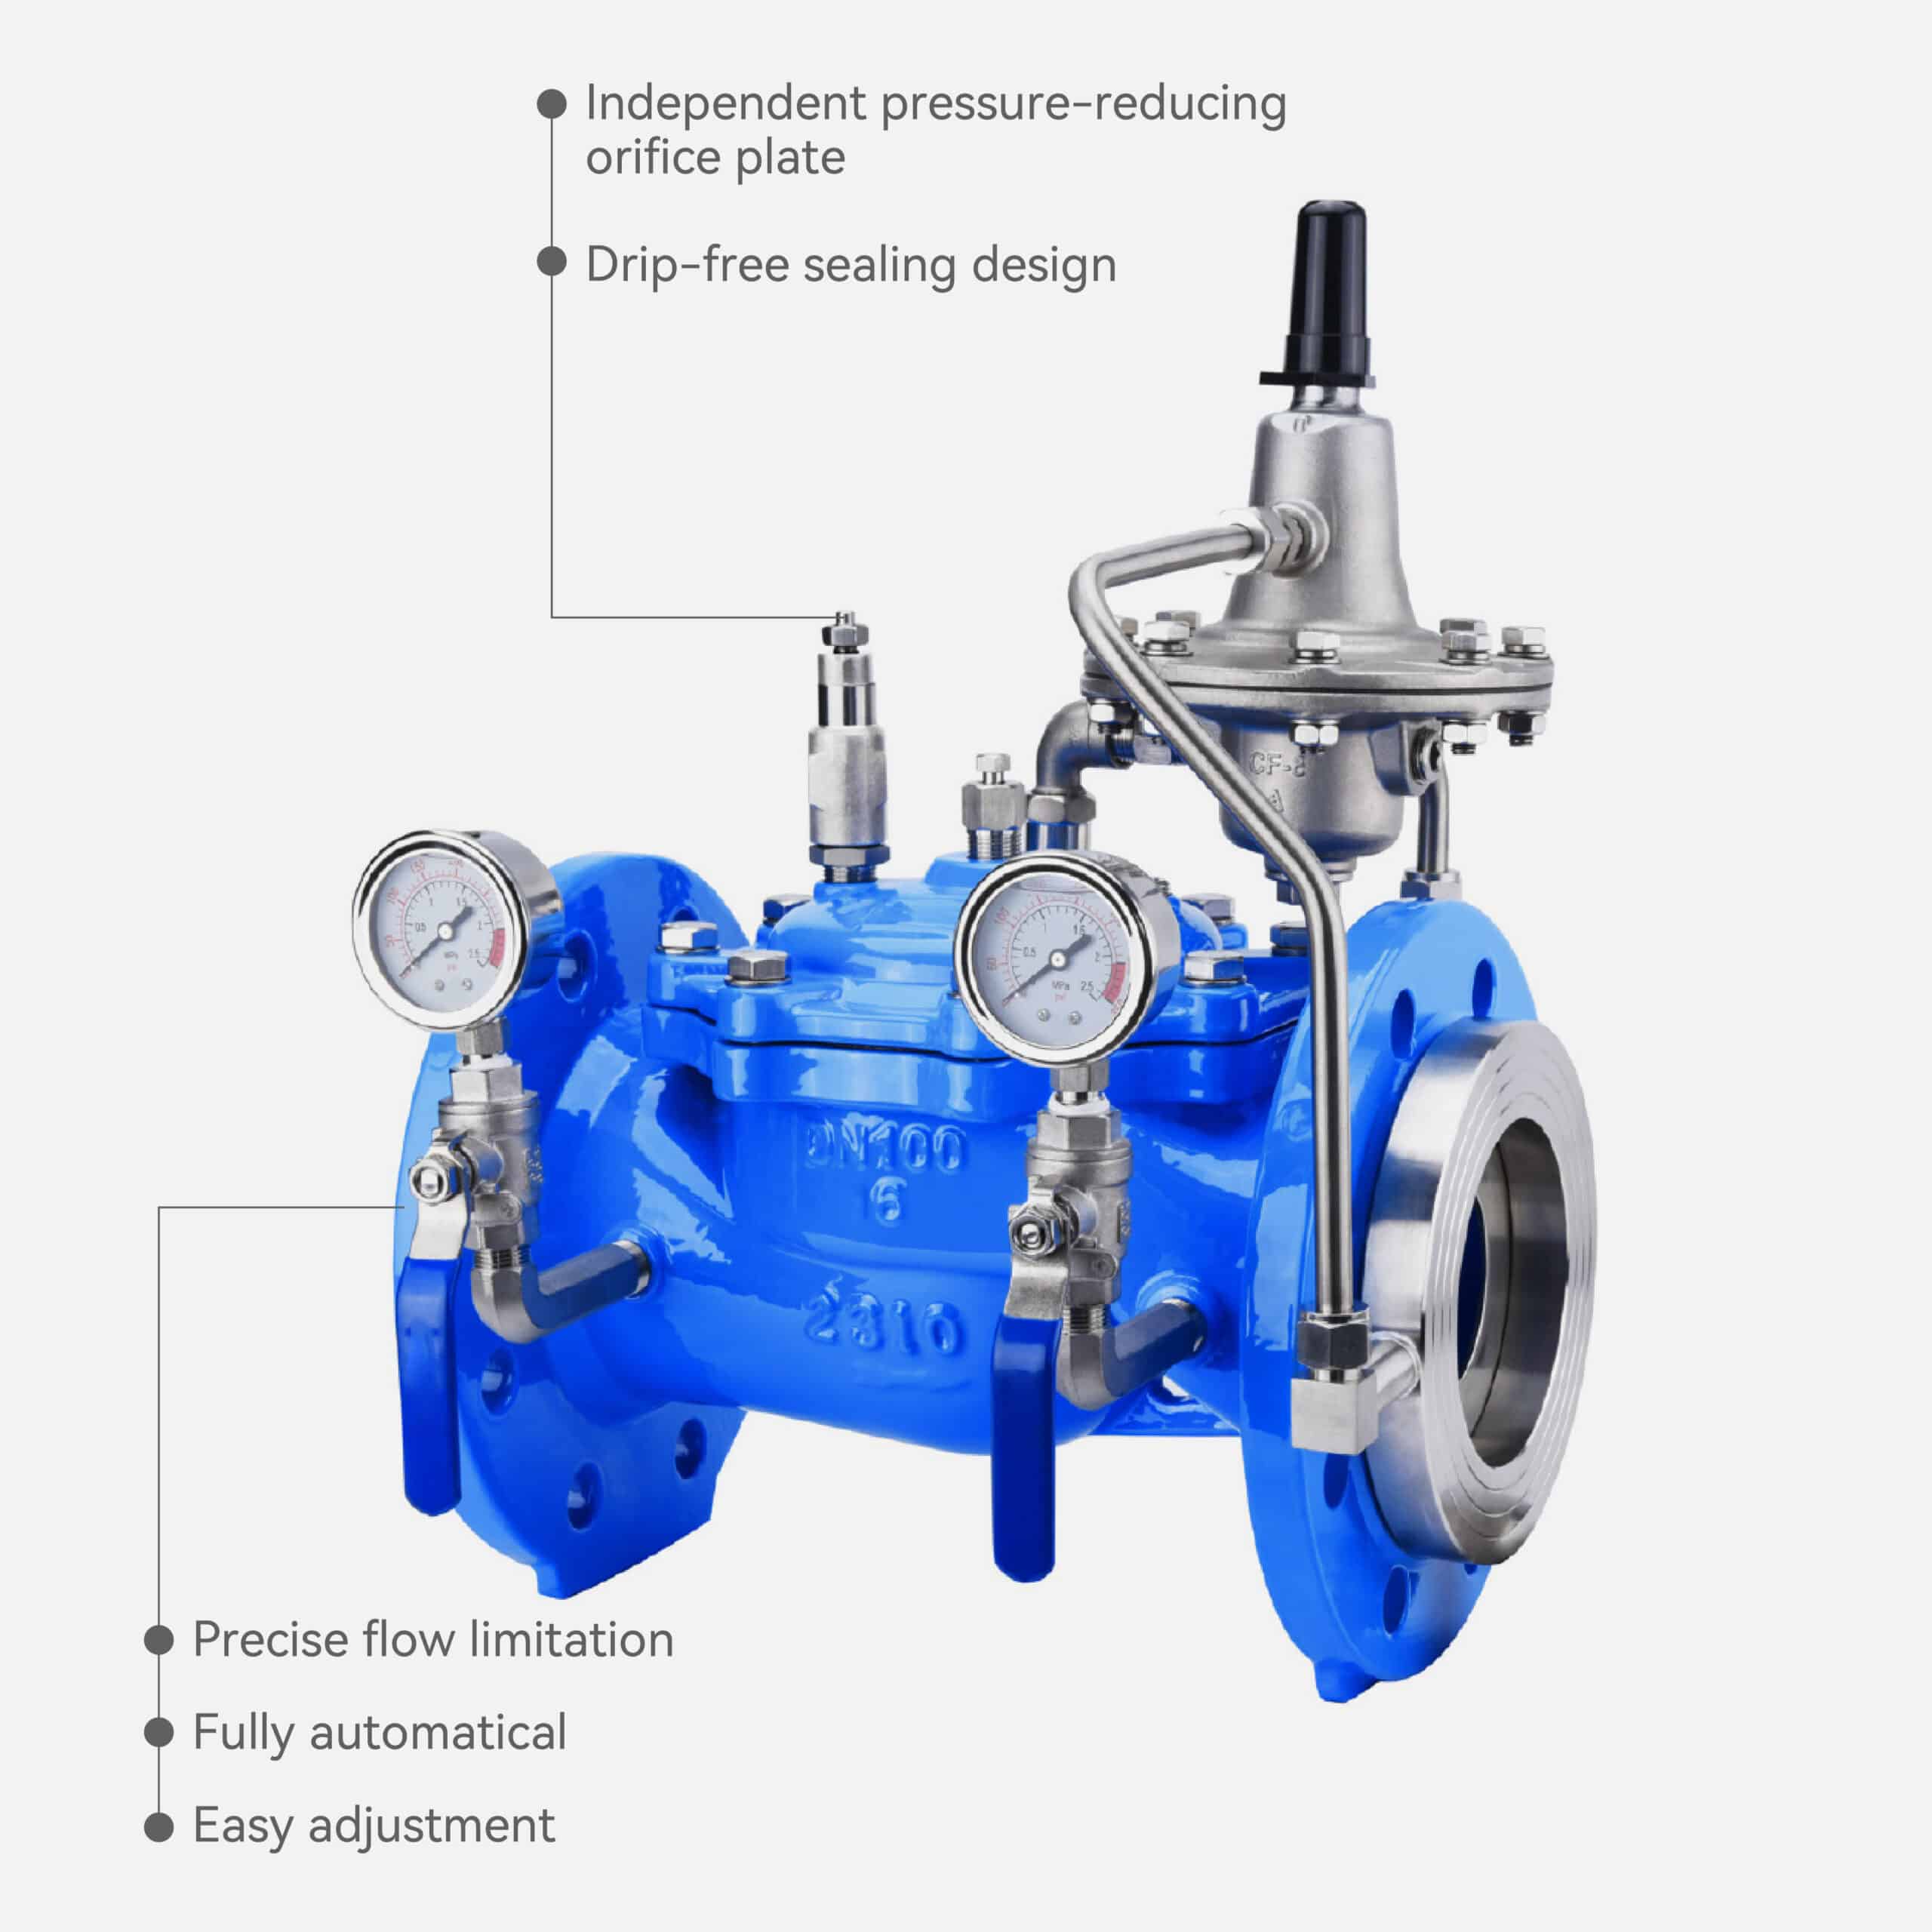
● Adjustable Closing Speed: Controlled by a needle valve for precise timing.
● Diaphragm Type: Seals reliably and responds flexibly.
● Automatic Operation: No external power or manual control required.
● Easy Maintenance: Simple structure and easy parts replacement.
Selection Guide
This guide will help you choose the right hydraulic, pilot-operated, diaphragm-type slow closing check valve for your typical water supply, booster pump, irrigation,
and municipal pipeline systems.
01
Step 1
Choose the Nominal Diameter (DN)
_
Simply match the valve DN with your pipeline DN.
Pipeline DN Recommended Valve DN
DN40–DN80 Same DN
DN100–DN200 Same DN
DN250–DN600 Same DN
Simple rule:
● For pump outlets → use the same DN as the pipeline
● For large-flow irrigation → never choose a smaller DN
● For long-distance pipelines → avoid undersizing to reduce pressure loss
02
Step 2
Choose the Pressure Rating (PN)
_
Choose based on your system’s maximum working pressure.
System Pressure Recommended PN
≤ 10 bar (1.0 MPa) PN10
≤ 16 bar (1.6 MPa) PN16 (most common)
≤ 25 bar (2.5 MPa) PN25 for high-pressure pumps
● Not sure? → Choose PN16
● High-head pump stations → Choose PN25
● Building water supply / municipal pipelines → PN10 or PN16
03
Step 3
Select the Connection Type
_
Application Recommended Type
● Municipal pipelines, pump stations, fire protection Flanged connection
● DN40–DN80 small pipelines Flanged (still preferred)
● 95% of applications use Flanged type — safest and most standard.
04
Step 4
Choose the Body Material
_
Clean water, pump rooms, municipal pipelines Ductile iron
Coastal, corrosive environment Stainless steel 316 or high-grade epoxy-coated ductile iron
High hygiene requirement Ductile iron + epoxy coating + stainless steel trim
● Normal water systems → Ductile iron
● Corrosive areas → 304/316 stainless steel
● Outdoor & humid areas → high anti-corrosion epoxy coated ductile iron
05
Step 5
Select the Sealing Material (EPDM or NBR)
_
● Clean water / drinking water EPDM
● Water with slight oil content NBR
● Use EPDM for all clean-water systems.
06
Step 6
Confirm Temperature Range
_
● Judberd slow closing check valves work within:0–80°C
● If your temperature is higher → Not applicable; a high-temperature valve type is required instead.
07
Step 7
Determine the Installation Orientation & Position
_
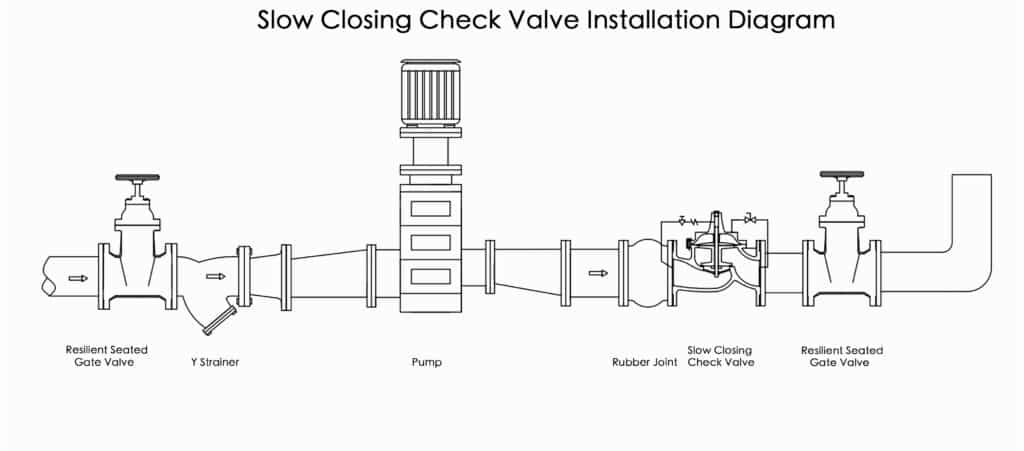
● Install as close to the pump outlet as possible
● Flow direction must match the arrow
● Vertical or horizontal installation is allowed
● Keep space for needle valve and ball valve adjustments
08
Step 8
Choose Based on Operating Conditions (MOST IMPORTANT)
_
Condition 1 — Prevent Water Hammer / Pup Stops Quickly
● Choose Slow Closing (Non-Slam) Type
● Closing time adjustable 3–60 seconds
● Equipped with: needle valve, pilot valve, control tubing
Condition 2 — Pump Starts/Stops Frequently
● Choose valve with fully adjustable closing speed
Condition 3 — Large Flow / Need Low Pressure Loss
● Match valve DN with pipeline DN
● Avoid undersizing
Condition 4 — Long Distance or High Static Head Pipelines
● Increase closing time to reduce water hammer
● Ensure the valve is close to the pump
Give Judberd team below 5 Data Points, We Will Select the Perfect Valve for You
_
● Pipeline size (DN)
● System pressure (bar/MPa)
● Medium (clean water / oily water / chemicals)
● Installation location (pump outlet / building supply / irrigation)
● Environment (indoor / outdoor / seaside / corrosive)
Installation Guide
1. Preparation Before Installation
Before starting the adjustment process, confirm the following
01
Confirm valve model and size (DN, pressure rating, flange standard).
02
Check flow direction arrow on the valve body.Make sure the flow direction is correct and not reversed.
03
Inspect all accessories: Ball valves, Needle valve, Pilot valve assembly, Control tubing, Fasteners & gaskets
04
Ensure installation space: Enough room for ball valve handles; Enough room for needle-valve adjustments; Easy access for future maintenance
2. Prepare the Pipeline
01
Flush (clean) the pipeline thoroughly before installation.Remove sand, welding slag, rust, debris to avoid blockage.
02
Ensure upstream pipeline has a strainer (filter) installed before the pump and before the check valve.Prevent dirt from entering the control system.
3. Install the Valve (Horizontal or Vertical)
01
Lift the valve using lifting lugs or slings, do NOT lift using copper tubing.
02
Align valve flanges with pipeline flanges.
03
Insert gaskets between flanges.
04
Install bolts and nuts:Tighten diagonally in a criss-cross pattern, Make sure the valve is centered and not under stress
4. Connect the Control System
01
Ensure all copper control tubes are correctly connected to:Ball valves, Needle valve, Pilot valve assembly
02
Confirm no tube is bent, twisted, or blocked.
03
Make sure all joints are tightened properly.
5. Valve Setting Before Water Filling
01
Fully open all ball valves on the control tubing.
02
Adjust the needle valve to the initial position:Recommended: 1.5~2 turns open as a starting setting, (Closing speed can be fine-tuned later)
03
Ensure the main valve is in fully open state (control chamber pressure released).
6. System Water Filling (First Start-Up)
01
Slowly open the upstream isolation valve.
02
Allow the valve and pipeline to fill with water gradually.
03
Check all flange connections and tubing joints for leaks.
04
Continue to fully open upstream and downstream isolation valves.
05
Let the system stabilize for 1–2 minutes.
7. Adjusting the Closing Speed
01
Shut down the pump to observe closing behavior.
02
If the valve closes too fast → slightly open the needle valve more.
03
If the valve closes too slow → slightly close the needle valve.
04
Recommended final closing time: 3–60 seconds, depending on system needs.
05
Repeat testing until the valve closes smoothly with no shock/no slam.
8. Final Safety Check
01
All ball valves remain fully open.
02
Needle valve adjusted to the desired closing speed.
03
All pipes, flanges, and control tubing are leak-free.
04
Flow direction is correct.
05
No abnormal noise or vibration when pump stops.
9. System Ready for Operation
Once all tests are completed and closing action is smooth, the valve is ready for long-term usage.
Selection Guide
This guide will help you choose the right hydraulic, pilot-operated, diaphragm-type slow closing check valve for your typical water supply, booster pump, irrigation,
and municipal pipeline systems.

Regular Inspection (Every 3–6 Months)
_
Visually check:
No external leaks from flanges, copper tubes, or fittings
Flow direction arrow still in place
No rust, cracks, or physical damage on the valve
No unusual vibration or noise when the pump starts or stops
Ball valves on the control tubing are fully open
If anything looks funny, do the troubleshooting steps below.

Clean the Strainer Regularly
_
The most common cause of valve problems is dirt or debris.
What to do:
Close the upstream and downstream isolation valves.
Remove and clean the strainer screen.
Reinstall the screen and tighten the cover.
Slowly reopen the pipeline.
Why:
A dirty strainer reduces water flow and affects the pilot valve and control chamber.

Check the Control Tubing and Fittings
_
Judberd valves use copper control tubes, ball valves, needle valves, and a pilot valve.
Maintenance tips:
Make sure all ball valves are fully open.
Make sure all copper tubes are straight, not bent or crushed.
Tighten fittings if they are dripping.
If the needle valve is clogged, clean or replace it.
If the valve opens slowly → the tubing might be blocked.
If the valve closes slowly → the needle valve might be open too much.

Adjust the Closing Time (If Needed)
_
The closing speed is controlled by the needle valve.
Close the needle valve slightly → faster closing (less backflow)
Open the needle valve slightly → slower closing (less water hammer)
Recommended closing time: 3–60 seconds
Make small adjustments (¼ turn each time), then test by starting and stopping the pump.

Check for Leaks Around the Valve
_
If you see water dripping:
Possible causes Loose flange bolts, Loose copper tube fittings, Old gasket or worn seal, Diaphragm aging
What to do
Tighten the bolts using a cross pattern (diagonal method).
Re-tighten the copper tube connectors.
Replace the flange gasket if needed.
If the internal seal is poor, inspect or replace the diaphragm and O-rings.

Inspect and Replace the Diaphragm (Every 2–3 Years)
_
The diaphragm is a key moving part.
Replace the diaphragm if:The valve cannot close fully; The valve vibrates or opens/closes irregularly; There is internal leakage even after cleaning
Steps (simplified):1, Close the inlet/outlet valves and release the pressure. 2, Remove the top cover. 3,Take out the diaphragm assembly.
4, Replace with a new original Judberd diaphragm. 5,Reinstall the cover using cross tightening.

Avoid Common Misuse
_
To ensure a long service life:
Do not use the valve above 80°C
Do not use with oil or chemicals (unless approved)
Do not hit or bend the copper tubes
Do not operate with clogged strainers
Do not lift the valve by the copper tubing
Do not run the valve at excessive pressure beyond the PN rating

After Any Maintenance — Test the Valve
_
After cleaning or adjustment:
Slowly fill the pipeline with water
Check for leaks
Start the pump — confirm the valve opens fully
Stop the pump — confirm the valve closes smoothly
Adjust the needle valve if needed
If everything is quiet and stable, the valve is ready for long-term operation.
Common Issues, Possible Causes, and Solution
1, Flow hunts (flow goes up and down repeatedly)
Symptoms:
● Flow is lower than expected
● Downstream pressure drops significantly
● Pressure drop across the valve is higher than normal
Possible Causes:
● Pipeline not properly flushed; debris enters the main valve or control tubing.
● Upstream strainer is clogged, causing insufficient inlet flow.
● Control chamber cannot release water (ball valves not fully open, pilot valve or needle valve blocked).
Incorrect valve sizing (DN too small), causing excessive pressure loss at high flow.
How to Prevent:
● Thoroughly flush the pipeline before installation.
● Ensure an upstream strainer is installed and cleaned regularly.
● Confirm all ball valves are fully open and control tubing is unobstructed.
● Select the correct nominal diameter with adequate flow margin for the system.
2, Valve Closes Too Fast, Water Hammer
Symptoms:
● Loud “bang” noise when pump stops
● Pipeline vibration or unstable pressure readings
Possible Causes:
● Needle valve opening is too small → closing time too short.
● System has inherently strong water hammer (long pipeline, high static head, rapid flow changes).
● Piping layout includes many sharp bends or sudden diameter changes.
How to Prevent:
● Adjust the needle valve to increase closing time (3–60 seconds recommended).
● For long-distance pipelines or pump stations, increase slow-closing time and test repeatedly.
● Optimize piping design by reducing unnecessary elbows or sudden transitions.
3, Valve Closes Too Slow, Backflow or Pump Reverse Rotation
Symptoms:
● Backflow occurs after pump stops
● Pump shows signs of reverse rotation
Possible Causes:
● Needle valve opening too large → closing too slow.
● Valve installed too far from the pump; backflow volume too large.
● Downstream elevation difference creates a strong reverse flow.
How to Prevent:
● Slightly close the needle valve to shorten the closing time.
● Install the valve as close to the pump outlet as possible.
● For high elevation or gravity-driven systems, consider using additional backflow protection devices.
4, Valve Won’t Close All the Way / Leaking or Backflow
Symptoms:
● Downstream pressure rises slowly or water flows backward
● Valve cannot seal properly when pump stops
Possible Causes:
● Foreign particles on the seat or sealing surface.
● Diaphragm worn, aged, or damaged.
● Control chamber cannot build sufficient pressure due to improper ball valve/needle valve settings.
How to Prevent:
● Install and maintain the strainer regularly.
● Use genuine EPDM / NBR sealing parts and replace them when worn.
● Ensure all ball valves in the control line are in correct positions and pilot valve is functioning properly.
5, Too Much Noise or Vibration During Operation
Symptoms:
● Whistling or humming noise
● Valve or piping vibrates during opening/closing
Possible Causes:
● Flow velocity too high due to undersized valve.
● Needle valve improperly adjusted, causing the main valve to oscillate.
● Pressure drop too high, resulting in near-cavitation conditions.
How to Prevent:
● Select the valve based on recommended velocity and pressure drop.
● Adjust the needle valve to avoid half-open, unstable positions.
● For large pressure drops, consider multi-stage pressure reduction or anti-cavitation design.
6, External Leaks From Valve Body or Control Tubes
Symptoms:
● Water dripping from copper tubing or fittings
● Leakage at valve cover or flange joints
Possible Causes:
● Copper tube connectors not tightened properly.
● Mechanical impact during transport or installation caused deformation.
● Improper bolt tightening sequence (uneven flange pressure).
How to Prevent:
● Use appropriate seal tape / sealing material for all joints.
● Do not lift or handle the valve by the control tubing—use lifting lugs or flanges only.
● Tighten flange and cover bolts using a cross-pattern sequence.
7, Valve Acts Erratically (Oscillating or Hunting)
Symptoms:
● Valve repeatedly opens and closes
● Downstream pressure fluctuates
Possible Causes:
● Large fluctuations in supply pressure or flow.
● Pilot valve contaminated by debris.
● Needle valve set too close to the “critical” range.
How to Prevent:
● Ensure the system operates under relatively stable flow conditions.
● Keep the pipeline and control circuit clean; clean the pilot valve if needed.
● Adjust the needle valve so the main valve stays near fully open during normal flow.
8, Diaphragm Fails Prematurely
Symptoms:
● Diaphragm cracking, deformation, or rupture
● Valve cannot control open/close properly
Possible Causes:
● Fluid temperature exceeds EPDM/NBR limits.
● Fluid contains chemicals, oils, or substances incompatible with rubber.
● Long-term operation above the rated working pressure.
How to Prevent:
● Confirm medium and temperature meet product specifications (clean water ≤ 80°C).
● Avoid using the valve in chemical or oily environments unless approved.
● Do not exceed the valve’s nominal pressure rating.
9, Trouble Starting Up or Adjusting
Symptoms:
● Unsure about valve settings after installation
● Valve does not respond correctly on first startup
Recommended Actions:
● Before start-up: Ensure all ball valves are fully open.
● Set needle valve to an initial opening of 1.5–2 turns.
● Fill the system slowly to avoid sudden pressure shock.
● Perform several closing tests by starting/stopping the pump, then fine-tune the needle valve.